Hey there  , how can we help?
About Techforce.ai
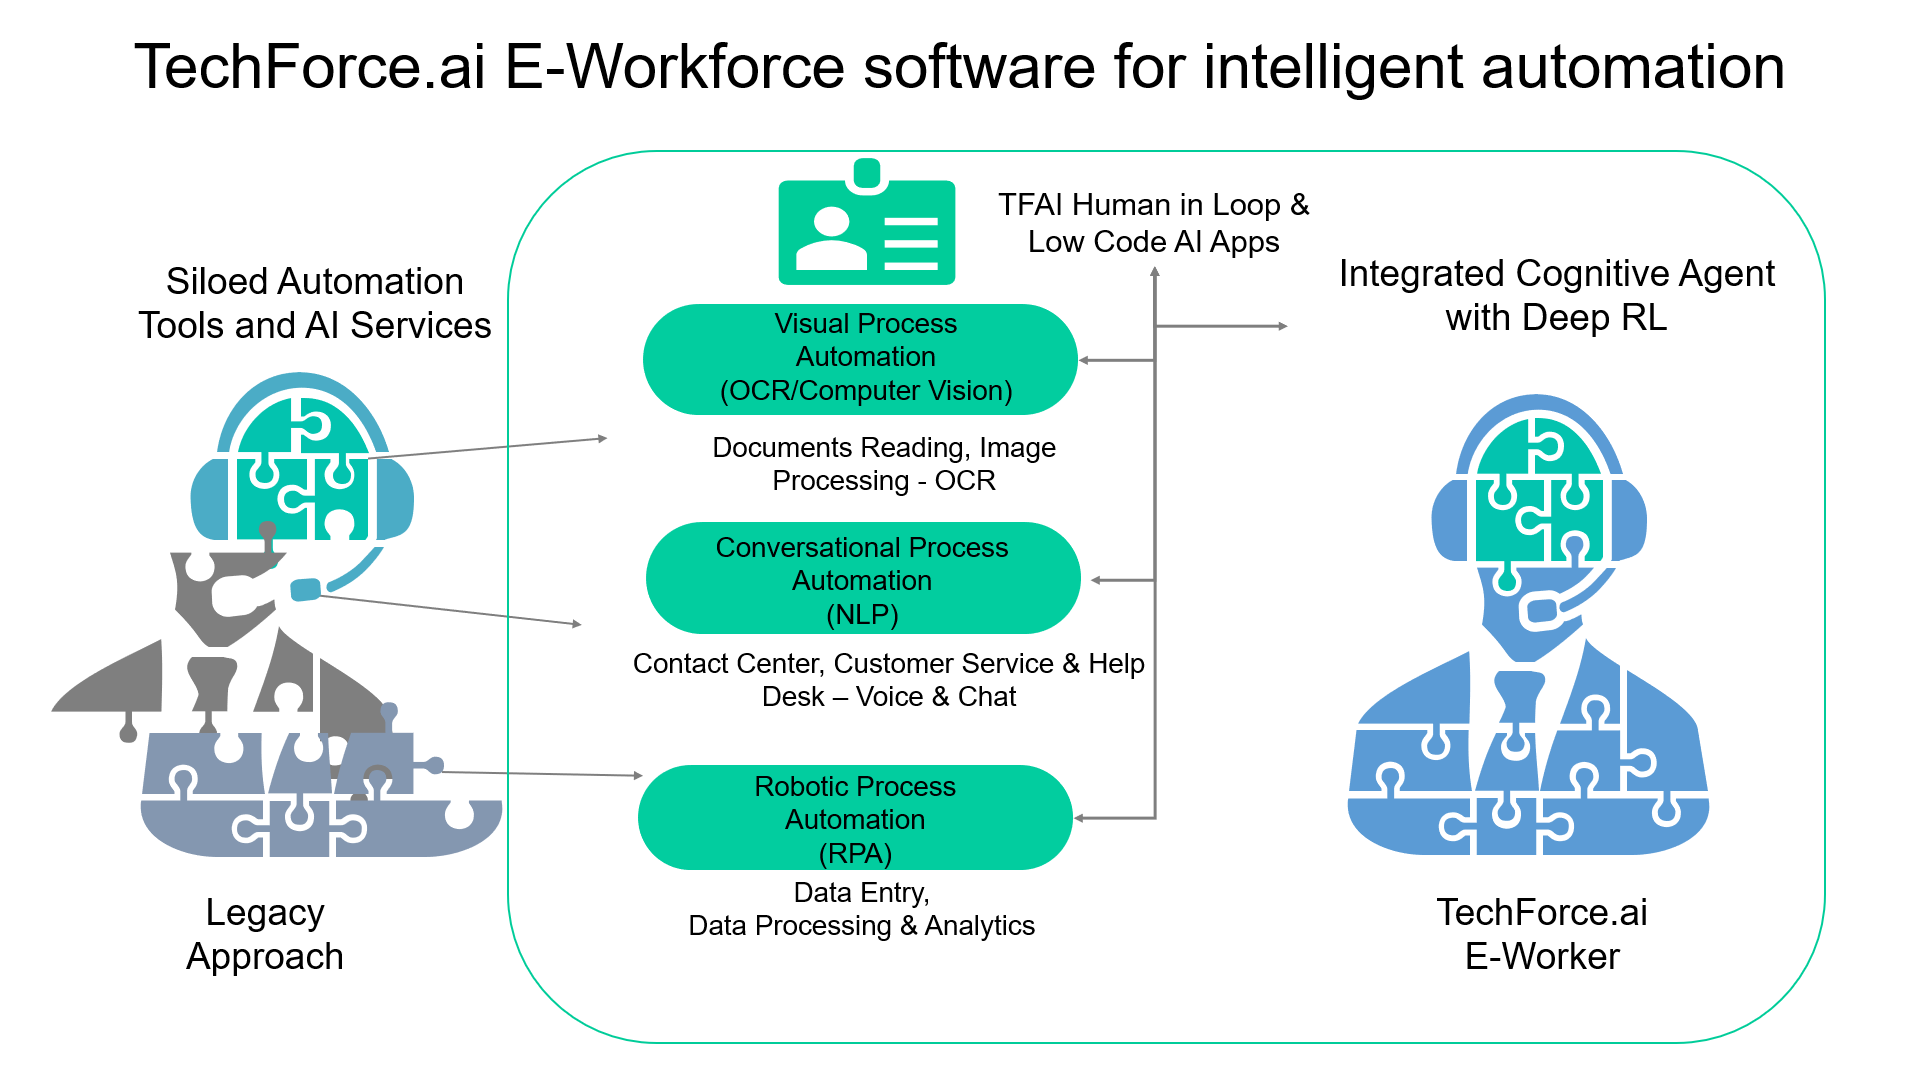
Techforce.ai(TFAI) is the industry’s first e-workforce company that helps companies deploy their own human-like digital employees to perform work, by leveraging intelligent automation technologies.

Intelligent Automation Software includes five major technologies:
Techforce.ai is a comprehensive, low code technology for developers to rapidly deploy e-workers across business processes with basic programming understanding.
TFAI's software offers integrated automation capabilities through its e-workforce.
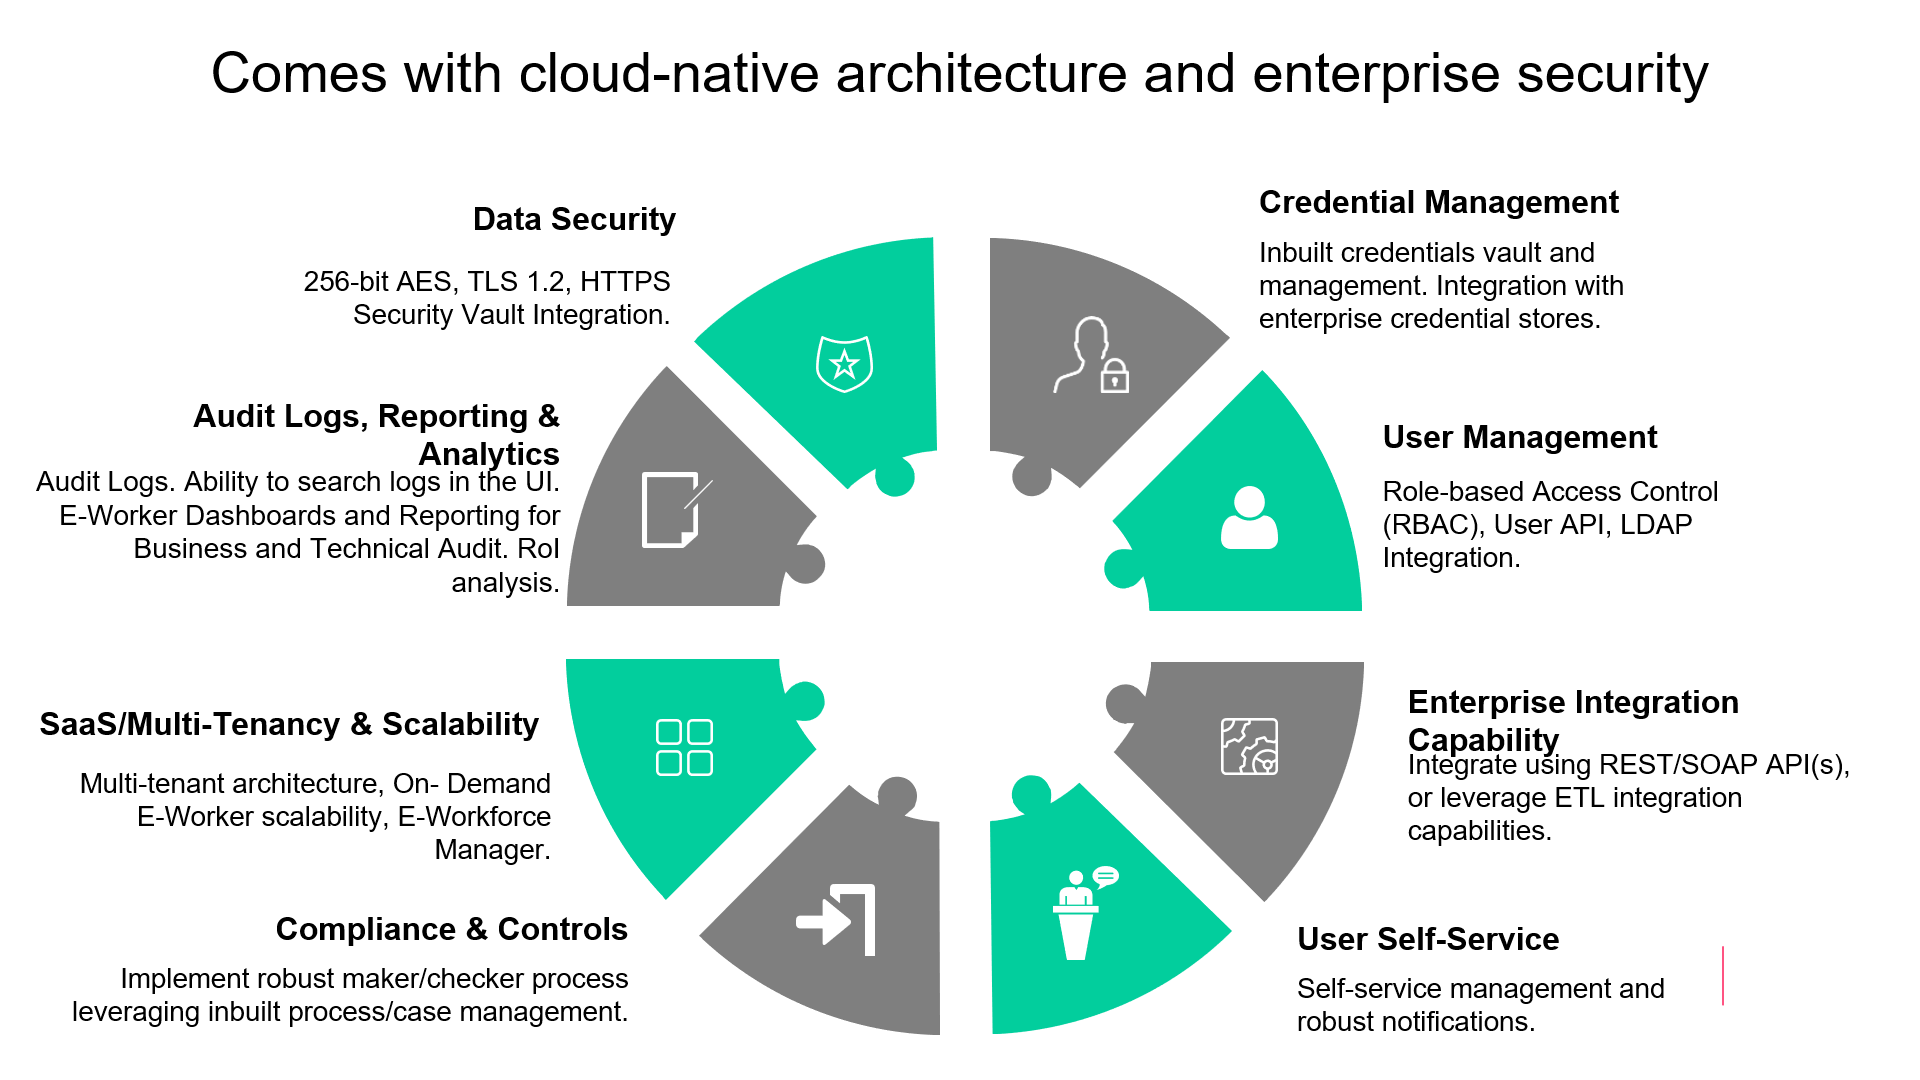
TFAI is the industry’s first intelligent automation-as-a-service platform with cloud-native architecture. It supports the dynamic scaling of e-workers across all layers of its intelligent automation stack.
It offers flexible and hybrid deployment options for enterprises, which include public cloud, on-premises, and Hybrid models, supported by pay-per-use and subscription-based pricing.
TFAI comes with built-in enterprise-grade security with native AES 256 encryption for data at rest and transit, along with a robust audit log framework.
It comes with an in-built credentials vault for storing keys and credentials of an enterprise in industry-standard encryption algorithms.
TFAI platform makes it easy to build, deploy and manage e-workers through self-service management capabilities.
The following detailed documentation explains various components of TFAI's intelligent automation software and how to build, deploy, and manage e-workforce.
Techforce.ai RPA Studio
Techforce.ai RPA Studio is a complete solution for application integration, and automation of third-party applications, administrative IT tasks, and business IT processes.
Techforce.ai RPA Studio contains multiple panels for easier access to specific functionalities. The UI of TFAI RPA Studio contains user-friendly functionalities, that can help automate any business process to augment the manual workforce and rapidly build AI-powered digital employees across the Business & IT workflows. The User Interface and features explained below:
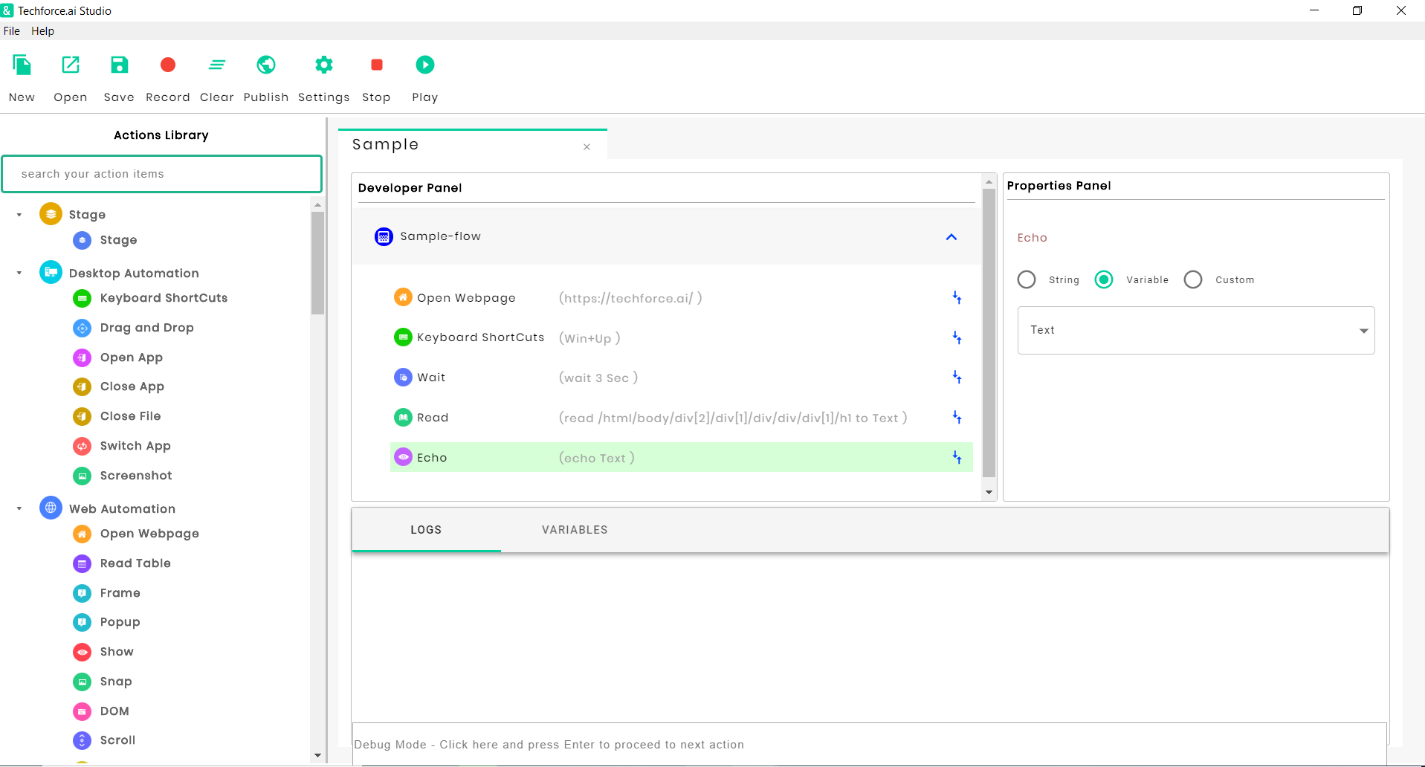
Figure: User Interface
Menu Bar
Techforce.ai RPA Studio Menu bar contains the File Tab and Record Tab. The menu toolbar contains New, Open, Save, Record, Clear, Publish, Settings, Stop, and Play functionalities. Menu bars are very common and easy to find. They help in the efficient use of space.
Action Library Panel
All the actions in the Action library panel are categorized based on the functionality. Actions in the Library panel are Stage, Desktop Automation, Web Automation, General, Programming, Mail Integration, and Database.
Developer Panel
Developer panel is used to develop the flow or script to automate any type of operations, either Desktop or Web-based, and using the Record button the developer can also create a flow of web automation.
Properties Panel
The properties panel is used to specify each Action’s and sub-actions property and helps to automate the e-worker successfully.
Variables Panel
The variables panel is used to specify the names to identify and store the data in different formats like a data table, list, string, etc., According to the usage, variables may be called into the properties panel to automate any script.
Logs Panel
Logs Panel is used to see the starting and ending of the automation and to find the flow logs and non-executable lines, which can easily get to know the Bugs.
Getting Started
This section aims at getting started with building of simple Action-flows:
To create and edit flows in the Techforce.ai studio, use the following examples. This would help familiarization with the features and enhance understanding.
Use Cases:
Build a basic flow:
Build a basic flow with the following actions:
Open the Amazon website, search for a product by entering some text into the search box, read the text from the searched product, store it into a variable and print the text to the logs panel.
Build a flow using desktop actions: (Click here to download the flow and its requirements)
Build a flow to show desktop, open notepad, enter some text, save the notepad, close the notepad, and switch back to the studio.
Build a flow using Web actions: (Click here to download the flow and its requirements)
Build a flow to open a webpage, click on an element, scroll the page down, take the snapshot of a page, print the text of an HTML element in the logs, capture the column data from a web table into a variable and print it in logs, and go back to the previous page.
Build a flow using Excel actions: (Click here to download the flow and its requirements)
Build a flow to filter data from an Excel sheet based on two different column values and save the data into a variable. Write the filtered data into a new sheet in the same workbook. Again, filter the data based on two different column values and save it into another variable. Append the data to the same new sheet. Then, get the complete data from the Excel sheet and write it into another Excel sheet. Delete a range of data from the newly created Excel sheet.
Build a flow using files and folders: (Click here to download the flow and its requirements)
Build a flow to get today’s date and retrieve the Excel files downloaded with today’s date from a folder. Compare the file names with specified data, rename the file, and copy it to the required folder. Then delete the downloaded files.
Release Notes
Version
1. Version v2.1.17
Patches & Updates
1. Fixed issues that prevents-studio installation when the install path has spaces
2. Resolved issues with desktop automation (dll file missing issues)
3. Enhanced support to handle Popups and Frames
4. Implicit wait feature that waits for webpage elements to load before act on
What’s New
1. Data Scrapping
2. Custom Condition in IF/Else
3. Pivot Table, Refresh Excel, Create Excel
4. Export to PDF
5. Unzip Files
6. Create/Delete Folder/Files (SFTP)
7. MS SQL option in Database connection
8. Get Parameters
Functionalities Modified
1. Keyboard Shortcuts
2. Assign (Desired variable name and Date format specification)
3. Convert to xlsx (To accept different types in the destination paths)
4. HTTP API (Accepts attachment)
5. Read Table (Entire table will be read)
6. Get Range (Specify what to get from Excel)
7. Delete Range (Deletes entire range when nothing specified)
8. Get Outlook mail
Issues Resolved
1. If-Else Comparison issue for Integer to String (Operator issue).
2. HTTP API (Multiple Headers)
3. For Loop
4. Break Statements
5. External flow triggering
6. Get Credentials/Get Secret
7. Variable selection issue
8. Open App (when a wrong input is given, the bot stops, throwing an exception in the flow)
9. Cut option
10. Stage minimizing option
11. Record option
Techforce.ai RPA
Techforce.ai Robotic Process Automation (Techforce.ai RPA) is one of the five components of the Techforce.ai platform. Techforce.ai RPA helps you automate mundane repetitive business processes. It helps businesses to streamline enterprise operations and reduce costs. Also, Techforce.ai RPA enables business users to focus on the most important value-added tasks by automating repetitive clerical tasks.
Benefits of Techforce.ai RPA:
Techforce.ai RPA components:
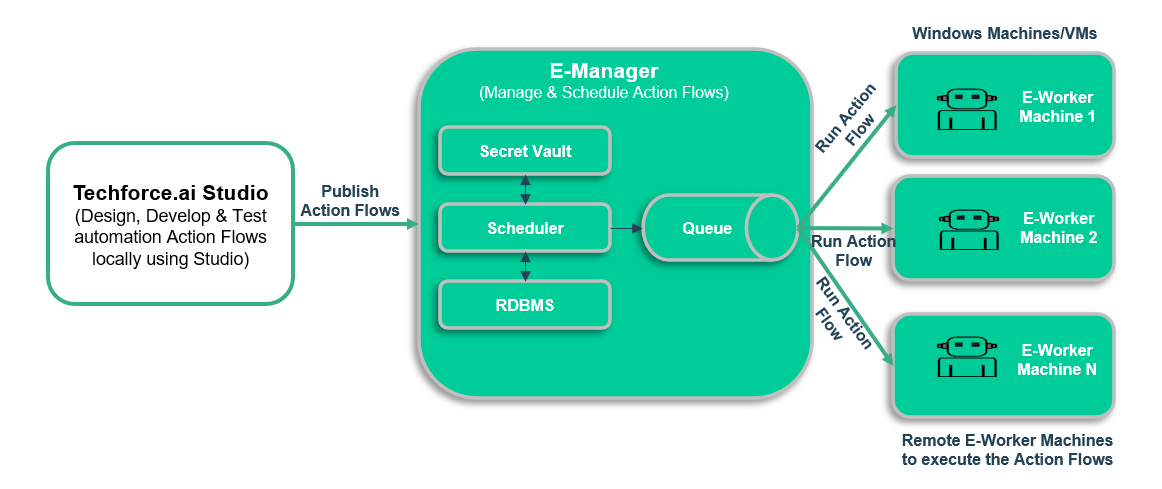
Techforce.ai RPA has three main components that will help you automate repetitive tasks. These components work together to provide both attended and unattended/scheduled automation. The following diagram depicts the logical flow architecture of the Techforce.ai RPA.
Let us understand each of these main components.
Techforce.ai RPA Studio:
Techforce.ai RPA Studio is a low-code, integrated development environment that helps business users and developers to create automation Action Flows using the drag and drop Actions from the Action Library.
It only requires very minimal coding skills to create and configure Action Flows due to the low-code nature of the studio.
Techforce.ai RPA studio is packaged with a rich set of actions that allows you to create an automation flow for any use case. The Studio has actions that work with desktops, browsers, databases, secure FTP servers, PDFs, Microsoft applications such as Excel and Outlook, and many more. It also has inbuilt support for JavaScript, Python, and AutoHotKey languages so that you can write your own piece of code if you do not find any action that fulfils your requirement.
Techforce.ai RPA studio also has a recording feature to record all web-related actions, modify the recorded action flow, and replay it.
You can simply record and play the Action Flow from the Studio to check how it executes locally.
When you create an Action Flow using Studio, a folder with the given name will be created on the disk. You can see two files inside the created folder - a JSON file with the list of actions and related instructions and an equivalent file (without any extension) with the actions and related instructions in a human-readable format.
To manage your Action Flow in unattended/scheduled mode, you need to open the Action Flow in the Studio and publish it to the e-manager console by simply clicking on the publish option available in the top menu. When you click on the publish option, in the background, the folder that was created on the disk for the Action Flow will be zipped along with the two files inside it and gets uploaded to the e-manager console application.
Techforce.ai E-Manager Console:
Techforce.ai e-manager console is a centralized administration console that enables you to publish, execute, schedule, monitor, and manage action flows for your organization. It is a central application that can manage and execute action flows on on-premises and cloud e-worker machines. An e-worker machine can be a physical or virtual machine that consists of Techforce.ai RPA runtime to execute Action Flows. You can register an e-worker machine with e-manager console by using the Techforce.ai icon under the system tray menu.
Techforce.ai e-manager console manages queuing of the requests, executing the action flows as per the sequence, logging audit trial, sending notifications, and real-time reporting. It also supports version control of the Action Flows, user & role management, profile management, billing management, and personal data management.
Techforce.ai Runtime: Techforce.ai Runtime is the actual engine that parses the actions in Action Flow to software instructions and executes those instructions as per the properties configured in the action. It receives commands from either e-manager console or Studio and completes the execution as per the instructions.
Techforce.ai Studio Guide
Installation
Software Requirements
OS Compatibility:
| On-Premise | GCP | MS Azure | AWS |
|---|---|---|---|
| Windows 10 / Windows Server 2016 and above | Windows Server 2016 Data Center / Windows Server 2016 Data Center Core and above | Windows 10 Pro Ver 1809, 1803 / Windows Server 2016 Data Center and above | Microsoft Windows Server 2016 Base and above |
Hardware Requirements
- 1. Processor: Intel Core i5 2.6GHz
- 2. RAM: 8GB
- 3. Storage: 10GB
- 4. Others: Microsoft .Net Framework 4.6(Windows 8.1 and Windows Server 2012 R2: 4.6.1).
Download Techforce.ai RPA Studio:
1. To download the studio, the user must register with the e-manager console.
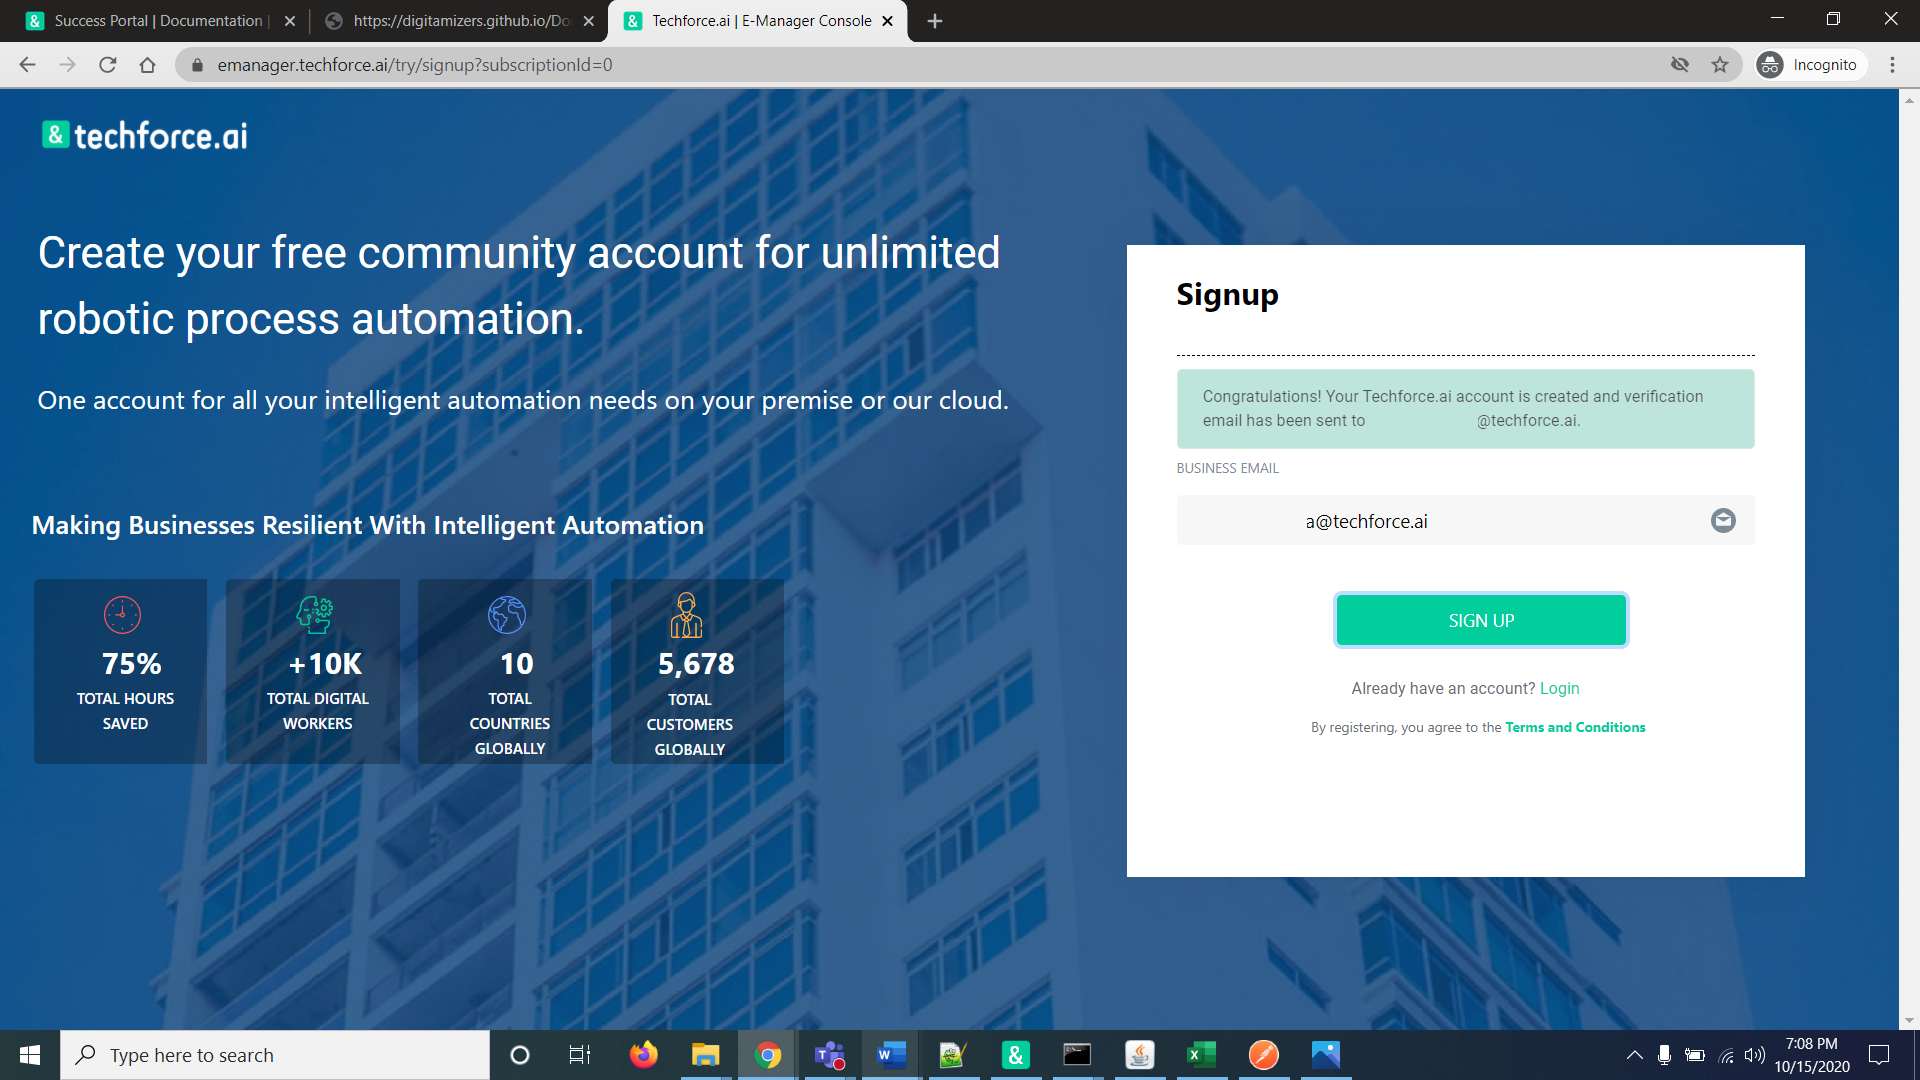
2. To get access to the e-manager console, go to https://emanager.Techforce.ai/try/signup?subscriptionId=0 and submit the details.
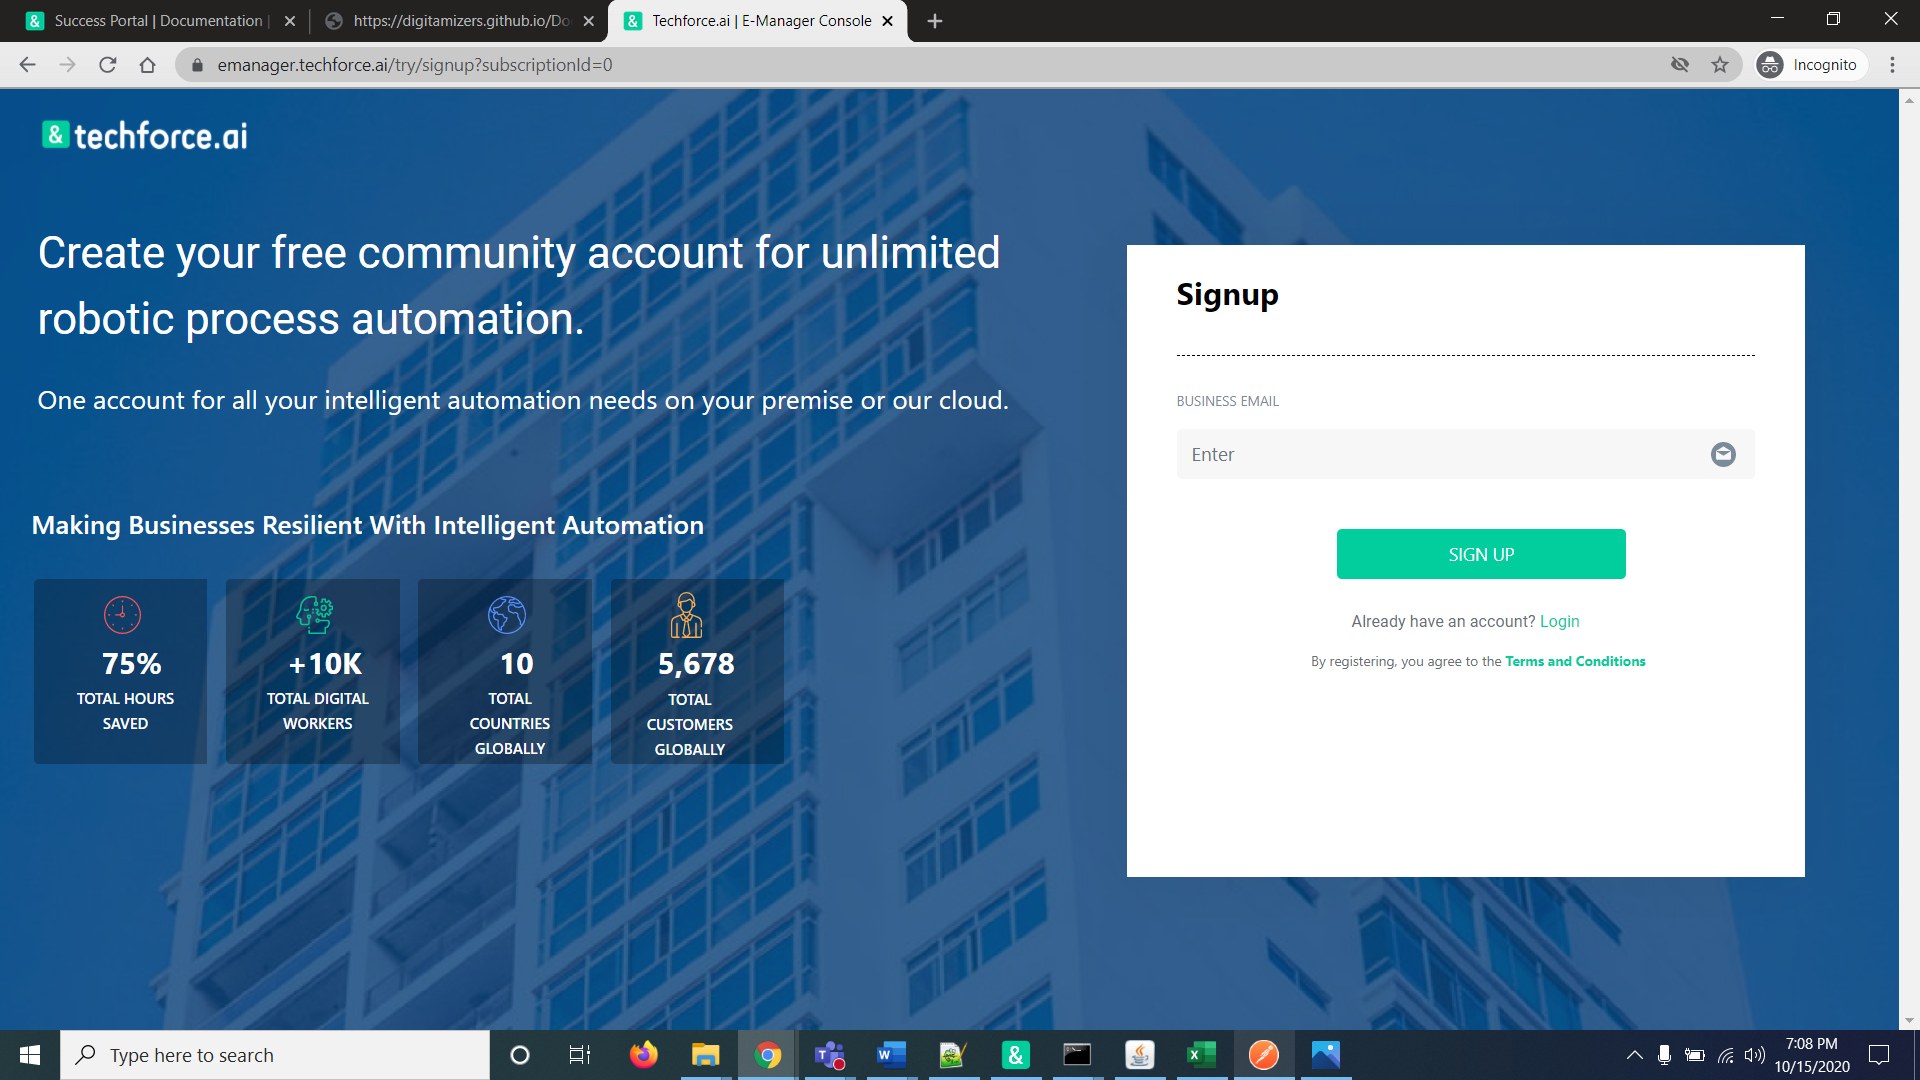
3. Upon successful registration, you will be redirected to the login page.
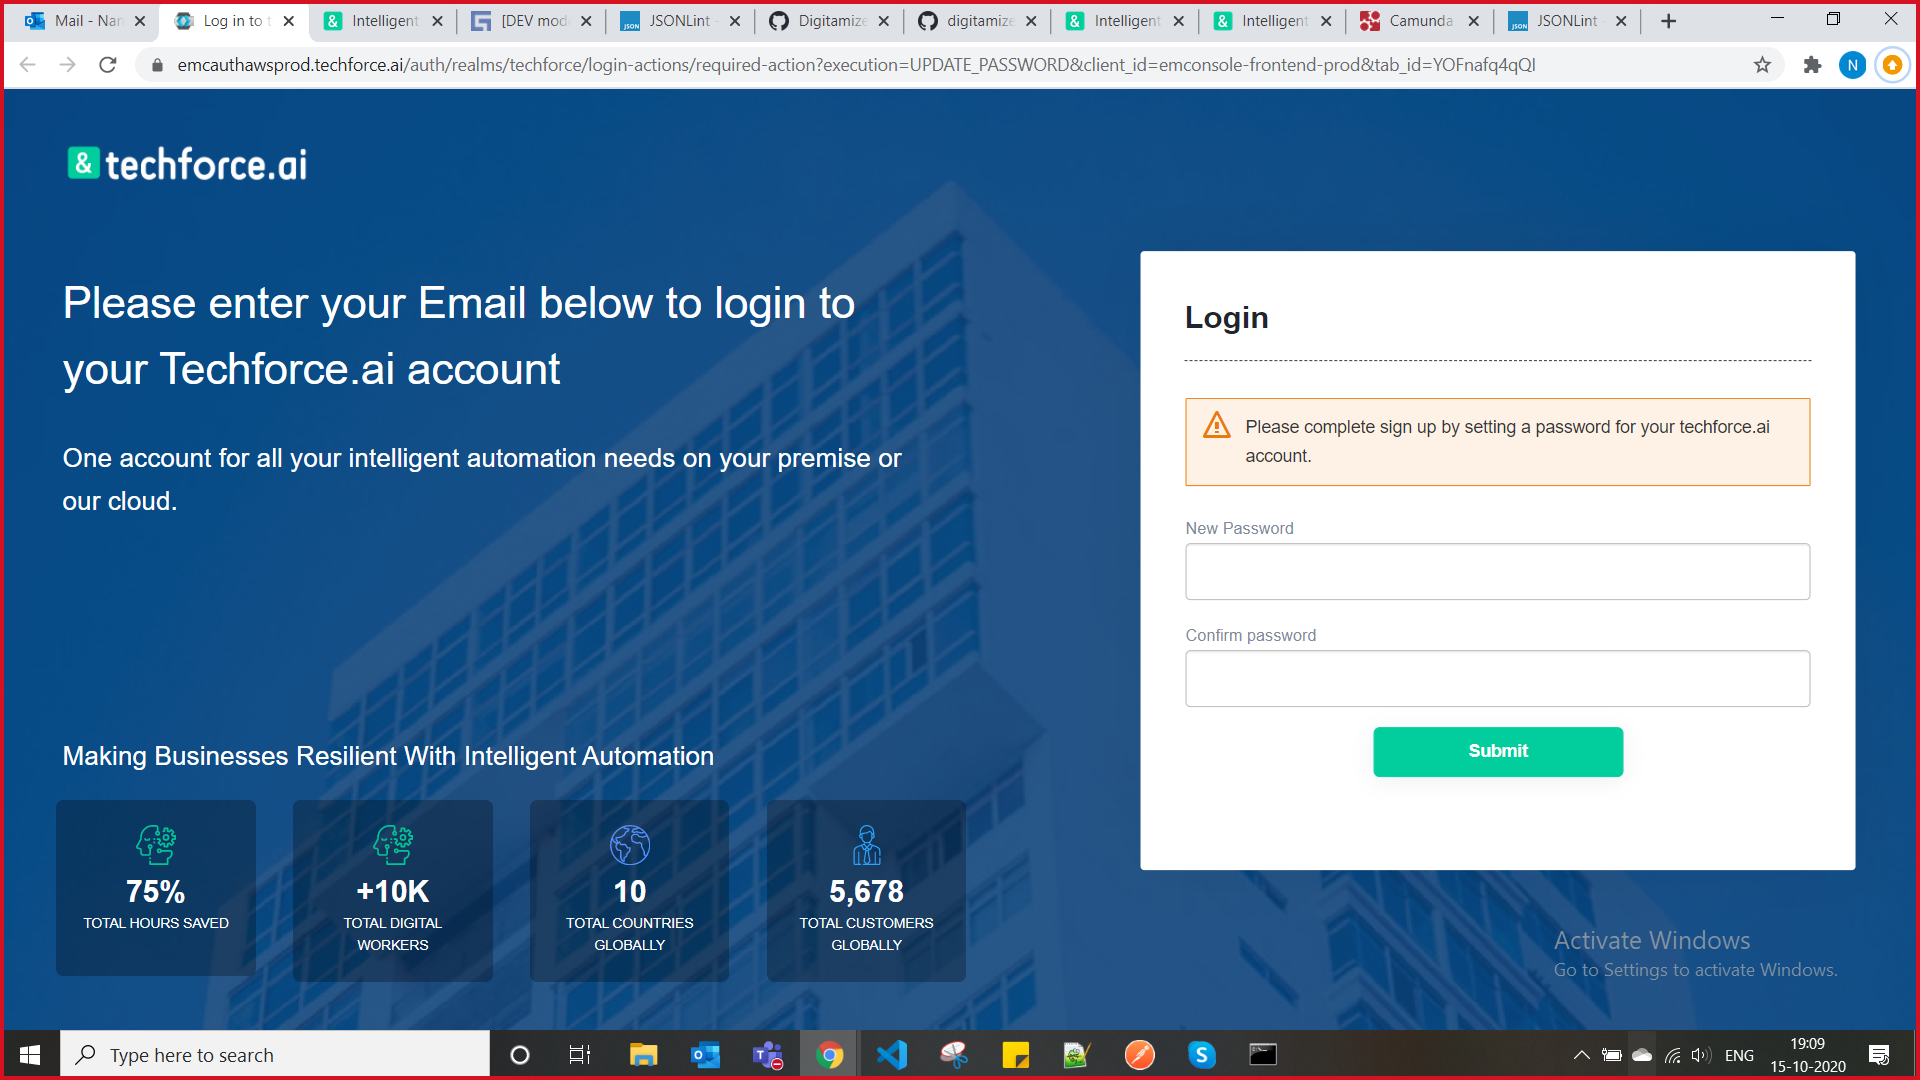
4. You will be prompted to verify your email on the first login.
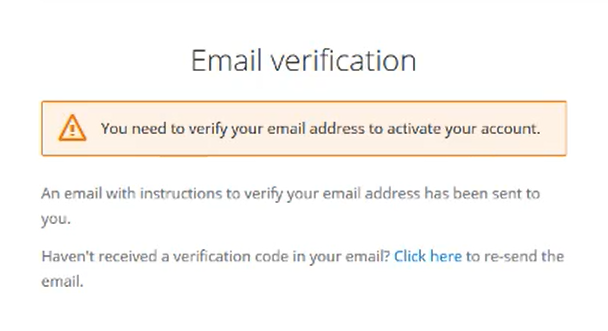
5. Go to your registered email and click on the verification link to complete the email verification process.
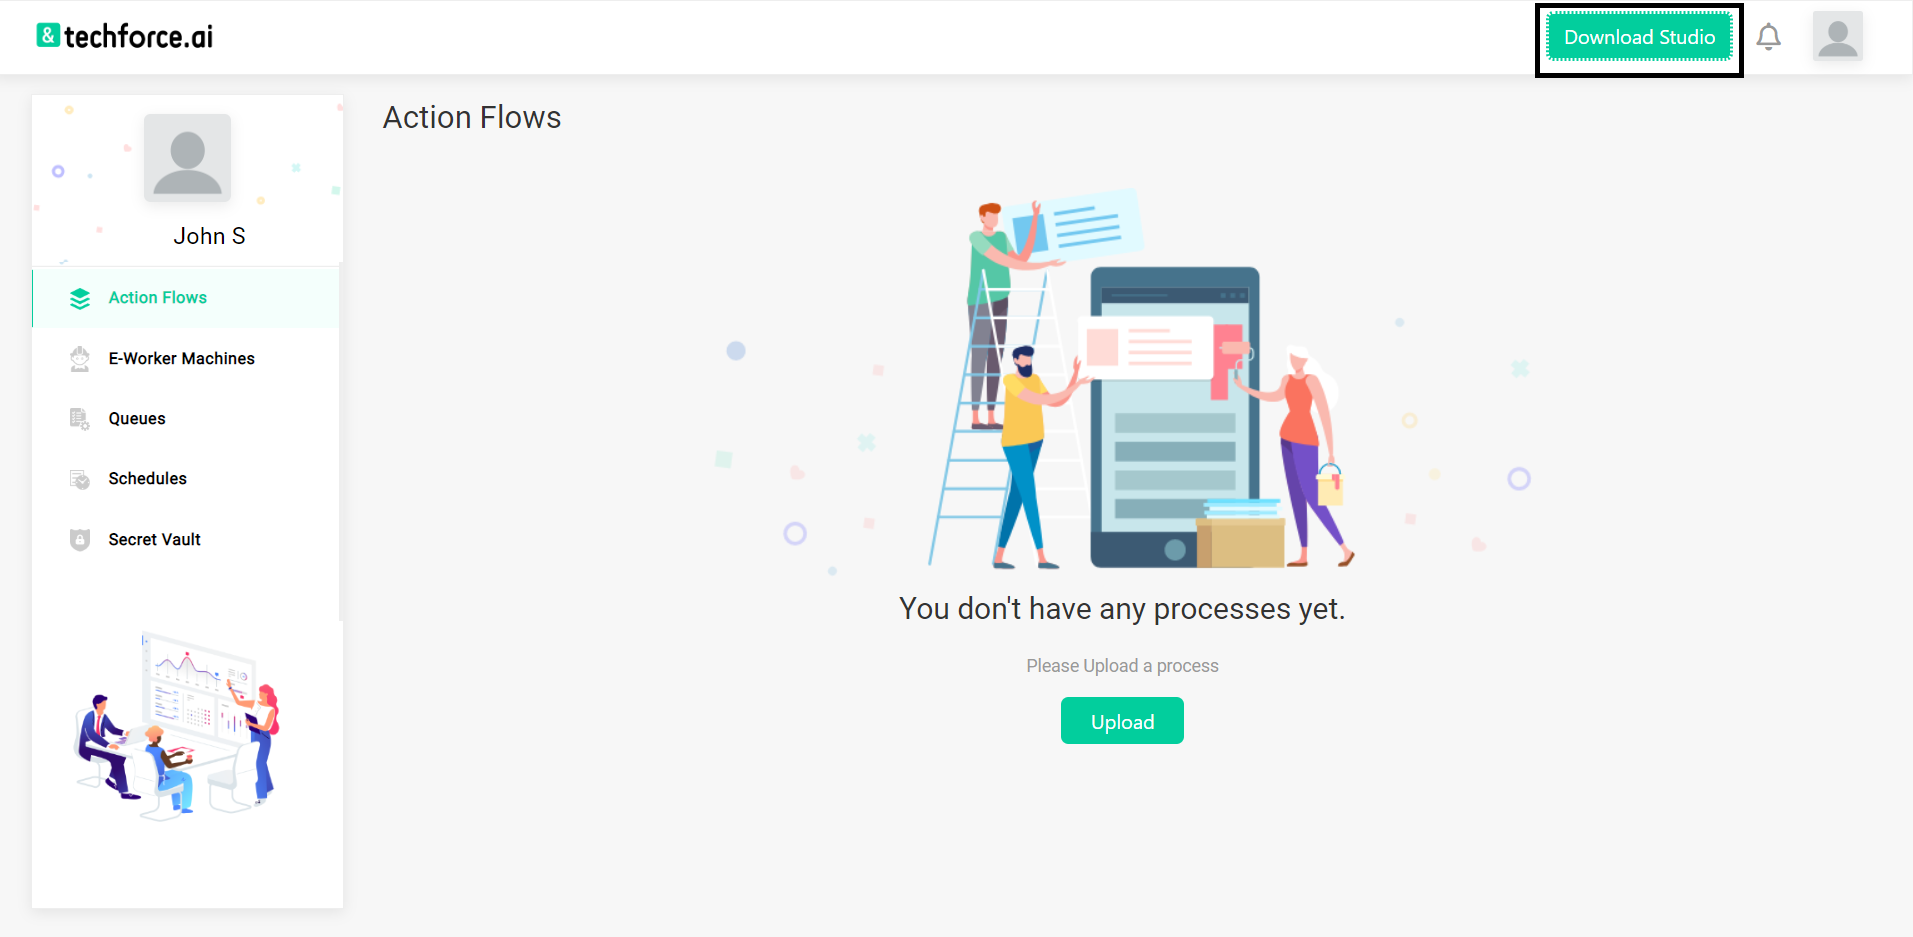
6. Once you login to the e-manager console, you will find the Download Studio button at the top right corner. Click on the button to start downloading.
Installation Instructions
Installing RPA Studio
- 1. After downloading the RPA studio, move the downloaded studio.exe file to the desired folder where it needs to be installed.
- 2. Double-click on the installer to start the installation.
- 3. Windows will ask for permission stating “Do you want to allow the unknown publisher to install the application”. Click YES, and the installation process will start.
- 4. Accept the license agreement of Techforce.ai to proceed for the further installation process.
- 5. Click on BROWSE and select a folder that does not contain a space in its name like shown in the image.
- 6. After selecting the folder, click on “INSTALL” which will start installing RPA studio.
- 7. The installation will take some time, and after installing the Studio, click on CLOSE button.
- 8.After completing the installation user can see the Techforce.ai RPA studio Icon on the desktop.
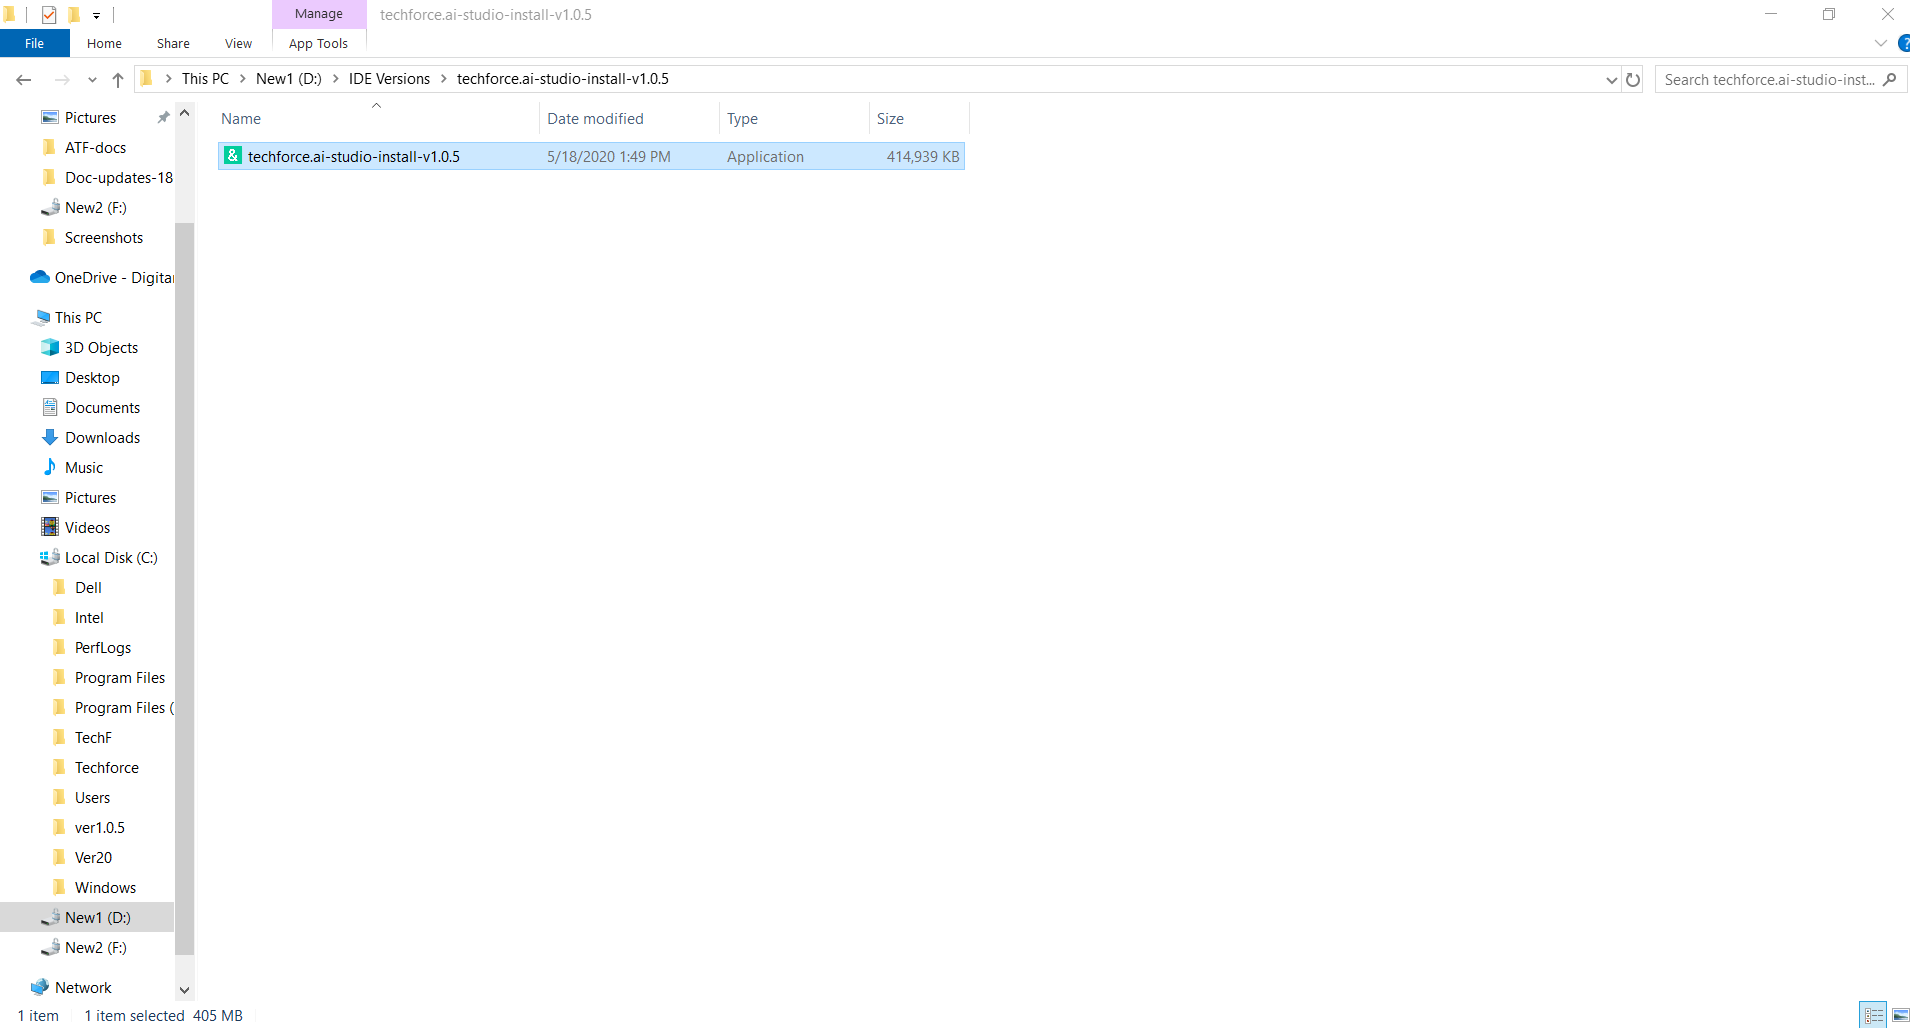
Figure: Installation Instruction-1

Figure: Installation Instruction-2
The installation process will show the folder selection screen.
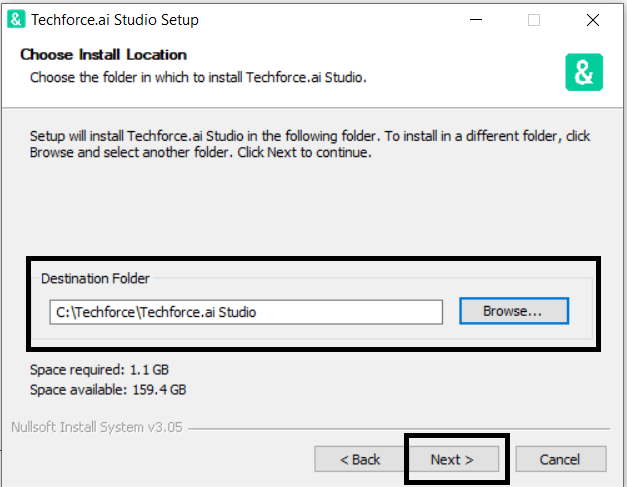
Figure: Installation Instruction-3
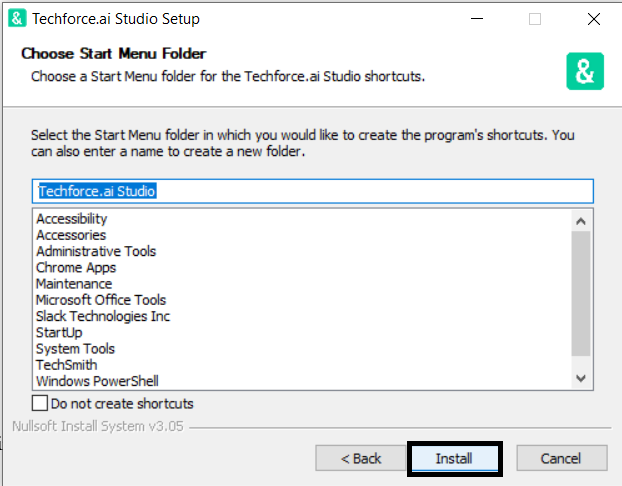
Figure: Installation Instruction-4
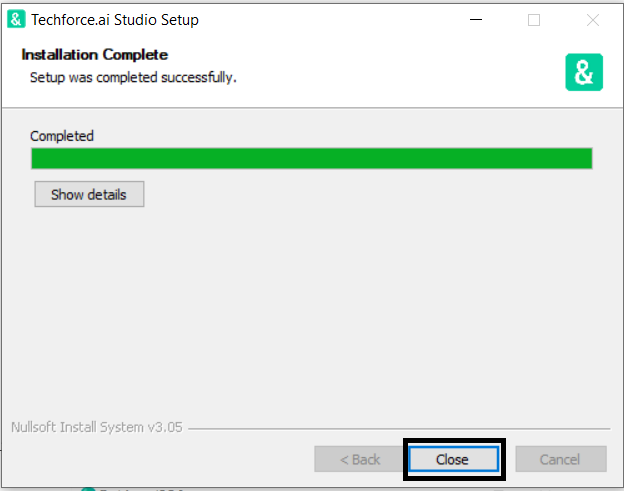
Figure: Installation Instruction-5
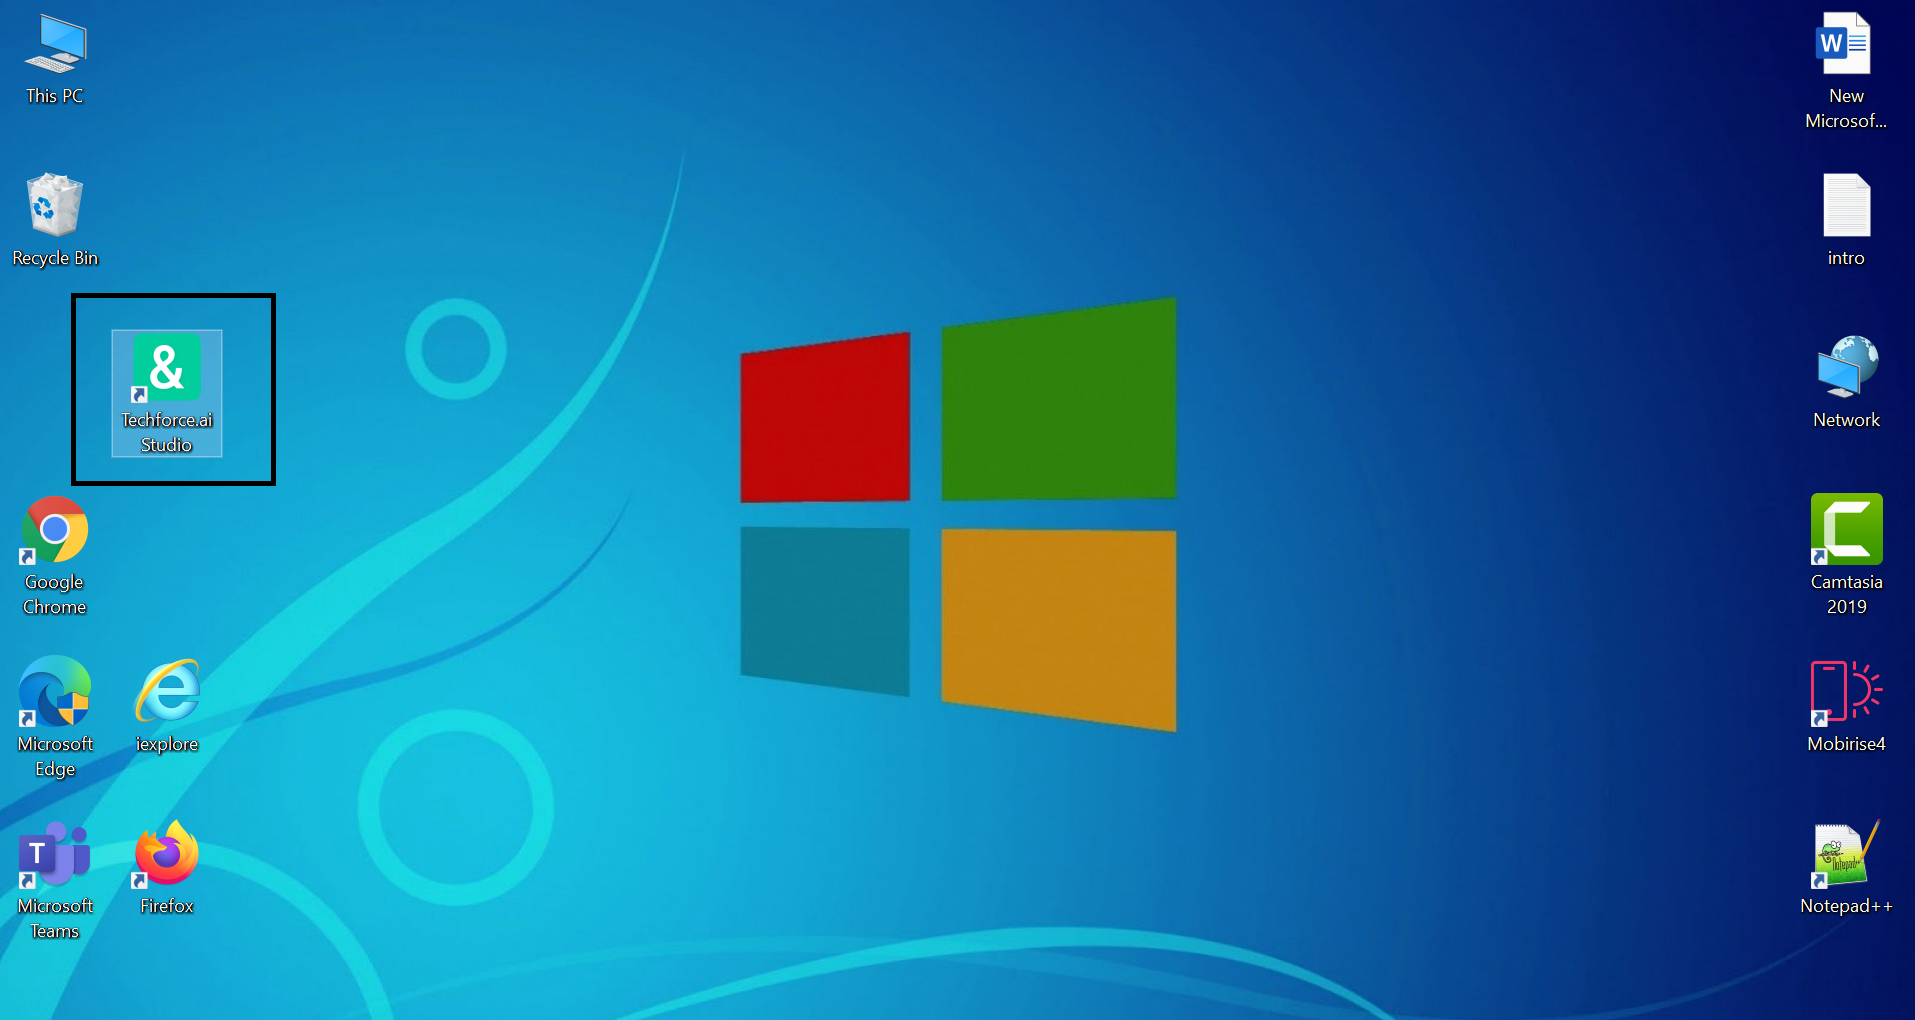
Figure: Installation Instruction-6
Post Installation Steps:
Installing Techforce.ai OCR
Installing techforce.ai OCR depends on User requirement.
User can find the techforce.ai OCR.exe in the given location: “C:\Techforce\Techforce.ai Studio\resources\static\tesseract-ocr-w64-setup-v4.0.0.20181030.exe”
Techforce.ai OCR needs 164MB of hard disk space for installation.
- 1. Double click on “tesseract-ocr-w64-setup-v4.0.020181.03.exe”.
- 2. In the first screen of Techforce.ai OCR installation, select preferred language, and click “OK” which will start the installation of Techforce.ai OCR.
- 3. Accept the license agreement of Techforce.ai OCR to continue the installation process.
- 4. After accepting the agreement, specify/select who should have the user level access to OCR Select appropriately from.
- 5. Select any one of the options and click on the NEXT button. In the next screen choose the components that are to be installed or else just click on NEXT to continue the installation process.
- 6. After selecting the components, the installation process will show the folder path selection. Keep the default storage space or else specify the installation folder.
- 7. Select the options for start menu action and then click on Install to.
- 8. After installation, click on the NEXT button and then click on the FINISH button to complete the RPA Studio installation
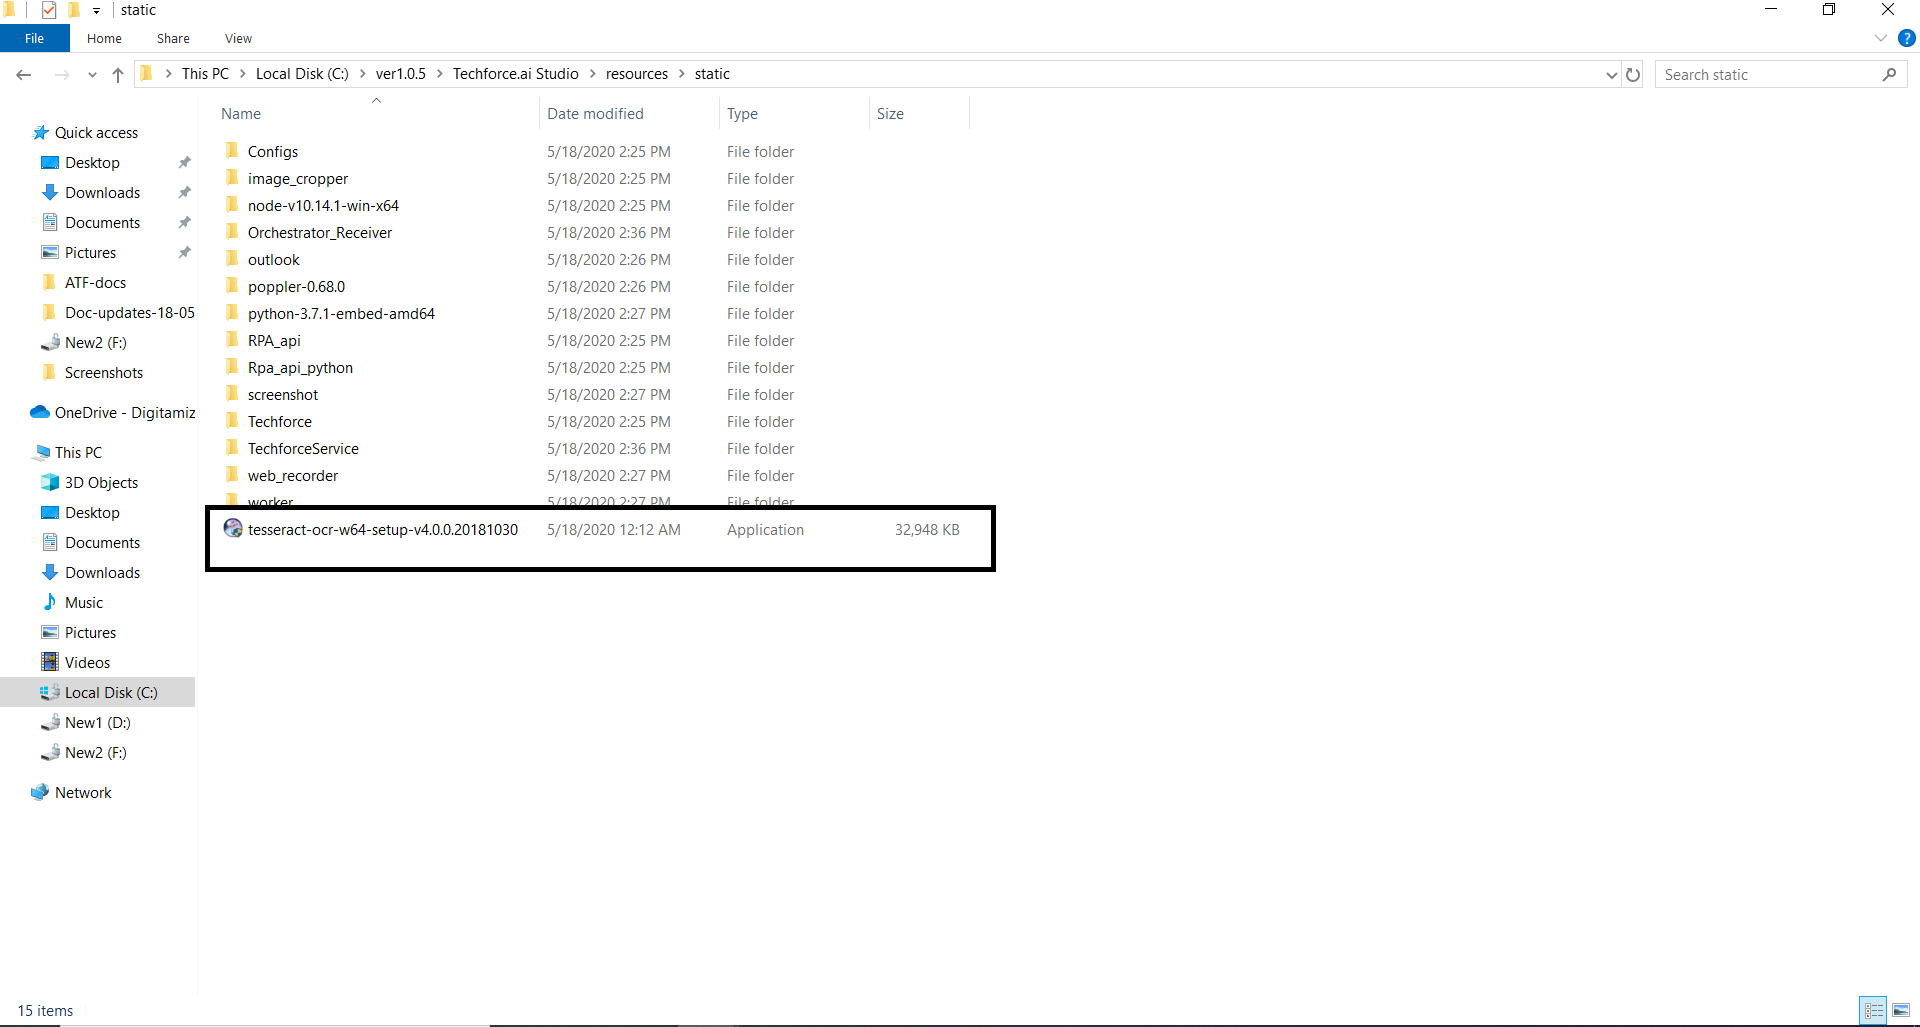
Figure: Installing Techforce.ai OCR-1
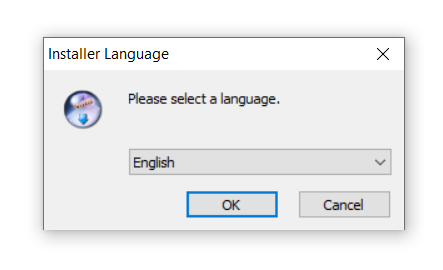
Figure: Installing Techforce.ai OCR-1
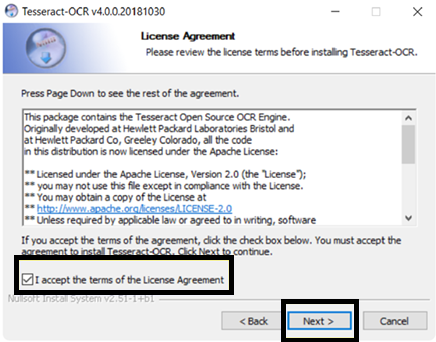
Figure: Installing Techforce.ai OCR-2
“Install for anyone using this computer or Install just for me”.
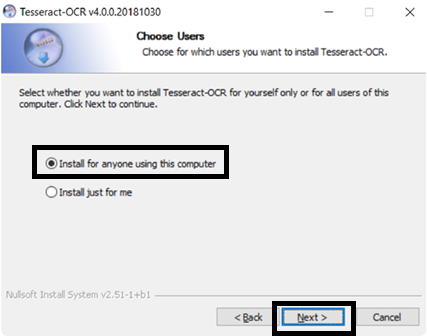
Figure: Installing Techforce.ai OCR-3

Figure: Installing Techforce.ai OCR-4
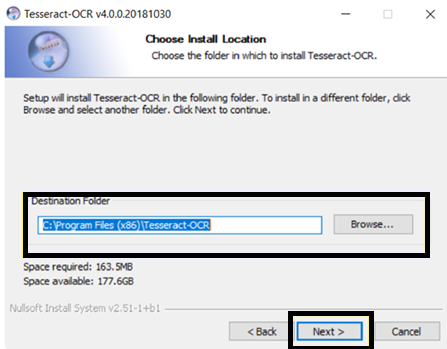
Figure: Installing Techforce.ai OCR-5
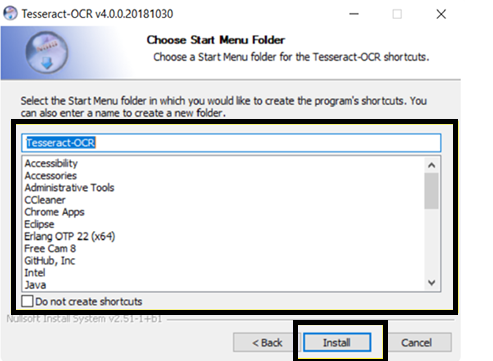
Figure: Installing Techforce.ai OCR-6
Using Microsoft Edge with Techforce.ai:
- 1. To use Microsoft Edge Browser in the Open webpage action.
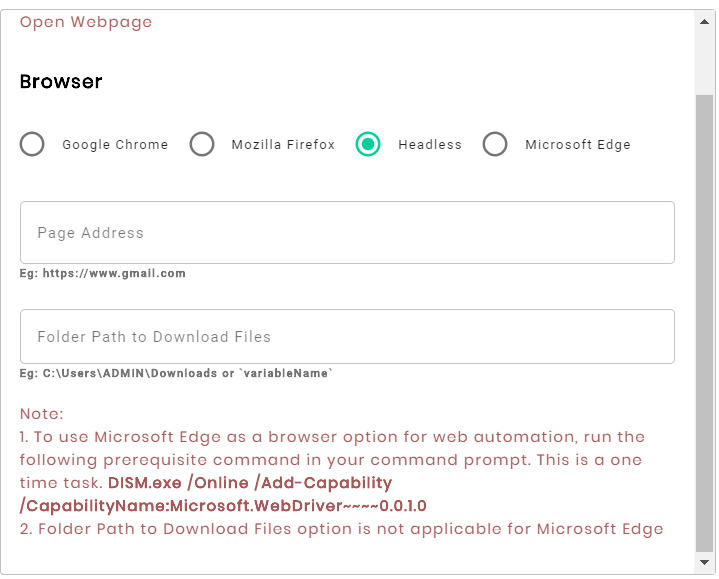
Figure: ME1
2. The user should open the command prompt with administrator privileges.
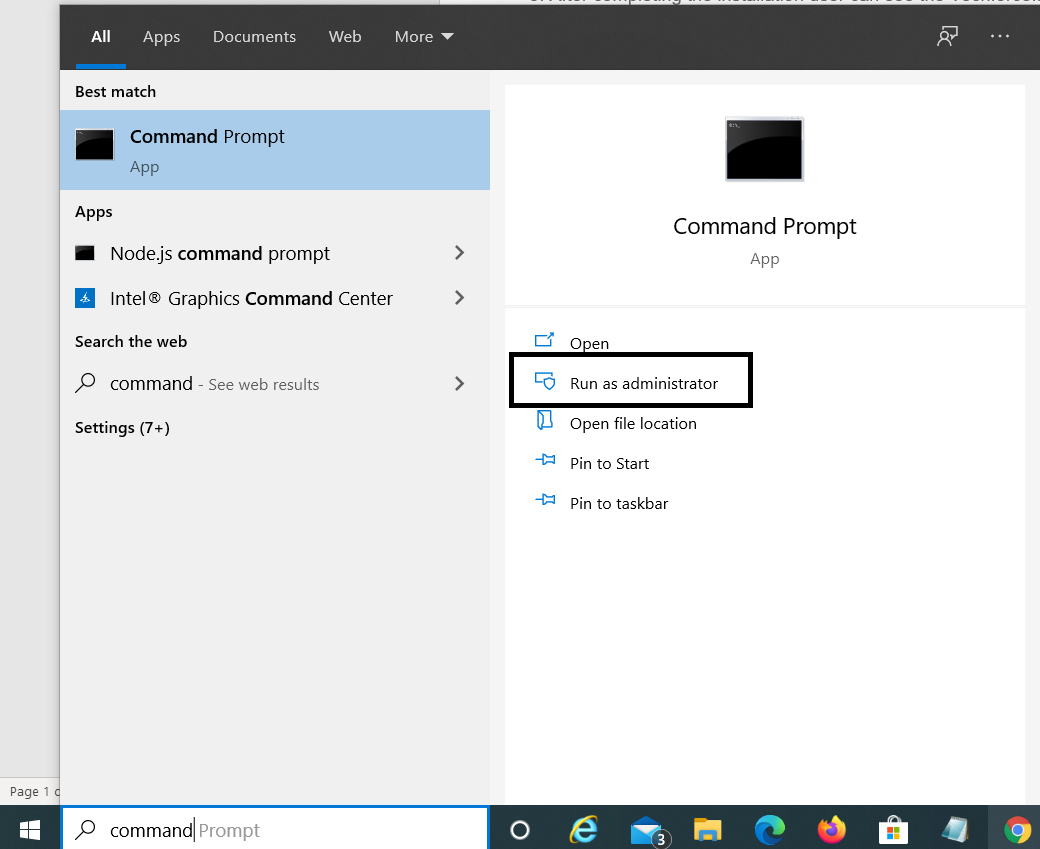
Figure: ME2
3. Run the following command: DISM.exe /Online /Add-Capability /CapabilityName:Microsoft.WebDriver~~~~0.0.1.0
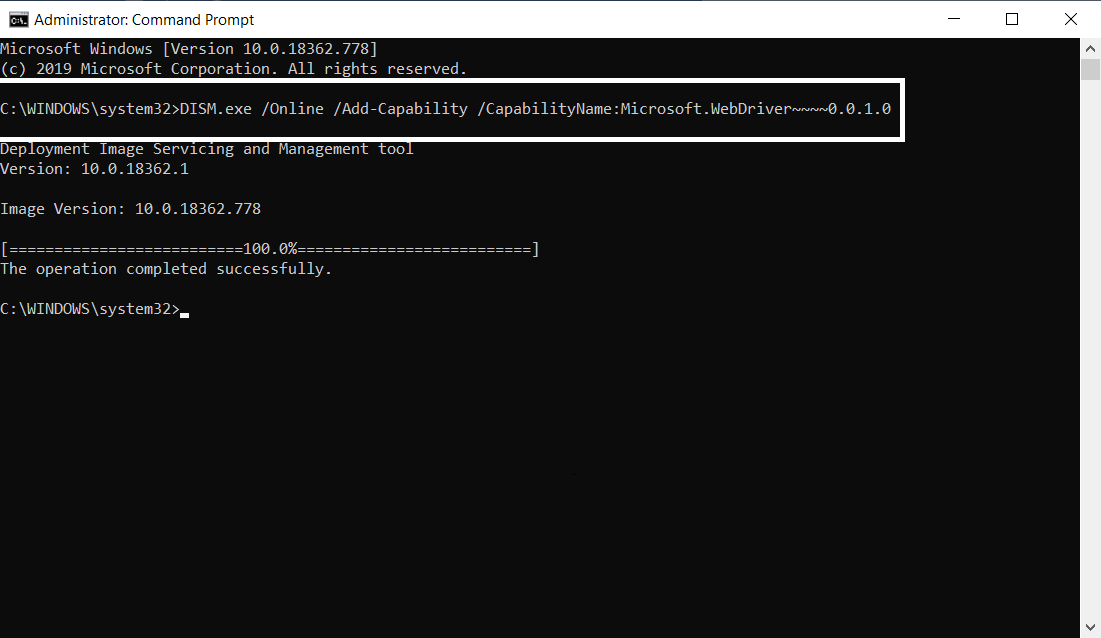
Figure: ME3
4. Click on enter and the command starts executing. It takes a few seconds, and then can see the success message. This process is a onetime task.
Uninstall Instructions
To uninstall the Techforce.ai studio, go to the Control Panel and click on Uninstall a program.
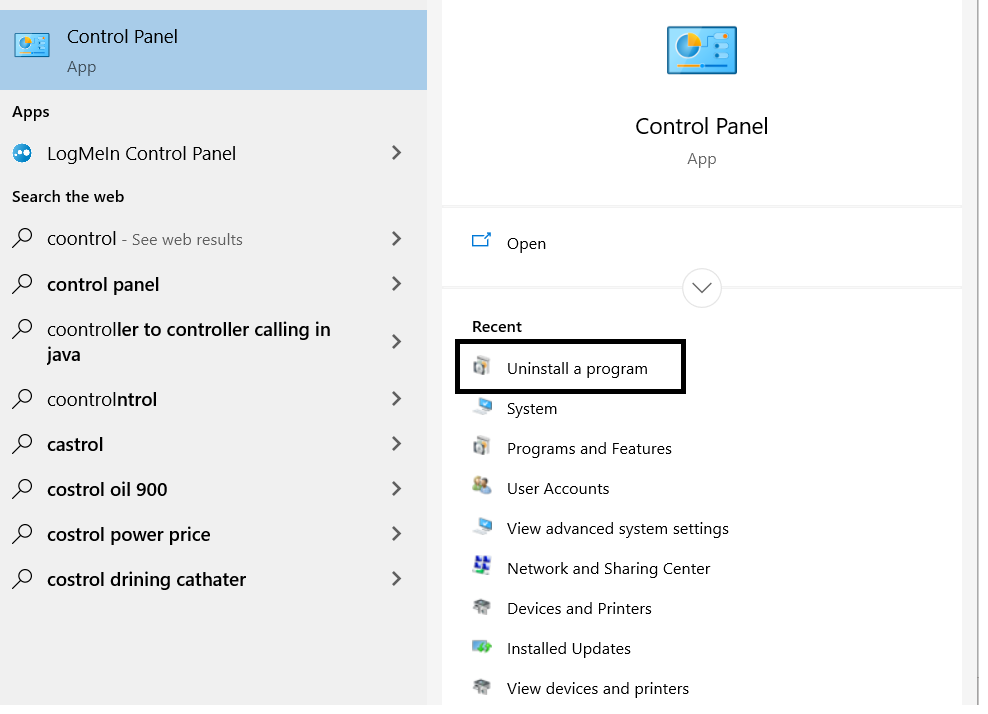
Figure: Uninstall Instructions-1
Now, select Techforce.ai studio, right-click on it and click on UNINSTALL.
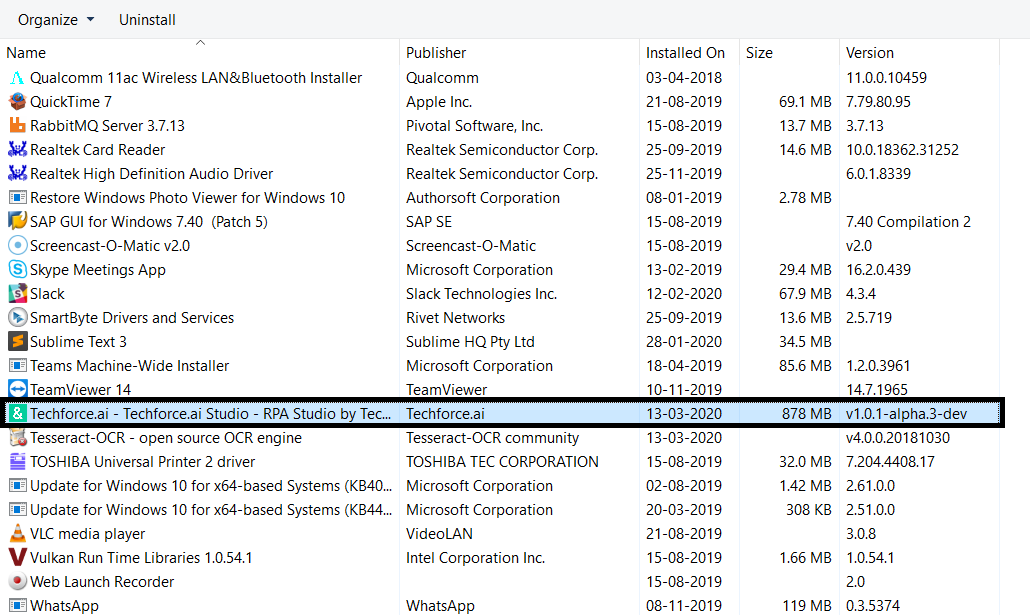
Figure: Un-install Instructions-2
Now, the Techorce.ai studio will ask for permissions to uninstall; click on YES.
The uninstall process will start, and it will take some time to uninstall.
After the process is completed, click on CLOSE.
You also need to uninstall the dependencies, so go back to the control panel, Select the Techforce.ai OCR engine, right-click and click on UNINSTALL.
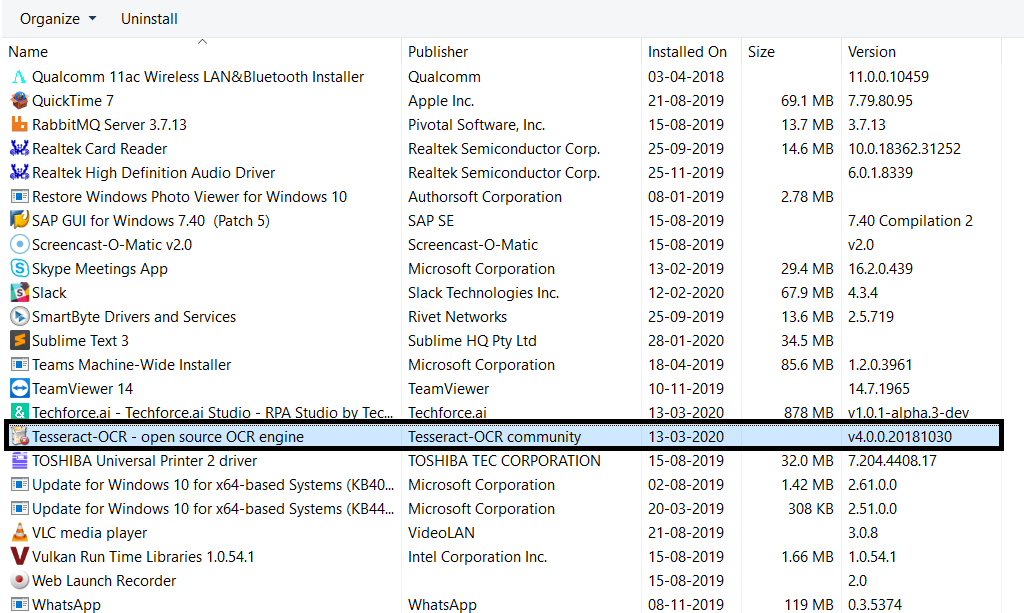
Figure: Uninstall Instructions-3
A pop up will open and ask for permission to uninstall the Tecforce.ai OCR.
Click on YES, and another pop up will open to select the language.
Click on OK, and the uninstall process will start.
After the process is completed click on FINISH.
Now, check the folder where Techforce.ai studio was installed. Sometimes some of the files might not be deleted.
In such cases, go to Task Manager, and under the Processes tab, search for the “Electron” process.
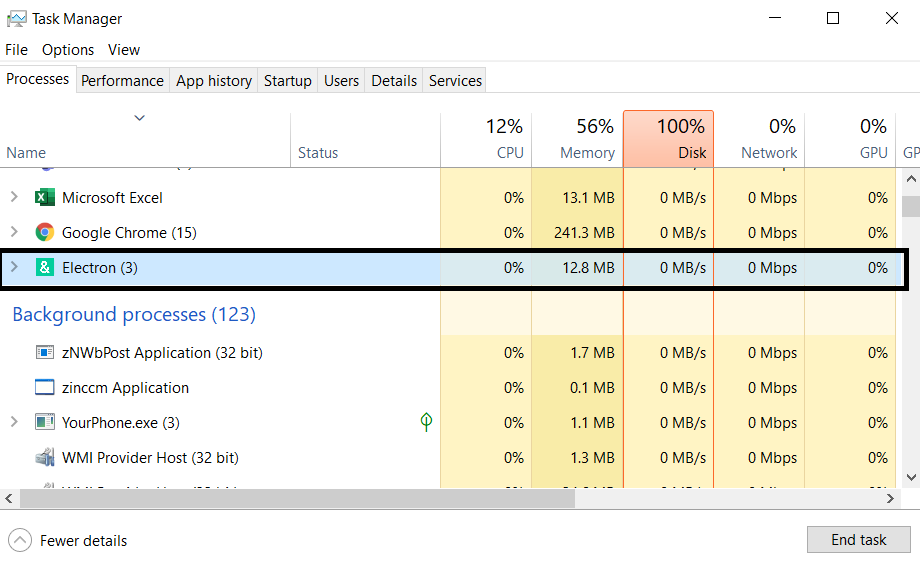
Figure: Uninstall Instructions-4
Select the process and click on the END TASK.
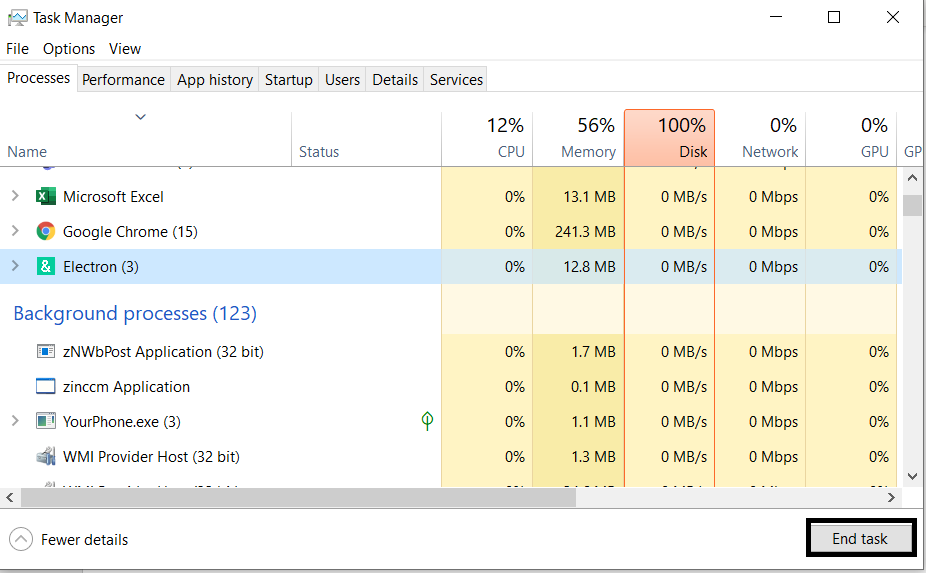
Figure: Uninstall Instructions-5
Now, go back to the folder path and delete the files. Now, all the files will be deleted.
Executing Tasks in a Minimized RDP Window
The settings are modified in the Windows Registry Editor (Administrator rights are required).
1. For the current user:
2. For all user:
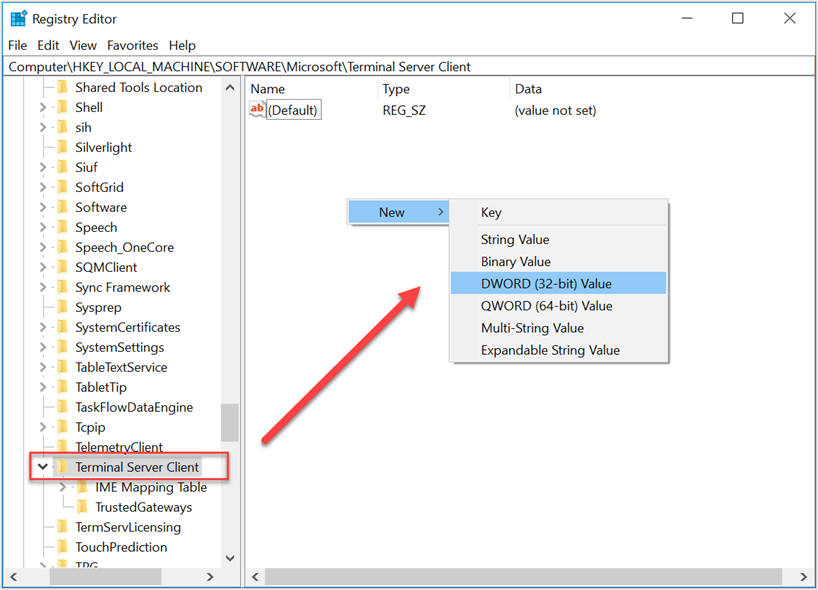
Figure 1
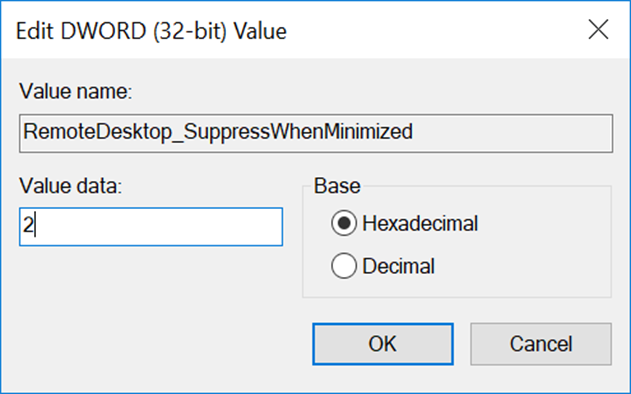
Figure 2
Unattended Setup Installation Process
Group Policy Settings required for Unattended mode configuration.
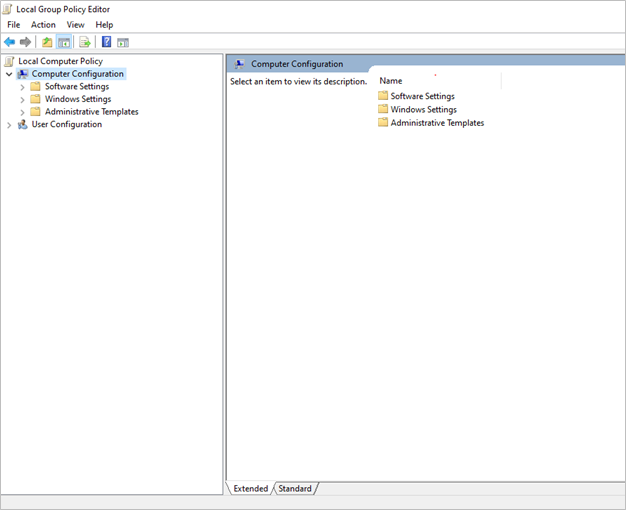
Figure 1
Local Computer Policy Computer Configuration Administrative Templates Windows Components Remote Desktop Services Remote Desktop Session Host Connections
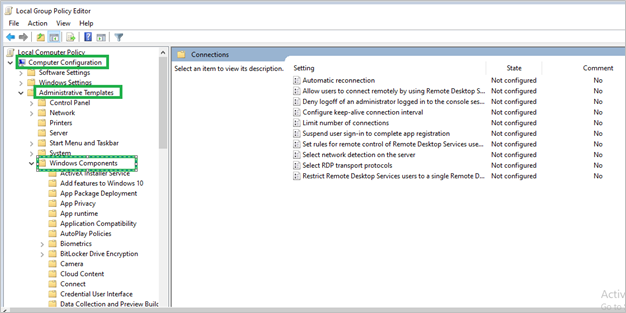
Figure 2
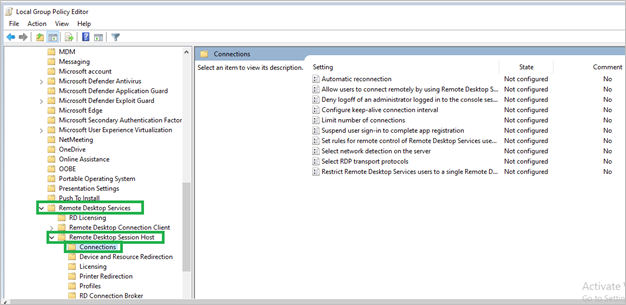
Figure 3
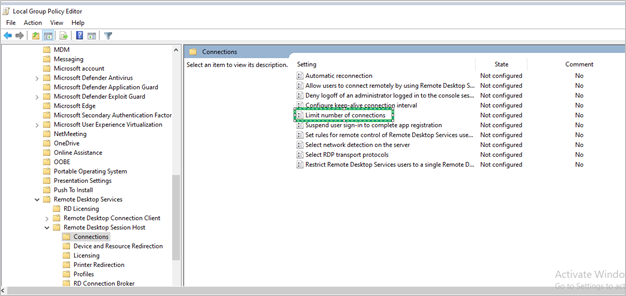
Figure 4

Figure 5
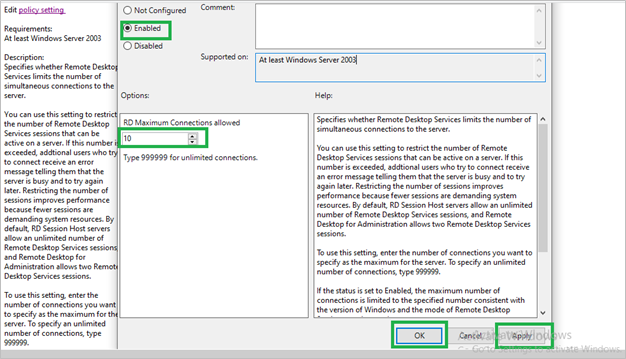
Figure 6
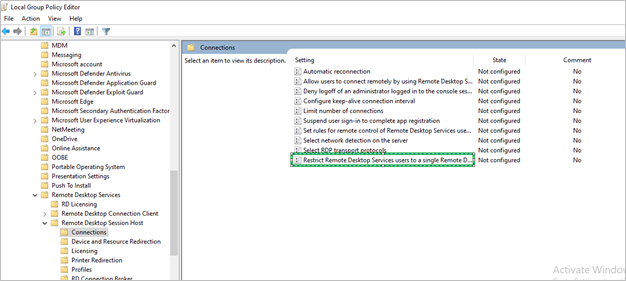
Figure 7
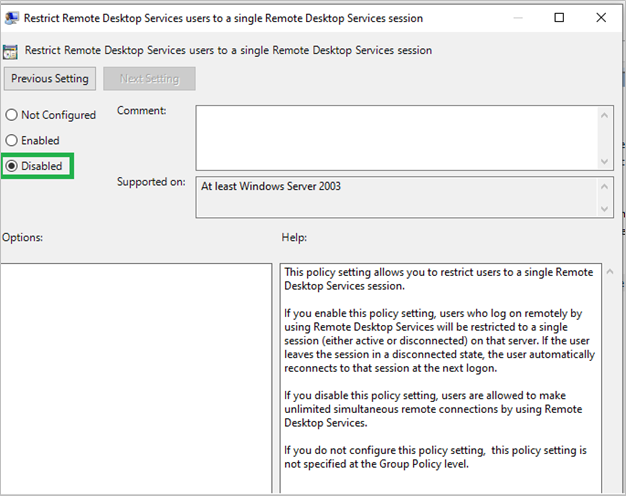
Figure 8
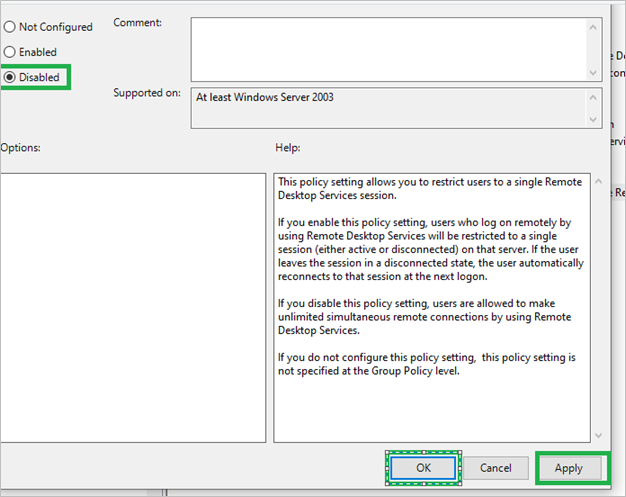
Figure 9
Command: gpupdate /force
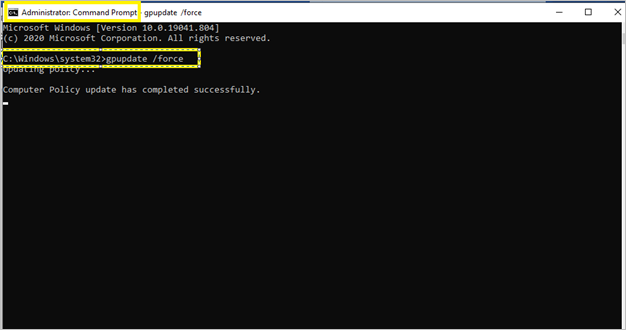
Figure 10
RDS (Remote Desktop Service) Setup required for unattended mode:
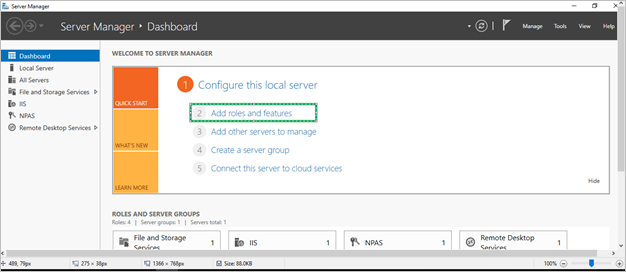
Figure 11
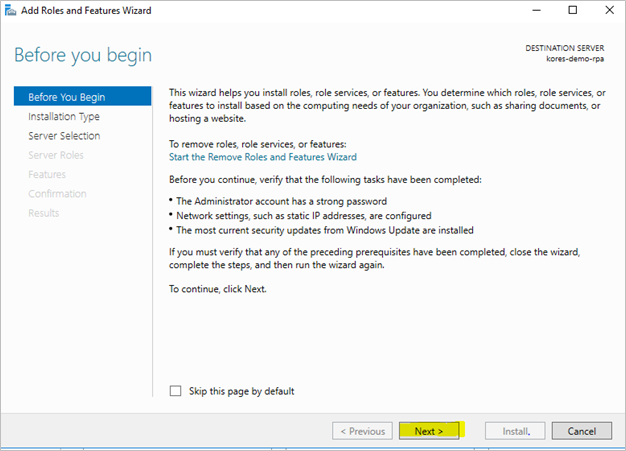
Figure 12
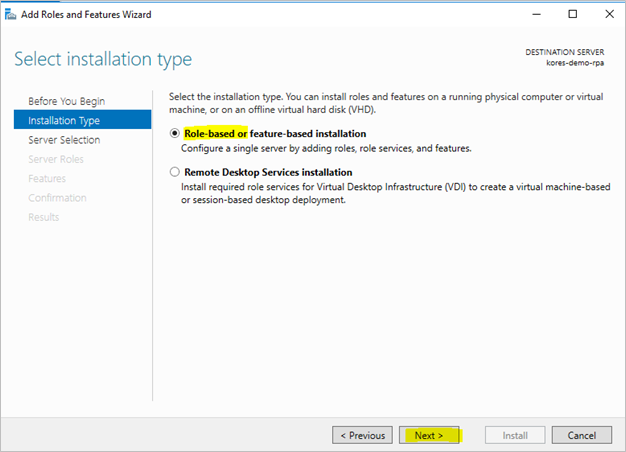
Figure 13
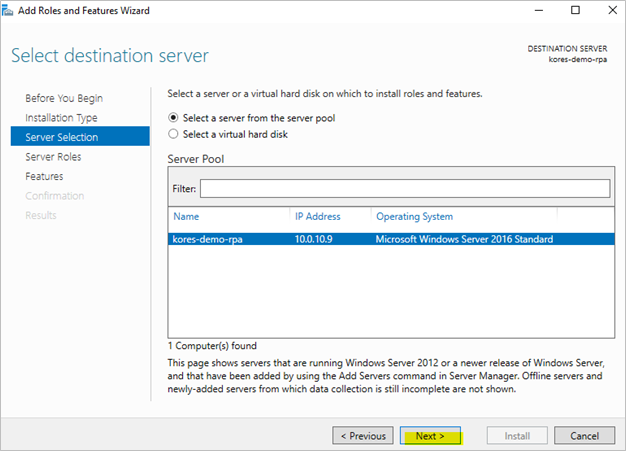
Figure 14
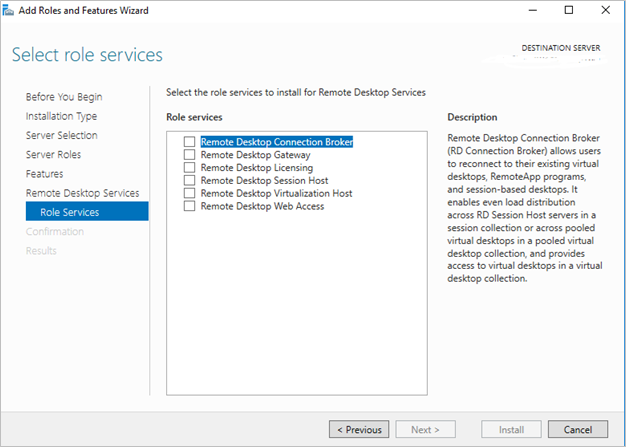
Figure 15
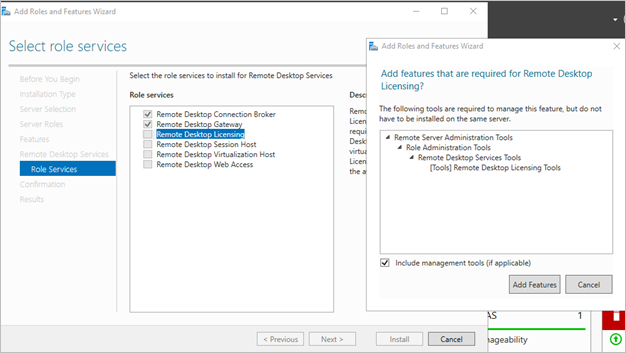
Figure 16
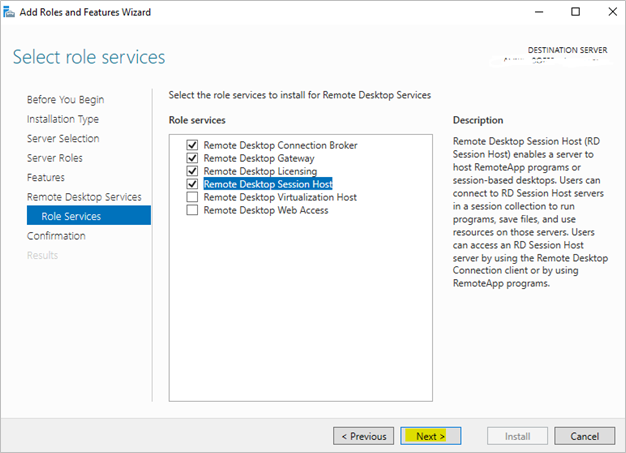
Figure 17
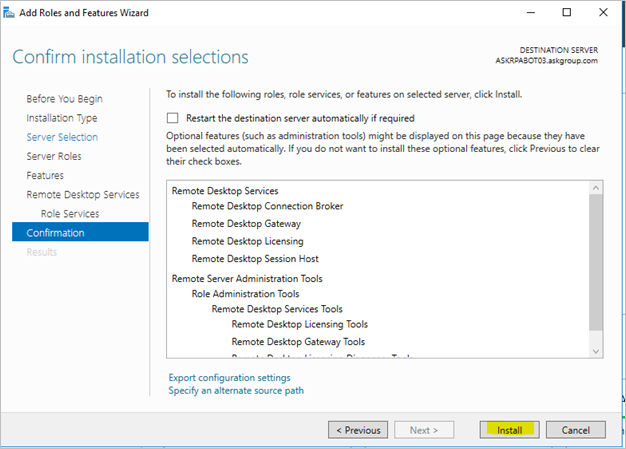
Figure 18
Note:Once the RDS services features are added, you need to restart the server and then only the new settings will apply.
Unattended Mode Setup Installation & Activation of the Unattended User Session
Example path: D:\IDE\Techforce.ai Studio\resources\static
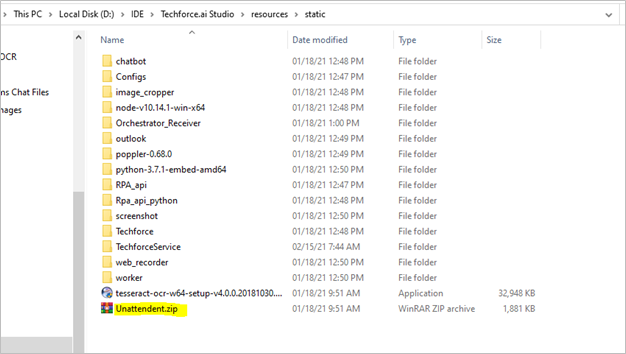
Figure 19

Figure 20
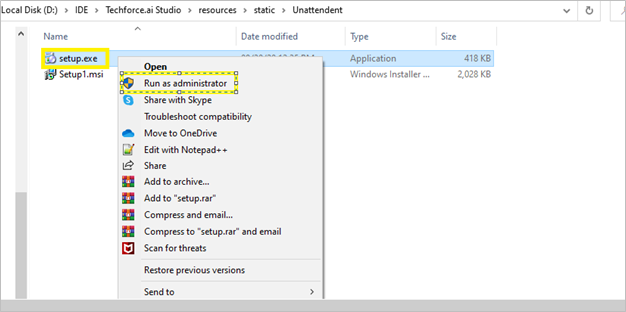
Figure 21
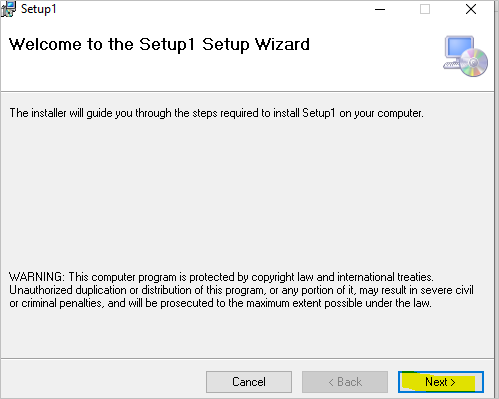
Figure 22
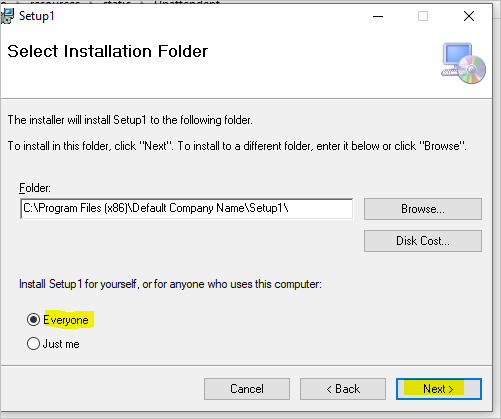
Figure 23
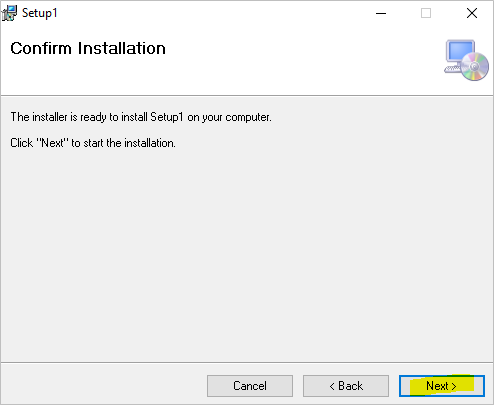
Figure 24
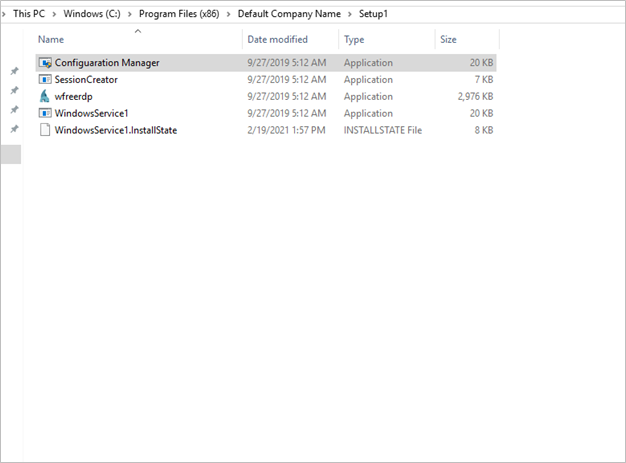
Figure 25
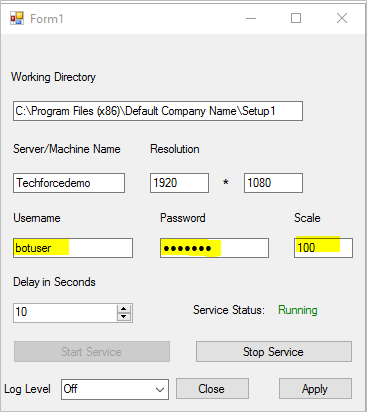
Figure 26
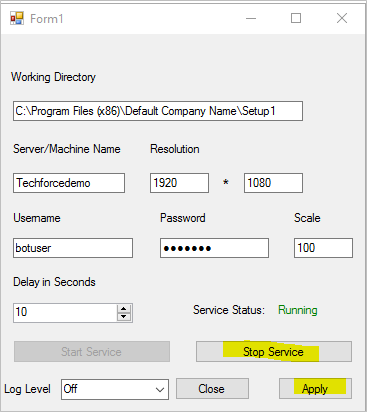
Figure 27
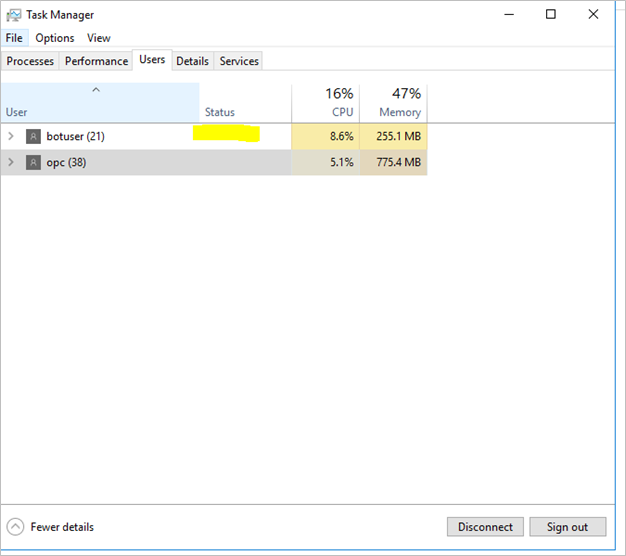
Figure 28
Note:If the user is not activated the first time, the Machine may require a restart, but not mandatory for all the Servers. (Unattended mode is only possible for the Windows Server VM -2016 and later versions).
Unattended Mode With FIPS
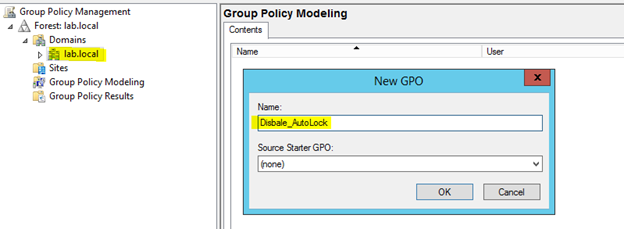
Figure 1
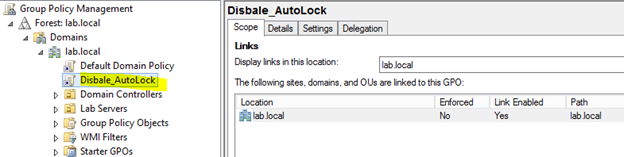
Figure 2
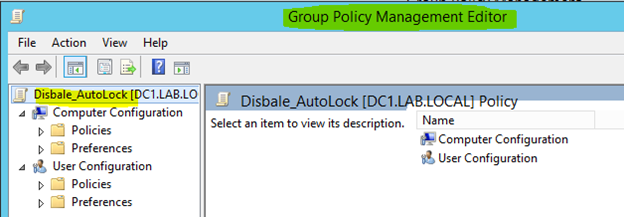
Figure 3
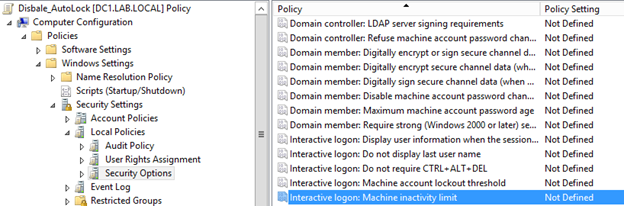
Figure 4
Windows notices inactivity of a logon session, and if the amount of inactive time exceeds the inactivity limit, then the screen saver will run, locking the session.
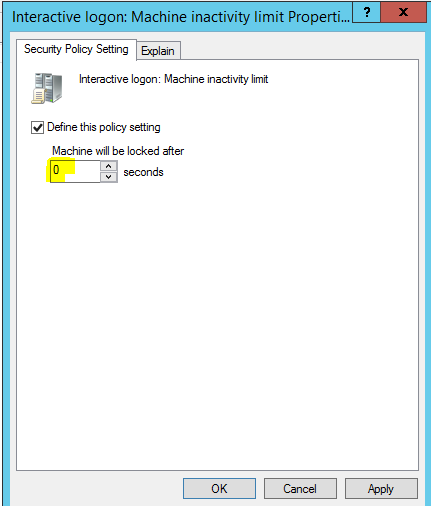
Figure 5
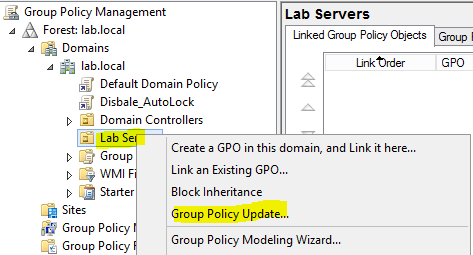
Figure 6
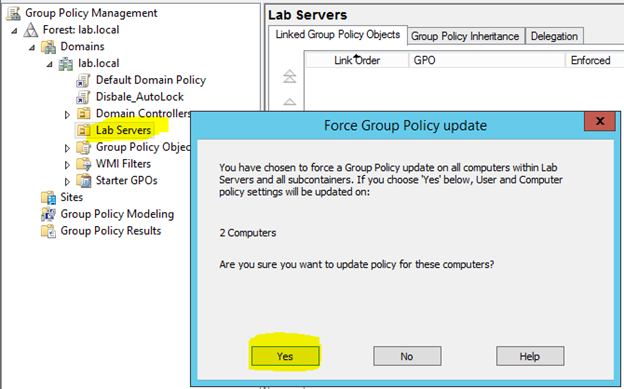
Figure 7
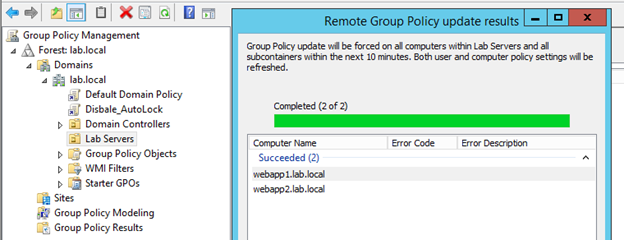
Figure 8
Outlook Settings
The Outlook Prerequisites settings to use the Outlook actions to execute in RPA Action flow.
- 1. Open the Outlook application with administrator permissions.
- The File bar displays various options in the drop-down menu. The options are Exit, Save, and Save As.
- 2. Goto File menu click on Options Click on Trust Center Click on Trust Center Settings Click on Programmatic Access.
- 3. Select the ‘Never warn me about suspicious activity’ radio button
- 4. Click on the OK button. Again click on the OK button.After doing these settings, you will not get the attached popup.
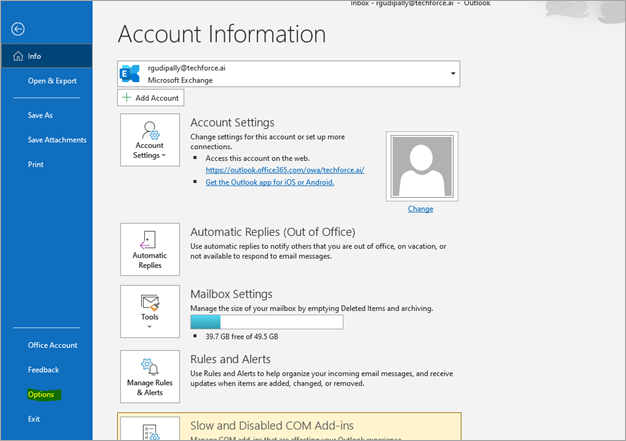
Figure 1
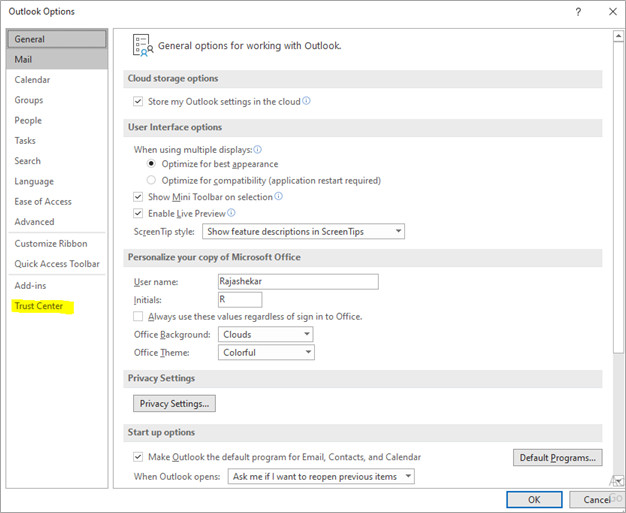
Figure 2
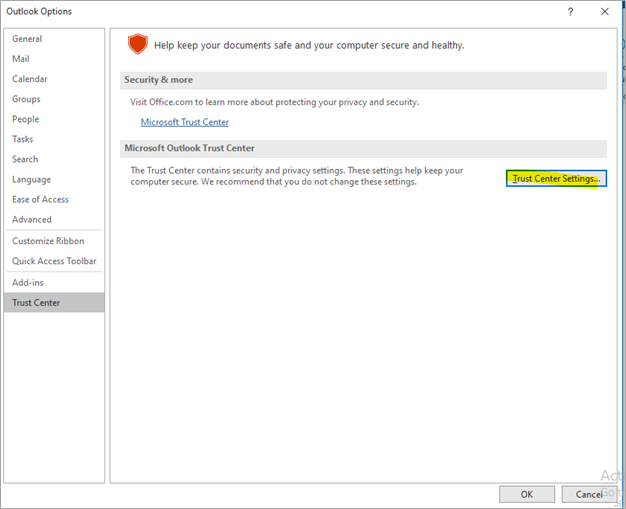
Figure 3
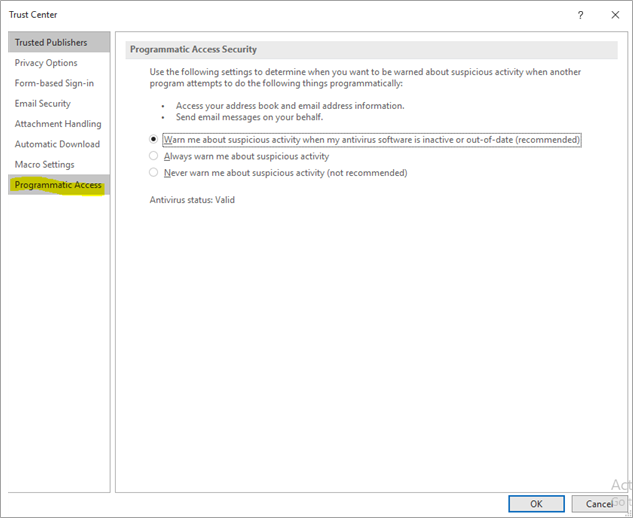
Figure 4
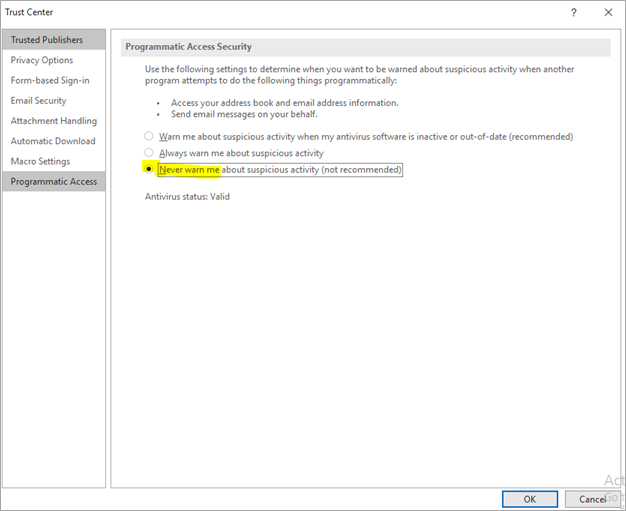
Figure 5
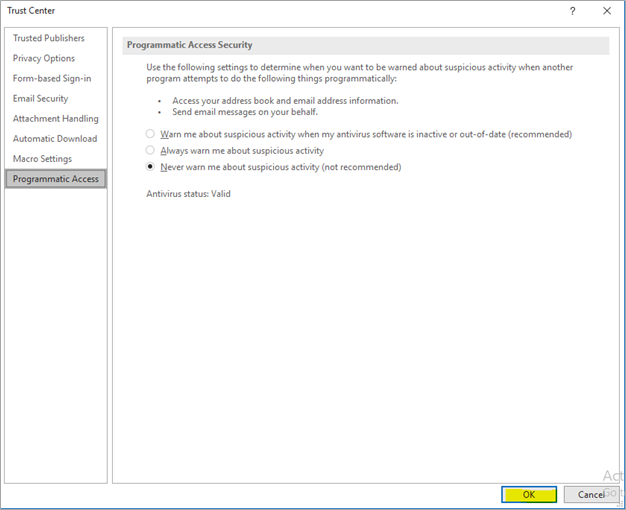
Figure 6
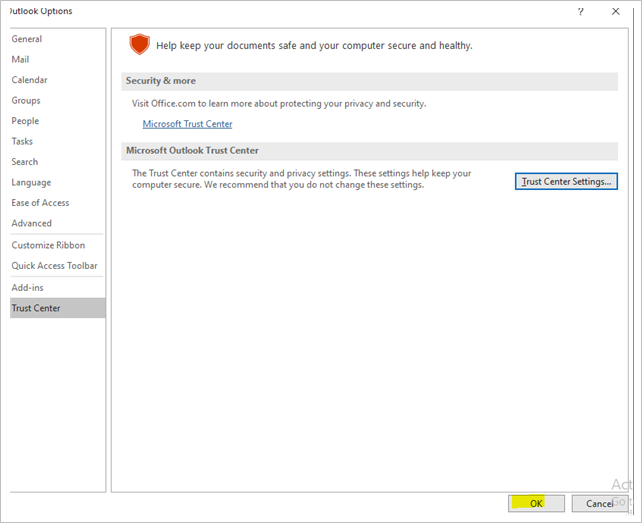
Figure 7
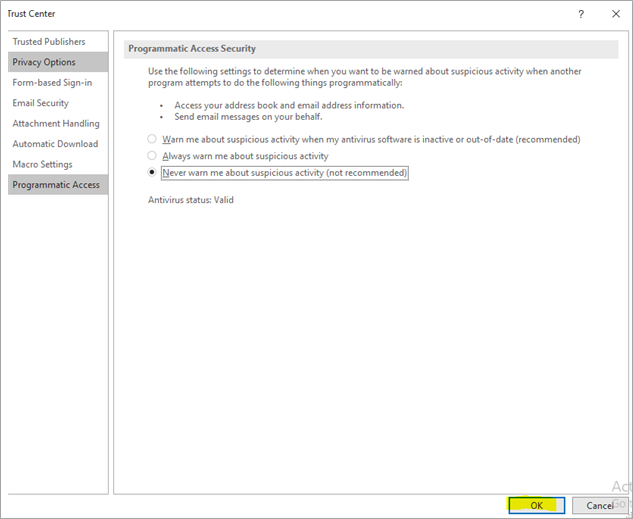
Figure 8
Building a basic Action Flow
Building a basic Action Flow
Use case: Get the Price of iPhone from Amazon
Launch the studio
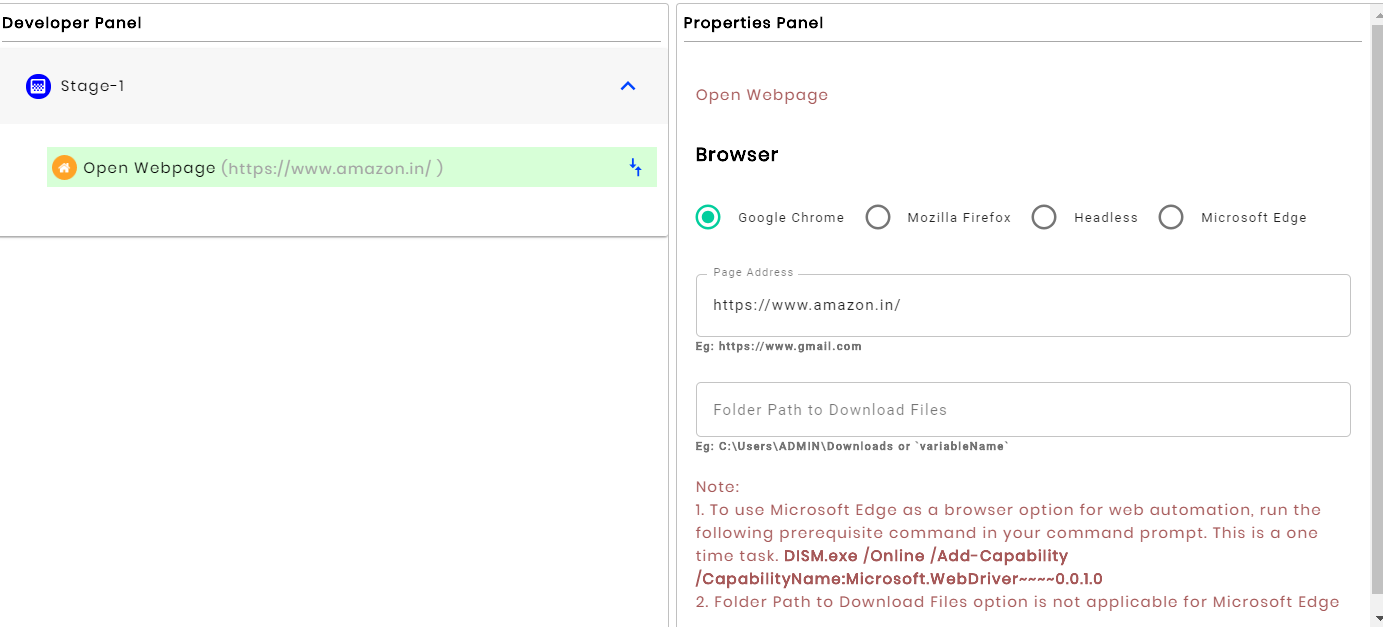
Figure: Open Web Page Action
Select Google Chrome and pass the URL of the website in the “Page Address”: https://www.amazon.in/
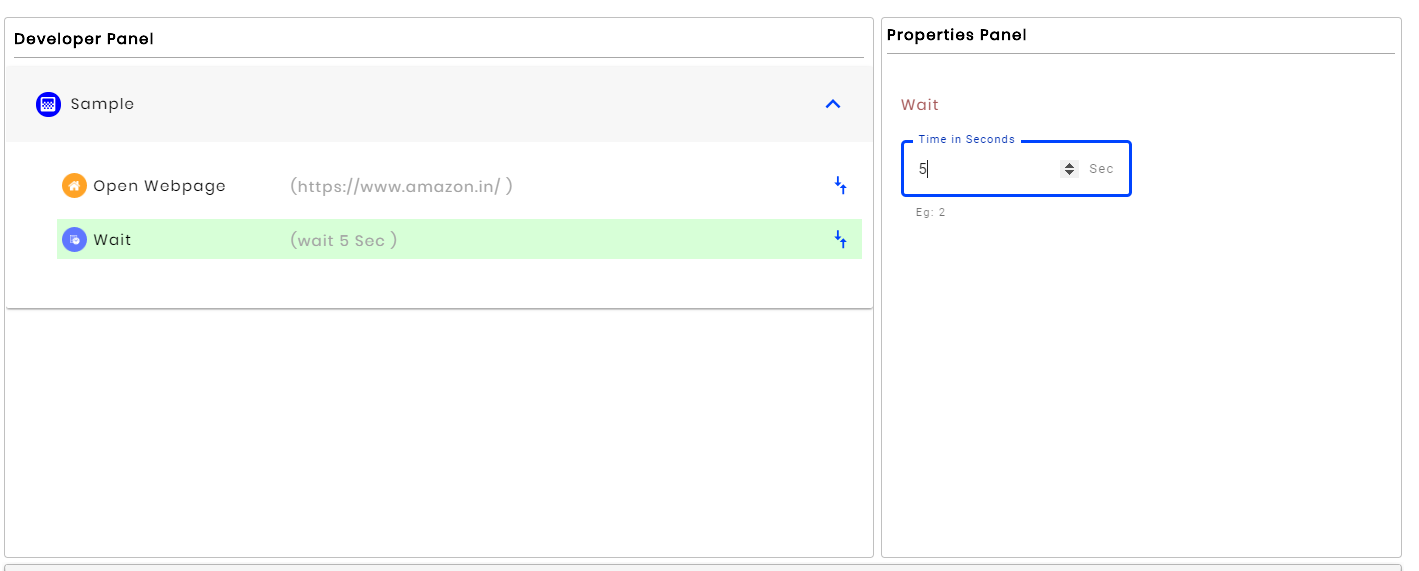
Figure: Wait Action
Pass “5 sec” in the Time in sec. Here 5 seconds wait time is given to load the webpage.
Capture the XPath of the HTML that needs to be written on the webpage and pass that XPath in the XPath.
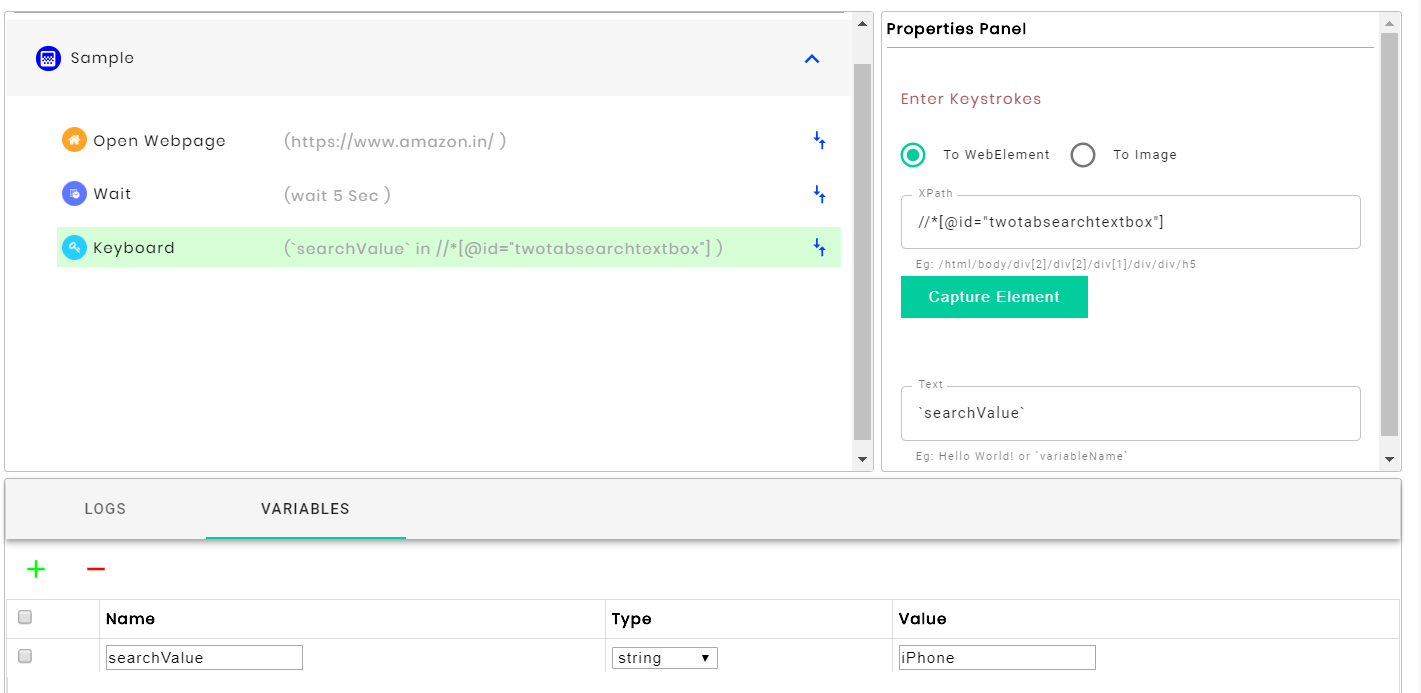
Figure: Enter Keystrokes Action
Create a variable in the variable window and set iPhone as the value pass that variable into the Text.
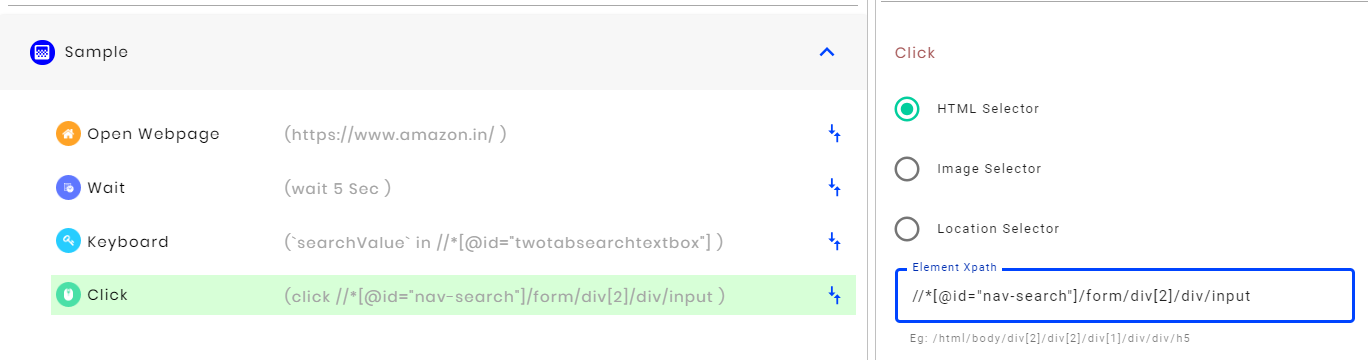
Figure: Click Action
Select the HTML selector and pass the XPath of the search button in the Selector
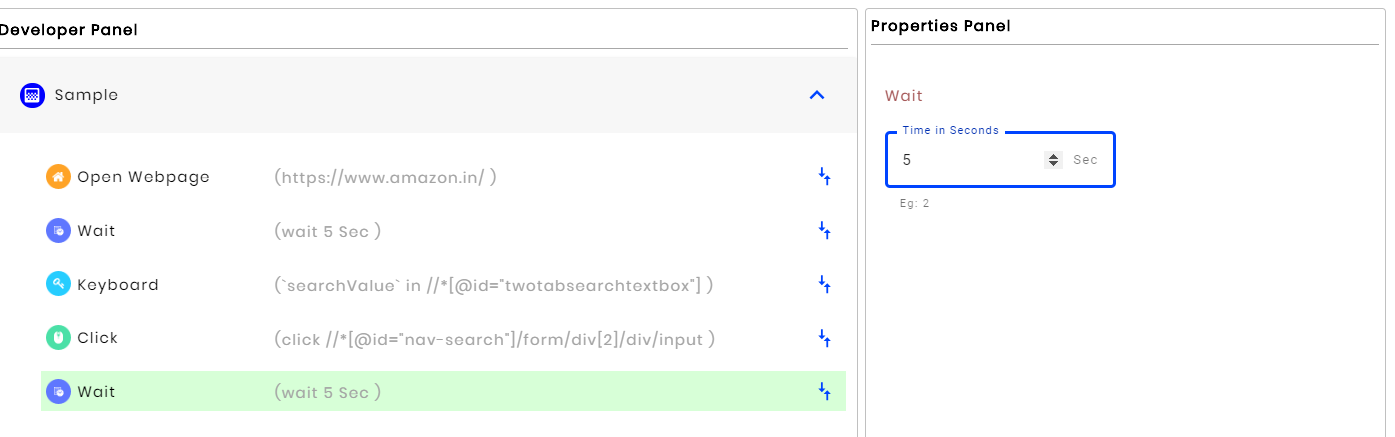
Figure: Wait Action
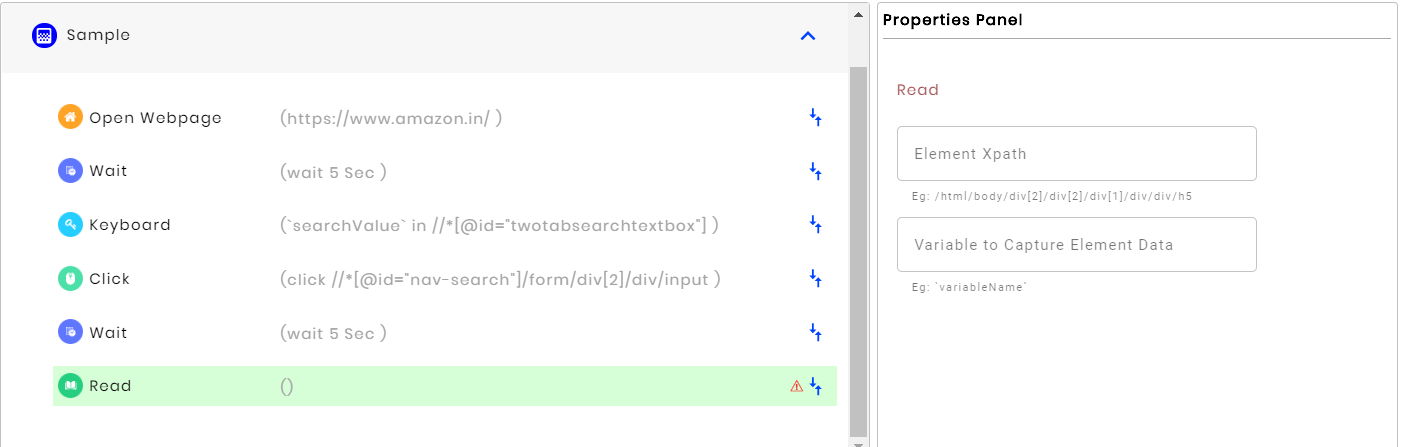
Figure: Read Action
Pass the XPath of HTML element which you want to read into Element Xpath Text box and create a variable in the variable panel and pass the variable name in the Read to the variable text box.
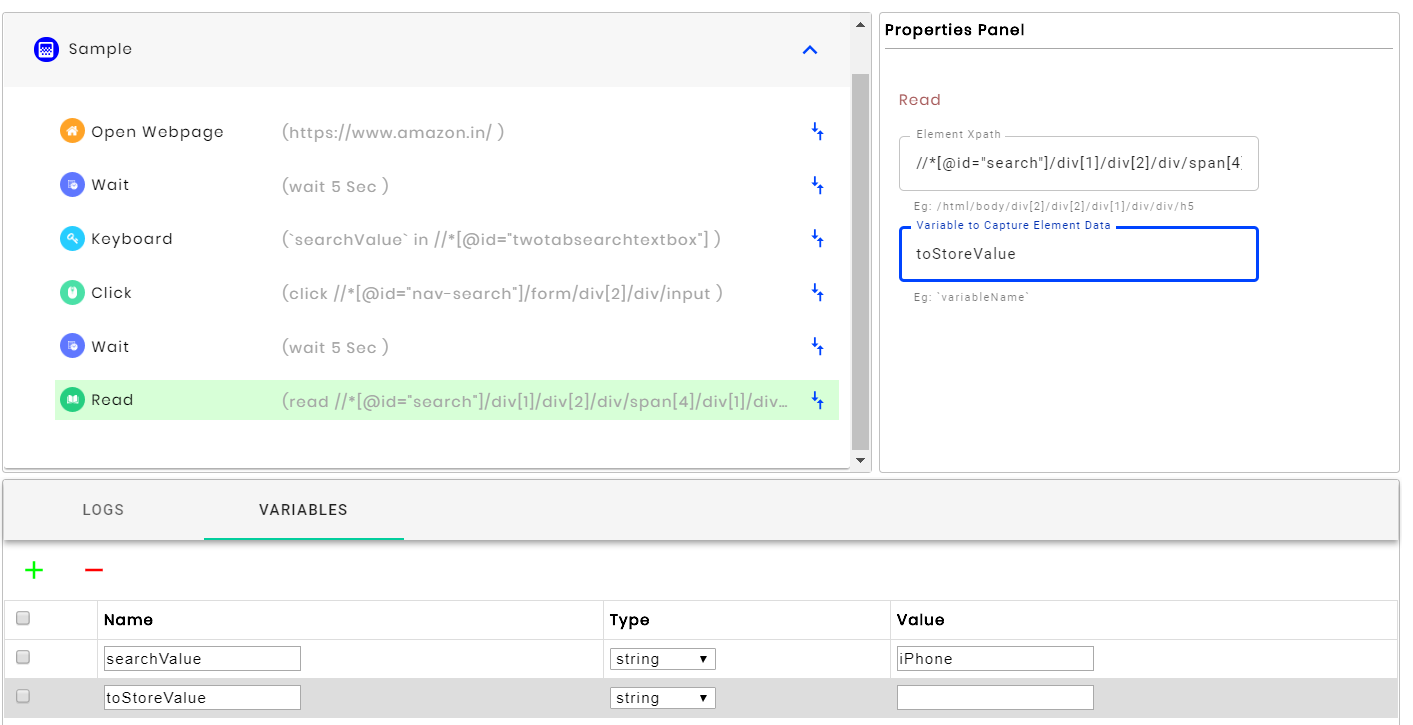
Figure: Variable Panel - Create Variable
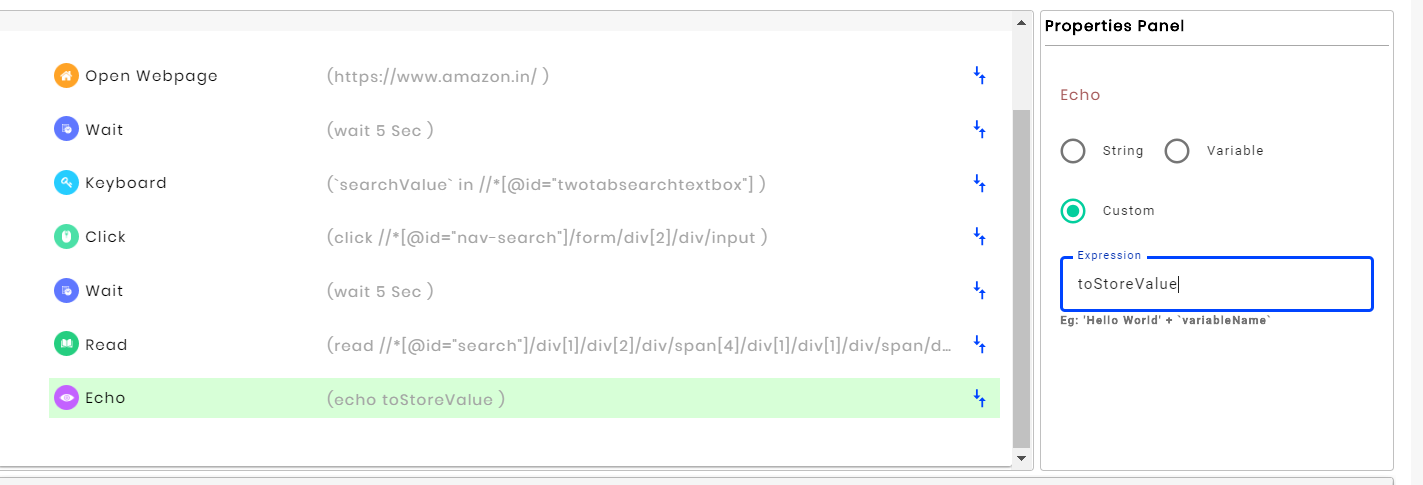
Figure: Echo Action
Pass the variable name created to store the read value from the webpage in the Write your custom Variable.
The ECHO action will show the results in the logs.
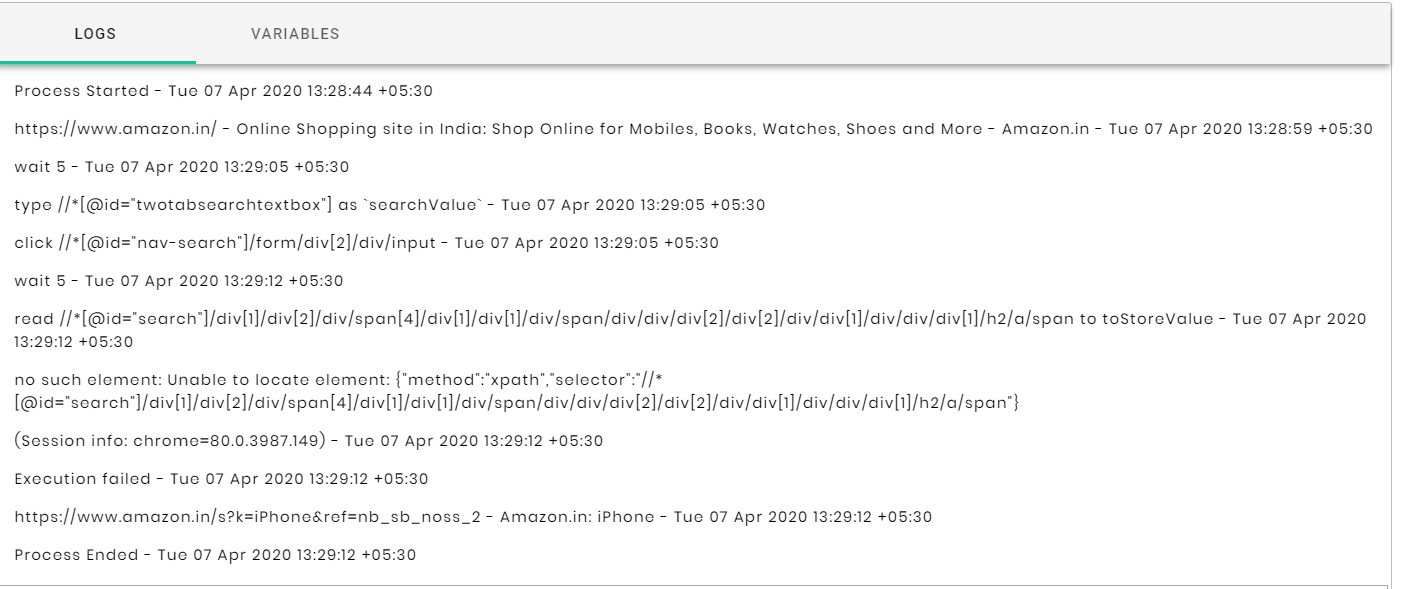
Figure: Logs Panel
Menu Options
Techforce.ai RPA Studio Menu bar contains the File Tab and Help Tab. The menu toolbar contains the following New, Open, Save, Record, Clear, Publish, Settings, Stop, and Play functionalities. Menu bars are very common and easy to find. They help in the efficient use of space.
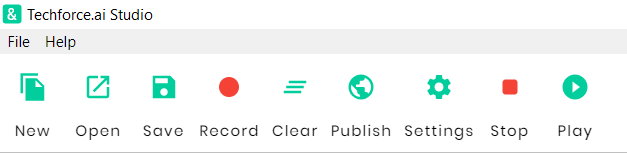
Figure 2: Menu Panel
- 1. File Tab:
- The File bar displays various options in the drop-down menu. The options are Exit, Save, and Save As.
- Exit: Exit is used to close the Techforce.ai RPA Studio.
- Save: It is used to save an RPA task with a name. The shortcut is Ctrl+S.
- Save As: It is used to save an already saved document with a new name. The shortcut is Ctrl+Shift+S
- 2. Help Tab:
- The Help tab displays the installed version of the studio.

Figure 3: File Tab
New
Used to create a new RPA action flows into the respected folder. The user can start a new project from predefined templates.

Figure 5: Studio New
Open
Used to open the existing flow file. Open a project the user worked on recently. By default, projects are created in C:\Users\\Documents\Techforce.ai-IDE.The Open project dialog searches for the project. JSON files.

Figure 6: Open
Save
Used to save the created action flow or Modified flow. It is used to save an RPA flow with a name. Shortcut is Ctrl+S

Figure 7: Save
Record
Used to record the WEB operations, simply called a Web-Recorder to automate the browser functionalities.
Techforce.ai RPA Web Automation uses a built-in recorder that can read and enact web-based activities. It identifies web elements by their attributes and accurately manipulates them while keeping up with website changes.

Figure 8: Record
Clear
Used to close the opened action flow. That means to clear any task (which the user may want to clear or close).

Figure 9: Clear
Publish
Used to publish the developed action flow using the required user credentials and IP.

Figure 10: Publish
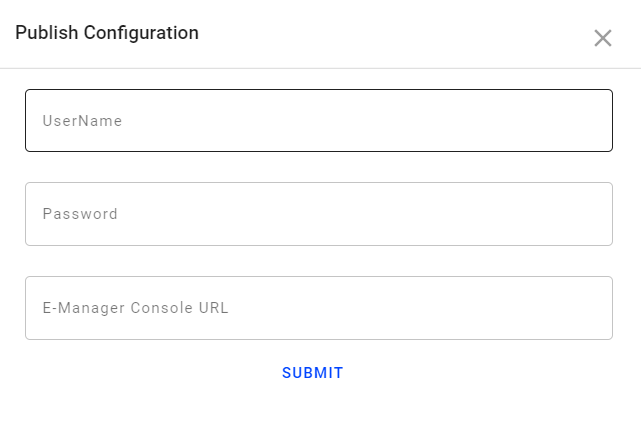
Figure 11: Publish Configuration
Settings
Used to set the global wait time for the action flows.

Figure 12: Settings
Also, it asks Chrome should open or close at the time of flow completion.
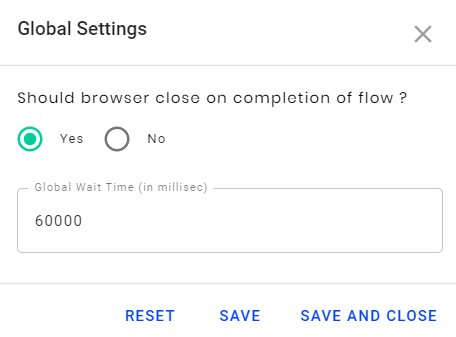
Figure 13: Global Settings
Stop
Used to stop the execution of flow while it is running.

Figure 14: Stop
Play
Used to run the flow to start the execution.

Figure 15: Play
Used to run the flow instantly. Validate and run the workflow, while using debugging tools to set breakpoints, monitor the execution of activities step by step, and adjust the debugging speed. Open logs to view details regarding execution and any changes made to the project.

Figure 16: Play Now
Action Library Panel
All the actions in the Action library panel are categorized based on the functionality.
List of action categories in Techforce.ai RPA Studio:
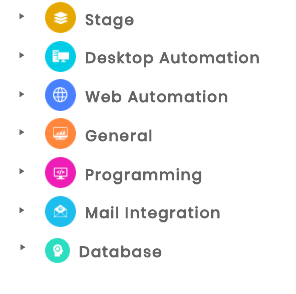
Figure 17: Action Library
In Techforce.ai RPA Studio, Stage Action is used to divide the flow into sub-flows to divide the functionalities and reduce the flow confusion to the developers.
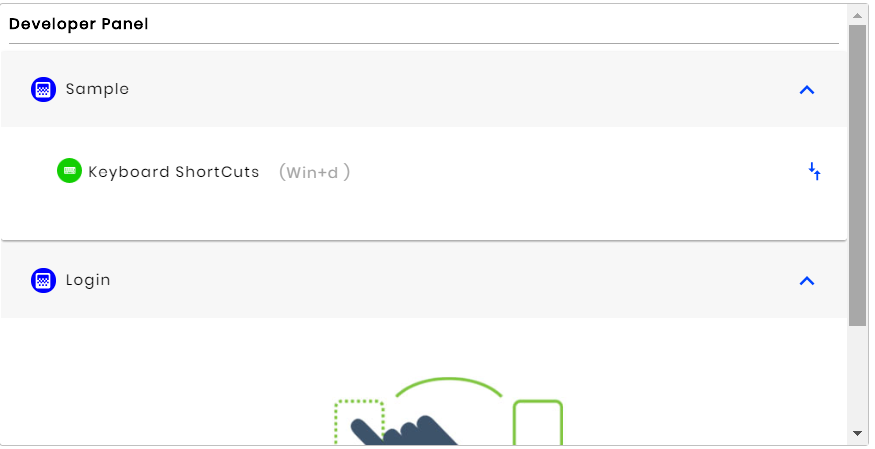
Figure 18: Stage Action
Desktop Automation is used to automate desktop applications like Notepad, Excel, MS-Word, folders, files, images, and screen functionalities, using sub-actions like Keyboard Shortcuts, Drag and Drop, Open App, Close APP, Close File, Switch App, Screenshot, and Data Scrape.
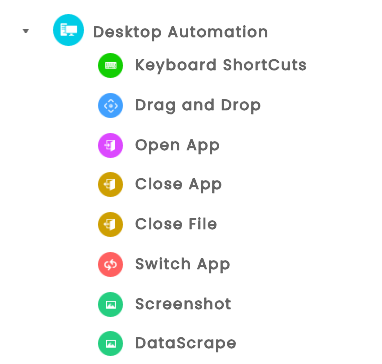
Figure 19: Desktop Automation
Web Automation is used to automate the browser applications like Chrome, Firefox and Internet Explorer, etc., using the Sub-Actions like Open Webpage, Read Table, Frame, Popup, Show, Snap, Dom, Scroll and Back.
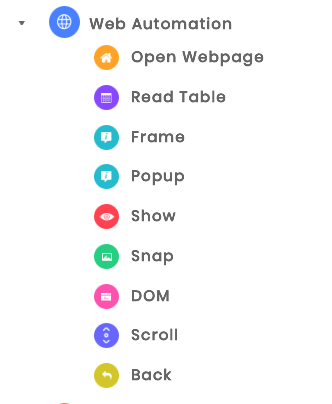
Figure 20: Web Automation
General Action is used to automate normal desktop-based and web-based operations using Subactions
The Subactions like Mouse Clicks, Conditions, Excel, Loops, Jump Statements, OCR, Exceptional Handling, Files and Folders, Secure FTP, CSV, Stop, Message Box, Clipboard, Assign, Ask, HTTP API, Wait, Read, Get Credentials, Get Secret, Get Parameters, Echo, Enter Keystrokes, Read and Module are used in General Action.

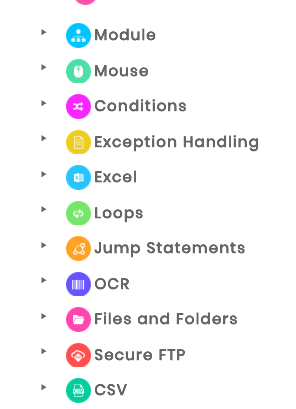
Figure 21: General
Programming Action comprises String and Technology Sub-Actions. Using String Sub-Action, the user can perform string operations and match case operations. By using Programming Sub-Action, the user can include programming languages like JavaScript, Python, and Auto Hotkey scripting, available to automate.
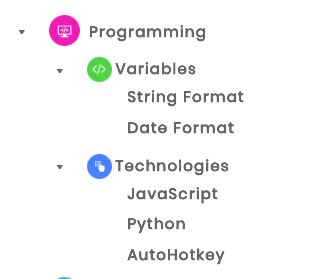
Figure 22: Programming
Mail Integration is used to automate mail operations to configure Read Mail, Send Mail and Save Attachments using Sub-Actions: IMAP, POP3, Outlook, and Save Attachments.
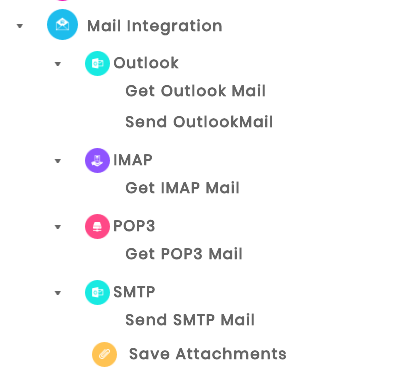
Figure 23: Mail Integration
The Database is used to connect to the database like My SQL, PostgreSQL, Oracle, and MS SQL. The data can be retrieved and stored in desktop applications. Similarly, the data can be sent to the database from the desktop applications. All the queries executed in the database can be executed using database actions.
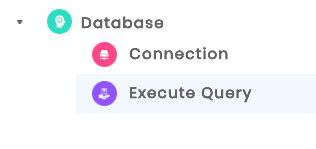
Figure 24: Database
Stage
The stage can be considered a group of multiple actions. The actions used in the flow must be included at least in one stage. The stage can be minimized or maximized by clicking on the UP arrow (to minimize) and down arrow (to maximize the stage).
Desktop Automation
Desktop automation is used to automate desktop applications. In this type of automation, either images or locations are used for interacting with the elements. Dom objects of the web page and web-based actions cannot be accessed using desktop automation. Instead, images and locations can be used. While triggering the flow designed using desktop actions, the user should be careful that the UI of the page should be visible on the screen.
Actions that come under desktop automation are Keyboard Shortcuts, Drag and Drop, Open App, Close App, Close File, Switch App, Screenshot, and DataScrape.
Keyboard Shortcuts
This action is used to send keyboard shortcuts to active applications in which functions like CTRL, WIN, ALT, and SHIFT are assorted in the studio.
1. Custom Keys: Provides a text box in which the user needs to type the function keys to be passed to the active application.
2. Standard Keys: Gives out a list of function keys and all the functions available on the keyboard. Click on keys and select the required function to be used on the active application.
3. Check in the Standard keys and click on the drop-down box to find a drop-down list of the entire keyboard functions; choose ENTER and click on it.
Example
1. Requirement: Need to send (Control +Copy) and enter key using custom keys and Standard keys.
2. Control+ Copy: Check in the Ctrl box and click on Custom keys and type “c” in the text box.
Drag and Drop
This action is used to drag/change the location of the file/folder from one location to another by using the image selector or location selector.
Properties
From Input Source
- 1. Image Selector: Where flow enables image capturing mode to select the image of the required file/folder to change.
- 2. Location Selector: Where flow enables location capturing mode to select the X and Y coordinates of the required file/folder.
- 1. Image Selector: Flow allows the user to select the required location in the image from where flow recognizes the file/folder or place in the image format.
- 2. Location Selector: Flow allows the user to select the destination of the selected file/folder by using the X and Y coordinates.
- 1. Requirement: Need to change the location of the .docx file present on the desktop from one location to another by using the image selector in “FROM” and by using location selector in “TO”.
- 2. From: Check in the image selector and click on the INSERT SCREENSHOT where the user will give access to select the image of the required .docx file.
- 3. To: Check in the location selector and click on the FIND LOCATION where flow allows the users to select the required location of destination by using X and Y coordinates.
To Output destination
Example
Open App
Opens Windows applications.
- 1. Requirement: Need to open Google by using Open App. Copy the full path of Google and paste it in the properties window.
Properties
1. App Shortcut or File Path: It is used to open Windows applications by giving the file path of the application with an extension like notepad.exe. Copy the path and paste it in the Open App properties window.
Example
Close App
Closes the active application(s).
- 1. Requirement: Need to close the Amazon website using the Close App. Copy the header of Amazon.in and paste it in the properties window.
Properties
App Window Title: Similar to the Open App, Close App also works on the same formulae but instead of the file path, just give the header of the existing app.
Example
Close File
Closes the indicated active file.
- 1. Requirement: Need to close the Excel file using Close File. Copy the header of the Excel file and paste it in the properties window.
Properties
File Path: Similar to the Close App, Close File also works on the same formulae but, closes the existing file.
Example
Switch App
Closes the indicated active file.
- 1. Requirement: Need to switch apps when two apps/windows are active.
- 2. Input: Just write down the heading of the required app/window or variable and paste it in the properties window.
Properties
App Window Title: Switch App is used to switch to a particular window or app when multiple windows are open. Just write down the header of the required app/window or variable and paste it in the properties window.
Example
Screenshot
Captures the screenshot of the current screen and saves it in the specified location.
- 1. Requirement: To take the screenshot of the current screen.
- 2. Input: Just give the location path with name and extension to save the image.
Properties
Image Path: The screenshot action captures the screenshot of the current screen and saves the image with the specified name and extension in the specified location.
Example
DataScrape
This action is used to extract the data from the selected image. The extracted data will be stored in a variable for further use.
- 1. Select Image: Click on the Select Image button. It opens a new window to select the image. Select the image from the path. On the image, select the area to extract the data from, and press Enter.
- 2. Select Variable: Create a string variable in the variable Panel. Select the created string variable from the drop-down to store the result.
Properties
Web Automation
Web automation is used to automate browser-based applications. Web actions enable the e-worker to open a web page, read data from the elements, scroll the webpage, deal with the popup windows, take a screenshot of the page, etc.
Open Webpage
Open a website by passing the URL in the properties window as input or else by creating the variable for URL in the variables section and pass the variable name in the properties.
- 1. Requirement: Need to open webpage www.irctc.co.in by creating a variable.
- 2. Input: create a variable in the variables and select the string for the variable type and place the www.irctc.co.in in value. Pass that variable into the page address property window.
Properties
Browser: Used to select the mode of execution. To execute in Google Chrome, Mozilla Firefox, Microsoft Edge, or Headless.
Page address: Pass the URL (example: www.Techforce.ai) in the page address properties window or else directly pass the variable.
Folder Path or Download Files: To download any files in the execution process, just pass the path to save the downloaded files in the specified path.
Headless
Page address: Used to run a program in the background without any extension. Pass the URL (example: www.flipkart.com) in the page address properties window or else directly pass the variable.
Example
Read Table
This action is used to retrieve data from the table on web pages. The data retrieved can either be the complete table data or specified column data.
Properties
Table XPath: This action is used to retrieve data from the table on web pages. The data retrieved can either be the complete table data or specified column data.
IFrame name: Enter the iframe name if the table is in the iframe.
Column Name: Pass the table column name from which you want to retrieve the data. To retrieve complete table data, leave the Column Name field empty.
Select variable: Create the variable as a DataTable type. Only DataTable variables are supported.
Frame
To automate web page HTML elements that are inside the iframe, the user first needs to access the frame element.
Properties:
Frame Name: Enter the name or ID of the iFrame.
Popup
To enter data from popup windows for using this popup action.
Properties:
Popup Address: Just pass the popup page URL.
Show
Show action is used to retrieve the data from the web page and display it in the logs.
Properties:
Element XPath: Provide the XPath of the element from which data is to be retrieved.
Snap
Used to take a screenshot of a whole page or can be customized to get a specific image by passing the XPath of the required HTML of the window.
- 1. XPath: Copy and paste the required image HTML element path in the XPath properties window or pass the variable.
- 2. Image File Path: Provide the path with image name and extension in the property window and the image will be saved by the given name in the specified location.
- 1. Requirement: Capture the whole page of google.com.
- 1. Input: Click on the page and pass the image name in the properties window as the captured image will be placed under the given file name.
- 1. Input: Click on the page and paste the XPath of the variable to be captured and pass the image name as string/variable in the properties window.
Properties:
Page: To take the screenshot of the complete page.
Image file Path: Provide the path with image name and extension in the property window and the image will be saved by the given name in the specified location.
Custom
To take the snap of the required HTML element.
NOTE:
By default, images are saved in .png format with a default name (snap1 snap2, etc.). To save the image with a given name, then the user needs to mention it with the format also i.e., .png or else each time flow overwrites the existing image and saves it in the same field. Example: image.png
Example
Page
Custom
DOM
When a web page is loaded, the browser creates a Document Object Model (DOM) of the page.
To access HTML elements with JavaScript, find the elements first.
There are a couple of ways to do this:
Changing HTML Elements
| Method | Description |
|---|---|
| document.getElementById (id) | Find an element by element id |
| document.getElementsByTagName (name) | Find elements by tag name |
| document.getElementsByClassName (name) | Find elements by class name |
Scroll
To scroll down the web page use the scroll action.
Properties:
1. Scroll if needed: Need to give the XPath here. If the given XPath exists, then it will scroll to that XPath.
2. Always: Even if the given XPath is not there, it will scroll.
Back
On a web page, to go a step back, use the back action.
General Actions
The General Activities pack contains all the basic activities used for creating automation projects. These activities enable the robots to:
- 1. Getting the input to robots.
- 2. Getting credentials to communicate with the e-manager console.
- 3. Read data from the web.
- 4. Assign the values to variables.
Enter Keystrokes
- 1. Send keystrokes to a UI Element. Enter by using XPath and by selecting Image.
- 1. XPath: The XPath of the corresponding web element.
- 2. String: If the string radio button is selected, pass the text to be written in the specified UI element.
- 3. Variable: If the variable radio button is selected, select the variable that contains the text to be written in the specified UI element.
- 1. Insert Screenshot: Capture the corresponding image, which needs to enter the text.
- 2. String: If the string radio button is selected, pass the text to be written in the specified UI element.
- 3. Variable: If the variable radio button is selected, select the variable that contains the text to be written in the specified UI element.
Properties of Web Element.
To Image
NOTE
If you give a variable name instead of direct text in the String field, the variable name needs to be placed in between the backquotes (` `).
Stop
To stop the execution process at the specified step.
Echo
- 1. Prints a string or the value of a string variable to the Output Panel. Strings have to be placed between quotation marks.
- 1. Text: The content to be written to the Output panel. This field only accepts Stings and String variables. Strings have to be placed between quotation marks.
- 2. Select Variable: Select the variable name from the list, which content is to be written in the output panel.
Custom:
1. Expression: The content to be written to the Output panel. This field accepts both Stings and variables. Strings have to be placed between quotation marks.
Properties:
String:
Message Box
Displays a message box with a given text with the button options. The User can also set the time to present the message box.
Properties:
- 1. Message: The text to be displayed in the message box. The User has to enter own text in this box or can pass the variable.
- 2. Time out: The time to display the message box. Directly pass the variable.
- Pass the variables between the left quote commands. Ex.(` `).
NOTE
Clipboard
To store the data in the clipboard memory into a variable.
1. Variable to capture the clipboard memory: Create a variable in the variable panel and pass the variable to store the data from the clipboard memory into the variable.
Get Secret
Gets a specified secret value from the secret vault of the e-manager console by using the Asset Name and returns a secret value, which can be Text, Boolean, or Integer.
Properties
Asset Name: Gets a specified secret value from the Secret Vault of the e-manager console by using the Asset Name and returns a secret value, which can be Text, Boolean, or Integer.
Variable to Capture Secret Text: Enter the variable name created in the variable panel to store the secret vault value.
Note
Once the user has been configured with the e-manager console, it will not ask to configure again. Directly the activity shows the asset name and variable field.
Get Credentials
Gets a specified credential by using the Asset Name provided, and returns a user name and a secure password.
Properties Configuration
- 1. UserName: UserName of the e-manager console account.
- 2. Password: Password of the e-manager console account.
- 3. E-Manager-Console URL: The e-manager console URL which needs to be accessed.
- 1. Asset Name: The name of the asset, which was created in the e-manager console to contain a secret value.
- 2. Select Variable to Capture User Name: Select the variable from the dropdown list to store the username data. The username, which is stored in the e-manager console secret vault will come to this variable automatically.
- 3. Select Variable to Capture Password: Select the variable from the dropdown list to store the password data. The password, which is stored in the e-manager console secret vault will come to this variable automatically.
After configuration, the secret vault is accessible in the e-manager console by using the given asset name, username, and password.
Get Parameters
Gets Parameters from the encoded string, decodes the data, and stores it into the specified variable.
Properties
1. Variable to capture Decoded Variable: Pass the variable created to store the parameter’s data.
Read
Reads the data from the web by using the XPath value of that data. It is only used to read values from the web.
Properties Configuration
- 1. HTML Element: The XPath of that data to be read from the web.
- 2. Variable: The variable used to contain the read value from the web.
Wait
Waits for a specified amount of time before continuing the workflow.
Properties
1. Time in sec: The amount of time (in seconds) the following activity to be delayed.
HTTP API
Enables the user to perform HTTP operations to a specified web API. When you first drag this activity to the Designer panel, the HTTP Request Wizard window appears, which provides an easier way to build requests and preview server responses.
Properties Configuration
- 1. URL: URL to hit the corresponding API.
- 2. GET: One of the methods to hit API. This will get a response from the corresponding API. Here only headers can be added.
- 3. POST: One of the methods to hit API. This sends the JSON object and gets a response from the corresponding API. Here add body(payload) along with the header.
- 4. PUT: This request creates a new resource or replaces a representation of the target resource with the requested payload.
- 5. DELETE: This request use to delete the specified resource.
Assign
Allocates any values to a variable. It can be used to increment the value of a variable in a loop. For example, it sums up the values of two or more variables and assigns the result to a different variable.
Properties
- 1. Value: The name of the variable to be assigned a value.
- 2. Expression (second field): The value to be assigned to the variable. It may be a string value or can pass the variable.
- 3. DateTime: In case if assigned, the expression related to date and time needs to check the DateTime checkbox.
NOTE
In both the fields, while passing the variable name, need to pass it in between backquotes (` variableName1`).
Ask
Pauses the execution of action flow for human input or verification (Captcha code).
- 1. Message Text: Specify the type of captcha image or code.
- 2. XPath: XPath of the input field to enter the captcha code.
Active Window
Activates the indicated window
- 1. App Window Title: Pass the header of the window to be activated.
- 2. Time in sec: Time in seconds to wait.
Module
Add External Module:
- 1. Add External Flow: This action helps to add sub-flows into the main flow. For this, give the exact path to call the sub-flow into the main flow.
Mouse
Click
Click Action is used to click on a particular element or image.
Specify the type of mouse click (single, double) used when simulating the click event and the mouse button (left, right) used for the click action. By default, the left mouse button is selected.
Properties
Click Action has three different types of selectors.
1. HTML Selector: HTML selector is nothing but the element X-Path.
2. Image Selector: Image selector is nothing but the Image as an indicator.
3. Location Selector: Location selector is nothing but the location of the element, which is X and Y axes.
Right Click
Right-click Action is used to click on a particular element or image with the right side button of a mouse.
Properties
The Right Click Action has three different types of Selectors.
1. HTML Selector: HTML selector is nothing but the XPath of an element.
2. Image Selector: Image selector is nothing but the Image as an indicator
3. Location Selector: Location selector is nothing but the location of the element, which is X and Y axes.
Double Click
Specifies the kind of click action and it is used to open direct applications like SAP & Outlook etc
Properties
The Double Click Action has three different types of Selectors.
- 1. HTML Selector: HTML selector is nothing but the element XPath.
- 2. Image Selector: Image selector is nothing but the Image as an indicator
- 3. Location Selector: Location selector is nothing but the location of the element which is X and Y axes.
Hover
Places the mouse cursor at a particular place wherever selected.
Properties
Hover Action has three different types of Selectors:
- 1. Html Selector: HTML selector is nothing but the element XPath.
- 2. Image Selector: Image selector is nothing but the Image as an indicator.
- 3. Location Selector: Location selector is the location of the element, which is X and Y axes.
Select
Select action is used to select an item from a combo box or a list box.
1. XPath: HTML Selector of the element into which data is to be passed.
2. Option value: The option value of the select element to be passed.
Conditional Actions
- 2. Variable: Variable name that needs to be compared with the value. The variable field also has a dropdown menu that contains URL(), Title(), and Text() to operate on a webpage.
- 3. Condition: Contains operators such as contains, not contains, equal to, not equal to, greater than, greater than or equal to, less than, less than or equal to, and Custom condition. In case if required to apply more than one condition using “AND”, “OR”, and “Not” operators can use the Custom condition option.
- 4. Value: Value field data is compared with the result of data from the variable field. To compare the string operands, pass both the operands in double quotes(“ “).
- 1. HTML Selector: Checks whether the given XPath exists on a webpage. If exists, a block of code will execute. Otherwise, Else block will execute.
- 2. Image Selector: Checks whether the given image exists on the current window. If exists, a block of code will execute. Otherwise, Else block will execute.
- 1. HTML Selector: Checks whether the given XPath is visible on a webpage. If visible, a block of code will execute. Otherwise, Else block will execute.
- 2. Image Selector: Checks whether the given image is visible on the current window. If visible, a block of code will execute. Otherwise, Else block will execute.
If, IfElse, ElseIf
1. Enables to route workflow execution to different step groups depending on the conditions provided.
Properties
Custom
1. It checks the condition. If the condition is met, a block of code will execute. Otherwise, Else block will execute.
Present
Visible
Count
Checks the count of the XPath based on the condition. If the condition is met, a block of code will execute. Otherwise, Else block will execute.
Exception Handling
Try Catch
Whatever be the actions involved in the flow, add each step or action in the Try block. After running the flow, if any exceptions are found, those exceptions will be handled by the Catch block
Excel Actions
Note
If passing the Excel path by using a variable then the variable type should be a string. If it is backward slash use double backward slashes (Example: C:\test\excel123.xlsx), and if it is a forward slash, then use a single slash (Example: C:/test/excel123.xlsx) for every Excel Action. Then pass that variable within the tilde symbol (Example: `VaribleName1`).
When inserting a single quote data into Excel, Replace the single quote ' with \’.
Open Spreadsheet
Opens an Excel workbook in the background mode and provides scope for Excel Activities. When the execution of this activity ends, the specified workbook and the Excel application are closed if a Workbook Application variable is provided in the Output. This activity can only be used if the Microsoft Excel application is installed on the machine.
Properties
Select an Excel File: Use the full path of the Excel spreadsheet. Only String variables and Strings are supported. To pass the Excel workbook path through variable, mention that variable name within the tilde symbol in that field (Example: `VaribleName`), otherwise click on File symbol and select that file.
Get SheetNames
Returns a list of all the sheet names in a workbook as String variables, ordered by their index (index value starts from zero).
Properties
1. Full Path: Need to give the full path of the Excel spreadsheet. This option is shown only while taking the Get Sheet Names action directly. If dragged into the open spreadsheet activity, it will not ask the path, and no need to mention the path.
2. Select Variable: Create one list variable and select that variable from the drop-down. Here only the list variable is allowed to select from the drop-down. The result value will be stored in the list variable.
Get Column
Reads the values from a column beginning with the cell specified in the Starting Cell property field, and stores them in a list variable.
Properties
1. Full Path: Need to give the full path of the Excel spreadsheet. This option is shown only while taking the Get Column action directly. If dragged into the open spreadsheet activity, it will not ask the path, and no need to mention the path.
2. Sheet Name: Enter the name of the sheet containing the column that needs to be read. Only String variables and strings are supported (Example: Sheet1).
3. Column Address or Number: The cell from which to start extracting the column data. Mention Column name A or B or number of the column.
4. Select Variable: Need to create the variable as a list. Stores the information from the specified spreadsheet column in a variable. Only list variables are supported.
Delete Column
Deletes a column from a spreadsheet-based on its name.
Properties
1. Full Path: Enter the full path of the Excel spreadsheet to be used. This option is shown only while taking the Delete Column action directly. If dragged into the open spreadsheet activity, it will not ask the path, and no need to mention the path.
2. Sheet Name: Enter the name of the sheet containing the column that needs to be deleted. Only String variables and strings are supported (Example: Sheet2).
3. Column Address or Number: The name or number of the column to be deleted. Only String variables and number values are supported.
Get Row
Reads the values from a row beginning with the cell specified in the Starting Cell field and stores it in a list variable.
Properties
1. Full Path: Enter the full path of the Excel spreadsheet being used. This option is shown only when taking the Delete Column action directly. If dragged into the open spreadsheet activity, it will not ask the path, and no need to mention the path.
2. Sheet Name: Enter the name of the sheet containing the column to be deleted. Only String variables and strings are supported (Example: Sheet1).
3. Row Number: Enter the exact row number to be read. Only String variables and number values are supported.
4. Select Variable: Need to create the variable as a list. Stores the information from the specified spreadsheet row in a variable. Only list variables are supported.
Delete Row
Remove a specified row at a certain position.
Properties
1. Full Path: Enter the full path of the Excel spreadsheet. This option is shown only when taking the Delete Row action directly. If dragged into the open spreadsheet activity, it will not ask the path, and no need to mention the path.
2. Sheet Name: Enter the name of the sheet containing the Row that needs to be deleted. Only String variables and strings are supported (Example: Sheet1).
3. Row Number: Enter the exact number of the row to be deleted. Only String variables and number values are supported.
Get Cell
Reads the values from a row beginning with the cell specified in the Starting Cell field and stores it in a string variable.
Properties
1. Full Path: Enter the full path of the Excel spreadsheet. This option is shown only when taking the Get Cell action directly. If dragged into the open spreadsheet activity, it will not ask the path, and no need to mention the path.
2. Sheet Name: Enter the name of the sheet containing the Cell to be read. Only String variables and strings are supported (Example: Sheet1).
3. Cell Address: The exact Cell address that needs to be read. Only String variables and number values are supported.
4. Select variable: Create the variable as string Stores the information from the specified spreadsheet Cell in a variable. Only string variables are supported.
Write Cell
Writes a value into a specified spreadsheet cell. If the sheet does not exist, a new one is created with the Sheet Name value. If a value exists, it is overwritten. Changes are immediately saved.
Properties
1. Full Path: Enter the full path of the Excel spreadsheet being used. This option is shown only when taking the Write Cell action directly. If dragged into the open spreadsheet activity, it will not ask the path, and no need to mention the path.
2. Sheet Name: Enter the name of the sheet containing the Cell to be written. Only String variables and strings are supported (Example: Sheet1).
3. Cell Address: Enter the exact Cell address to be written. Only String variables and number values are supported.
4. Cell Value: Enter the cell value to be written. It allows only the String and String variable. If passing the value through variable, mention the variable within the tilde symbol (Example: `VaribleName`).
Get Range
Reads the value of an Excel range and stores it in a DataTable variable. If the range isn't specified, the whole spreadsheet is read. If a particular range is specified, it reads the values from that specific range only.
Properties
1. Full Path: Enter the full path of the Excel spreadsheet. This option is shown only when taking the Get Range action directly. If you drag it into the open spreadsheet activity, it will not ask the path, and hence no need to mention the path.
2. Sheet Name: Enter the name of the sheet containing the Cell that needs to be read. Only String variables and strings are supported (Example: Sheet1).
3. Range: Specify the range of cells to be read. If this value is not specified, the whole spreadsheet is read. Only String variables and strings are supported to mention that range (Example: B5: G15).
4. Include Headers: If the Include Headers checkbox is checked, the headers' data will also be included in the result.
5. Text Format: If the Text Format checkbox is checked, the results will be displayed in the row format.
Note: Do not check the Text format checkbox in case if writing the range data into another Excel sheet.
6. Values: In case there are any formulas in the retrieving data, check the Values checkbox to retrieve the data and not the formulas.
7. Select variable: Create the variable as DataTable. It stores the information from the specified spreadsheet range values in a variable. Only DataTable variables are supported.
Write Range
Writes the data from a DataTable variable in a spreadsheet starting with the cell indicated in the Starting Cell field. If the starting cell is not specified, the data is written starting from the A1 cell. If the sheet does not exist, a new sheet is created with the value specified in the Sheet Name property. All cells within the specified range are overwritten. Changes are immediately saved.
Properties
1. Full Path: Enter the full path of the Excel spreadsheet. This option is shown only when taking the Write Range action directly. If dragged into the open spreadsheet activity, it will not ask the path, and no need to mention the path.
2. Sheet Name: Enter the name of the sheet containing the range that needs to be written. Only String variables (Example: `VaribleName`) and strings are supported (Example: Sheet1).
3. Range: Specify the cell from which to start writing the data. Only string variables and strings are supported (Example: A1 or B1).
4. Select variable: Select the variable the data that needs to be written to the specified range, as a DataTable variable. Only DataTable variables are supported.
Append Range
Adds the information stored in a DataTable variable to the end of a specified Excel spreadsheet. If the sheet does not exist, a new one is created with the name indicated in the Sheet Name field.
Properties
1. Full Path: Enter the full path of the Excel spreadsheet. This option is shown only when taking the Append Range action directly. If dragged into the open spreadsheet activity, it will not ask the path, and no need to mention the path.
2. Sheet Name: Enter the name of the sheet containing the Cell that needs to be read. Only String variables and strings are supported (Example: Sheet1).
3. Range: Enter the name of the sheet in which the range that needs to be appended. Only String variables (Example: `VaribleName`) and strings are supported (Example: Sheet1).
4. Select variable: Select the variable the data that needs to be appended to the specified range, as a DataTable variable. Only DataTable variables are supported.
Delete Range
Deletes a specified range of data in an Excel workbook.
Properties
1. Full Path: Enter the full path of the Excel spreadsheet. This option is shown only when taking the Delete Range action directly. If dragged into the open spreadsheet activity, it will not ask the path, and no need to mention the path.
2. Sheet Name: Enter the name of the sheet containing the range that needs to be deleted. Only String variables (Example: `VaribleName`) and strings are supported (Example: Sheet1).
3. Range: Specify the range of data to be deleted. If this value is not specified, the whole spreadsheet data is deleted. Only String variables and strings are supported to mention that range (Example: B5: G15).
Get Cell Color.
Extracts the background Color of a cell and saves it as a Color variable. It can be used within the Open Spread Sheet Action and outside the Open Spread Sheet Action.
Properties
1. Full Path: The full path of the Excel spreadsheet that you want to use. This option is shown only if you are taking the Get Cell Color action directly. If you drag into the open spreadsheet activity, it will not ask the path, and no need to mention the path.
2. Sheet Name: The name of the sheet in which the cell color name that you want to read. Only String variables (Eg: `VaribleName`) and strings are supported (Eg: Sheet1).
3. Cell Address: The exact Cell address that you want to get the color. Only String variables and strings are supported (Eg: B1).
4. Select Variable: Create and select the variable as a string. Stores the name of the color from the specified spreadsheet Cell in a variable. Only string variables are supported.
Set Range Color
Changes the color of a specified cell or cell range using a Color variable. It Can only be used within the Open Spread Sheet action and outside the Open Spread Sheet Action.
Properties
1. Full Path: The full path of the Excel spreadsheet that you want to use. This option is shown only if you are taking the Set Range Color action directly. If you drag it into the open spreadsheet activity, it will not ask the path and no need to mention the path.
2. Sheet Name: The name of the sheet in which the cell color name that you want to read. Only String variables (Eg: `VaribleName`) and strings are supported (Eg: Sheet1).
3. Range Address: The range address that you want to set the color. Only String variables and strings are supported (Eg: A1: B5 or A3).
4. Color: Select the color from the drop-down to set the range color. (Eg: green or black etc).
Get Cell Formula
Extracts the formula used in the specified Excel cell.
Properties
1. Full Path: The full path of the Excel spreadsheet that you want to use. This option is shown only if you are taking the Get Cell Formula action directly. If you drag into the open spreadsheet activity, it will not ask the path, and no need to mention the path.
2. Sheet Name: The name of the sheet in which the cell formula that you want to read. Only String variables (Eg: `VaribleName`) and strings are supported (Eg: Sheet1).
3. Cell Address: The exact Cell address that you want to get the cell formula. Only String variables and strings are supported (Eg: B1).
4. Select Variable: Create and select the variable as a string. Stores the formula from the specified spreadsheet Cell in a variable. Only string variables are supported.
Filter Column
Filter column action is used to Filter the specified column data from an excel sheet, based on the specified column values.
Properties
1. Full Path: Enter the full path of the Excel spreadsheet. This option is shown only while taking the filter column action directly. If dragged into the open spreadsheet activity, it will not ask the path, and no need to mention the path.
2. Sheet Name: Enter the name of the sheet containing the column that needs to be filtered.
3. Include headers: Click the checkbox to get the data from the headers too.
4. Column name: Here you need to provide the column name which you want to extract data.
5. Values: The data which you want to filter.
6. Select variable: Need to create the variable as a data table. Stores the information from the specified spreadsheet filter column in a variable. Only data table variables are supported.
Convert XLS to XLSX
Converts the Excel workbook from XLS to XLSX format.
Properties
1. Full Path: Give the full path of the Workbook (.xls file) which you want to convert from XLS to XLSX format.
2. Destination File Name: File name is optional. If a file name is not mentioned, then the Workbook is converted from xls to xlsx format with the same name in the same location. If a file name is mentioned for that file, the new file will be created in xlsx format with that filename. If in conversion already a file exists with the same name in that location in xlsx format, then it will overwrite the file with the same name. If passing the file name through a variable, you need to mention that variable within the tilde symbol (Eg: `varibleName`).
Insert Column
The Insert Column action is used to create a new column into an Excel file.
Properties
1. FullPath: Need to give the full path of the excel spreadsheet. This option is shown only while taking the insert column action directly. if dragged into the open spreadsheet activity, it will not ask the path, and no need to mention the path.
2. SheetName: Enter the name of the sheet containing the insert column that needs to be inserted.
3. Number of columns: Need to give the number of columns to be added in the excel.
4. Positions: The position from where the column that is to be inserted, the number should be given.
Create Excel
This action is used to create an Excel file in the specified folder with the specified name and extension.
Properties
1. FullPath: Enter the path of the folder where the new file is to be created.
2. FileName: Enter the name and extension for the file to be created.
Create Pivot Table
This action is used to create a pivot table for the specified Excel sheet with defined columns, rows, and values.
Properties
1. Enter FullPath: Enter the full path of the Excel spreadsheet. This option is shown only when taking the Get Range action directly. If you drag it into the open spreadsheet activity, it will not ask the path, and hence, no need to mention the path.
2. Enter Sheet Name: Enter the name of the sheet containing the Cell that needs to be read. Only String variables and Strings are supported (Example: Sheet1).
3. Table Range: Specify the range of data to be added to the pivot table.(Example: R1C1: R5C3, where R is for row and C is for Column).
4. Sheet Title: Specify the sheet name into which the created pivot table data is to be added.
5. Add/ Remove: To add or remove the new fields.
6. Header Names: Specify the header name of the columns.
7. Header Area: Specify the Header area to be added in the created pivot table as Row, Column, or Values.
8. Function: Once the value option is selected in the Header area, the functions available will be visible.
Refresh Excel File
This action is used to refresh the Excel file.
Properties
1. FullPath: Enter the full path of the Excel spreadsheet. This option is shown only when taking the Get Range action directly. If you drag it into the open spreadsheet activity, it will not ask the path, and hence no need to mention the path.
Google APIs
Google APIs, helps us communicate with Google Services and their integration to other services.
API Configuration: Configures the APIs to use the services
Properties
Select Authentication type from below:
Note: To download the credentials.json file:
This is a one-time process.
Create Spreadsheet:
Create a Google spreadsheet.
Properties
Spreadsheet Title: Specify the spreadsheet name in the available text field to create a spreadsheet with the specified name.
Get Spreadsheet data:
Get data from the specified Google spreadsheet.
Properties
Google Spreadsheet URL: Specify the URL of the Google spreadsheet from which you need to retrieve the data.
Sheet name: Specify the sheet name.
Range: Specify the range of cells.
Select variable: The variable name into which the data is to be stored. The variable should be of a List type.
Write Spreadsheet Data:
Write data into the specified Google spreadsheet.
Properties
Google Spreadsheet URL: Specify the URL of the Google spreadsheet into which you need to write the data.
Sheet name: Specify the sheet name.
Range: Specify the range of cells.
Select variable: The variable name from which the data is to be retrieved. The variable should be of a List type.
Send Message to Google Chatbot:
To send message to the specified chat room.
Properties
Space Name: Specify the space name into which the data is to be shared.
Message: The message that is to be shared in the chat room.
Loops
For
Loops are an efficient way to complete work through multiple iterations until the targeted result is achieved.
Properties
1. Index Value: The variable that the user wants to iterate.
2. Initial value: The index value of the element to start with. In general, the index starts with zero.
3. Range: The index value of the element to end with. To loop indefinitely, use range value as the infinity. This loops 1024 times as the infinity variable is preset to 1024.
Jump Statements
Break
Use this statement only for a loop. If the iteration needs to stop after a certain number of executions, then use this Break statement.
Continue
Use the Continue action in a loop to execute several iterations continuously
Techforce.ai OCR
This action is used to extract the data from the inputs provided. The extracted data will be stored in a variable for further use.
Properties
1. Indicate on-screen using location: Click on Select Location button. It opens the new window to select the location. Select the location and press Enter. Select any string variable from the drop-down to store the result of the OCR.
2. Indicate on Screen: Click on the Insert Screenshot button. It opens the new window to select the area. Select the area and press Enter. Select any string variable from the drop-down to store the result of the OCR.
3. Select Image: Click on the Insert Image button. It opens the new window to select the image. Select the image from the path. Select any string variable from the drop-down to store the result of the OCR.
4. Select PDF: Select the required input PDF file by clicking on the path button. Select an option from All/ Single/ Multiple to extract data from all pages/ from a single page/ from multiple pages.
Select any string variable from the dropdown to store the result of the OCR.
Files and Folders
Create Files /Folders
Creates a file/folder in the specified location.
Properties
File
File Path: Give the full path of the file to be created with extension. The path can be given by assigning it to a variable using double slashes. For example, path = C:\Desktop\filename.Extension. The variable should be included within `` while passing to file path.
Folder
Folder Path: Give the full path of the folder to be created. The path can be given by assigning it to a variable using double slashes. For example: path = C:\Desktop\foldername. The variable should be included within `` while passing to file path.
Overwrite: The folder will be overwritten if there is any folder existing with the same name in the given path.
Skip: The creation of the folder will be skipped if there is any folder existing with the same name in the given path.
Write To File
Appends/Overwrites the specified string or the data assigned to a variable to the specified file.
Properties
File Path: Give the full path of the file. The path can be given by assigning it to a variable using double slashes. For example: path = C:\Desktop\filename.Extension. The variable should be included within `` while passing to file path.
Overwrite: The file data will be overwritten with the string/variable data if any data is existing in the file.
Content to Write: Give the string/variable to be written to the file specified. If it is a string, it can be given directly. If it is a variable, it should be included in ``.
Overwrite: The file data will be overwritten with the string/variable data if any data is existing in the file.
Append: The file data will be appended with the string/variable data if any data existing in the file.
Copy Files /Folders
Copy/Move a file from one location to another location as specified.
Properties
File
Source Path: Give the full path of the file to be copied/moved including the extension. The path can be given by assigning it to a variable using double slashes. For example: path = C:\Desktop\filename.Extension. The variable should be included within `` while passing to file path.
Destination Path: Give the full path of the location where the file needs to be copied/moved including the extension. The path can be given by assigning it to a variable using double slashes. For example: path = C:\Desktop\filename.Extension. The variable should be included within `` while passing to file path.
Copy: Makes a copy of the file specified from the source path to the destination path.
Move: Moves the file specified in the source path to the destination path.
Overwrite: Overwrites the file while moving/copying the file specified if there is a file existing with the same name in the destination.
Skip: Skips the copying/moving of the file specified, if there is a file existing with the same name in the destination.
Folder
Source Path: Give the full path of the folder to be copied/moved. The path can be given by assigning it to a variable using double slashes. For example: path = C:\Desktop\foldername. The variable should be included within `` while passing to file path.
Destination Path: Give the full path of the location where the folder needs to be copied/moved. The path can be given by assigning it to a variable using double slashes. For example: path = C:\Desktop\foldername. The variable should be included within `` while passing to file path.
Copy: Makes a copy of the folder specified in the source path to the destination path.
Move: Moves the folder specified in the source path to the destination path.
Overwrite: Overwrites the folder while moving/copying the folder specified if there is a folder existing with the same name in the destination.
Skip: Skips the copying/moving of the folder specified if there is a folder existing with the same name in the destination.
Get Folder Contents
Lists the contents of the folder based on the filter criteria.
Properties
File
Folder Path: The full path of the folder from where the contents to be retrieved. The path should be given using the forward-slash (/). Example: C:/Desktop/FolderName. If it is given by variable, it should be included in ``. for ex: `variable name`.
Variable: Variable name to list the contents of the folder. The result will be stored in a list.
Which Contents to List
Folders: Lists the folders in the folder specified in the Folder Path.
Files: Lists the files in the folder specified in the Folder Path.
Filter: Filters the files based on the given extension like .png, .xls, .xlsx etc.
Filter Criteria
Date Modified: Filters the contents of the folder based on the date modified selected in the From Date and To Date fields.
Delete File/Folder
Deletes the file/folder specified.
Properties File
File Path: The full path of the file to be deleted including the extension. The path can be given by assigning it to a variable using double slashes. Example: path = C:\Desktop\filename.Extension. The variable should be included within `` while passing to file path.
Folder
Folder Path: The full path of the folder to be deleted. The path should be given using the forward-slash (/). Example: C:/Desktop/FolderName. If it is given by variable, it should be included in ``. For example: `variable name`.
Read File
Reads all the content from the file specified and stores it into a variable specified.
Properties File
File Path: The full path of the file to be read including the extension. The path can be given by assigning it to a variable using double slashes. Example: path = C:\Desktop\filename.Extension. The variable should be included within `` while passing to file path.
Variable: Variable name to store the contents of the file specified.
Unzip Files
This action is used to unzip a zip file and extract it to the same location or other destination locations.
Properties
Source File to extract: Enter the path of the zip file.Extract to the same location (Source location): If you want to extract data to the same location, check the checkbox, and the extracted data will be stored in the source location folder.
Destination folder: Enter the path of the destination folder to store the extracted data. This option is available only if the above checkbox is not checked.
Overwrite: Overwrites the file while moving/copying a file if there is a file existing with the same name in the destination folder.
Skip: Skips the copying/moving of the file specified if there is a file existing with the same name at the destination.
Export Word to PDF
This action is used to convert the selected Word file into a PDF file and store the file with the specified name.
Properties
Select Document: Select the Word document, which is to be exported.
Save File as: Specify the file path with name and extension where the file is to be saved.
Overwrite: Overwrites the file while moving/copying a file if there is a file existing with the same name in the destination folder.
Skip: Skips the copying/moving of the file specified, if there is a file existing with the same name at the destination.
Secure FTP
Connect
Enables USER to connect to a secured server via entering credentials
Properties
Host: The User needs to provide the IP address of the host.
Username: Need to provide the Username for the host to connect.
Password: Need to provide the password for the host to connect.
Port: Need to give the port address.
Get File
The User can GET a single file, upon specifying a remote & local path including the file name.
Properties
1. Remote Path: Need to give the server file path, which is the target path including file name and extension.
2. Local Path: Need to give the destination path including file name and extension.
Put File
The User can PUT a single file, upon specifying a remote & local path including the file name.
Properties
1. Remote Path: Need to give the server destination Path including file name and extension to put the file.
2. Local Path: Need to give the Source path including the file name and extension of the local machine.
Get Files
The User can GET multiple files, upon specifying a remote & local folder path.
Properties
1. Remote Path: Need to give the server folder path which is the target path.
2. Local Path: Need to give the destination folder path.
Put Files
The User can PUT a single file, upon specifying a remote & local path including the file name.
Properties
1. Remote Path: Need to give the destination path of the server machine including folder name.
2. Local Path: Need to give the Source path of the local machine.
Delete
The User can delete a file in a specified path or folder.
Properties
1. Remote Path: Need to give the file path including name and extension of the server machine.
Delete Files
Users can delete the file(s) in a specified path or folder.
Properties
1. Remote Path: Need to give the folder path of the server machine.
Move Remote File
To transfer a file from one path to another path in a remote server, MOVE REMOTE FILE action is used.
Properties
1. Remote source: Give the server file path including filename and extension, which is the source path.
2. Remote Destination: Give the destination path.
Move Remote Files
To move multiple files from one location to another location in a remote server.
Properties
1. Remote source: Give the server folder path, which is the source path.
2. Remote Destination: Give the destination path.
Create New Folder
This action is used to create a new folder in the remote machine.
Properties
Remote Folder Path: Enter the folder path in the remote machine where the new folder is to be created.
Overwrite: Overwrites the file while moving/copying a file if there is a file existing with the same name at the destination.
Skip: Skips the copying/moving of the file specified if there is a file existing with the same name at the destination.
Delete Folder
Enter the path of the folder, which needs to be deleted in the remote machine.
Properties
Remote Folder Path: Enter the path of the folder, which needs to be deleted in the remote machine.
CSV Actions
CSV Header
This action is used to send the headers to a specific CSV file.
Properties
1. CSV File Path: The full path of the CSV file.
2. Header Name: Provide the header values to be passed to the CSV file. The user can give multiple values by pressing Enter.
CSV Row
This action is used to create the data row values in the specified CSV.
Properties
1. CSV File Name: Use the full path of the CSV file.
2. Variable: Provide any list variable to store the row data to the file.
Programming
Variables
String Format
The string format action is used to manipulate the strings according to the required format. The string format contains “Substring”, “Replace”, “Match”, “Split”, “Trim”, “ToUpperCase”, “ToLowerCase” methods. Either string values or RegExp can be used in the methods.
Properties
Method:
1. SubString: The substring method is used to retrieve the part of the main string as per the given index values.
2. Replace: The replace method is used to replace the part of the main string as per the given values.
3. Match: The match method is used to match the part of the main string as per the given pattern.
4. Split: The split method is used to split the main string as per the given pattern.
5. Trim: The trim method is used to remove the white spaces from both ends of the main string.
6. To Upper Case: The to upper case method is used to convert all the characters of the main string into Capital case letters.
7. To Lower Case: The to lower case method is used to convert all the characters of the main string into Lower case letters.
8. Regular Expression Pattern: Give the regular expression to be performed in the field. Ex: [b-e]. This expression matches the characters in the input, which are in the range b to e. The user can give regular expression using a variable also, by assigning the expression to a variable in the variable section. The variable should be passed using the ``codes. Example: `variableName`.
9. Result variable: The result of the Matches action will be stored in a list variable provided
Date Format:
The Date format action is used to provide a customized date and time according to required formats.
Properties
1. Select Variable: The Result Date format will be stored in the variable provided. Select that variable from the drop-down.
2. Select: The required date can be selected from the available drop-down list, “Yesterday”, “Today”, “Tomorrow”, “Week start date”, “Month start date”, “Quarter start date” and “Year Start date”.
3. Date Format: The date and time format can be in which the result is to be displayed is passed.
Technologies
Techforce.ai RPA supports three programming languages. The supported languages are JavaScript, Python, and AutoHotkey. The user can add simple programming code snippets using this action.
JavaScript
The user can add a JavaScript code snippet using this action. It will support all ES5 methods and functions. The result of the action is stored in a default variable “js_result”. If the result is of JSON type, you can use the “js_json” variable.
Python
The user can add a Python code snippet using this action. The result of the action is stored in the “py_result” variable.
AutoHotkey
The user can add an AutoHotkey code snippet using this action. The result of the action is stored in the “vision_result” variable.
Mail Integration
The Mail Integration Activity contains all the mail activities used for creating automation projects. These activities enable robots to:
Configuring action flow with corresponding Outlook account.
Sending emails from Outlook account and other mail providers.
Receiving emails from corresponding Outlook and other mail providers.
Saving an attachment with the email.
Outlook
The outlook2016 actions are used to read and send emails from the Outlook application Read mail
Get Outlook Mail
Reads emails from the configured outlook account.
Properties
Inbox
1. Folder: Checks the Folders to get the Inbox, Sent Items, Custom, and Delete items options.
2. Inbox: To read the mail data of the specified email from the inbox.
3. Sent Items: To read the mail data from the specified number of sent emails.
4. Customs: To read the mail data from any specified folder.
5. Delete Items: To read the mail data from the specified number of deleted mail items.
6. Unread: Reads only unread emails if specified true. Reads emails if specified false and both read and unread emails if left empty.
7. Mark as Read: If checked this checkbox, marks all the unread emails as read mails.
8. Move to folder: Moves the read mails to the specified folder.
9. Top: Filters a particular number of emails that are present on the top.
10. Select Variable: Stores the emails collected from the corresponding email account.
Note
Here, the list type variable is used to store the email data.
1. To access the subject of the email, use variableName[index].Subject
2. To access the body of the email, use variableName[index].Body.
3. To access the From address of the email, use variableName[index].From.
4. To access the received Date and Time of the email, use variableName[index].Received.
We can send variable instead of direct text in to, subject, body
Send Outlook Mail:
Sends emails from the configured outlook account to the specified mail ids.
1. To: The receivers mail id.
2. CC: Mail id if need to add any.
3. BCC: Mail id if need to add any.
4. Subject: The subject of the mail to be sent.
5. Body: The body of the mail to be sent.
6. Attachments: Path of the attachment that is to be sent in the mail.
Note
You can send variables instead of direct text into To, Cc, Bcc, subject, body, and Attachments.
IMAP
IMAP (Internet Message Access Protocol) is a standard email protocol that stores email messages on a mail server but allows the end-user to view and manipulate the messages as though they were stored locally on the end user's computing device(s). This allows users to organize messages into folders, have multiple client applications know which messages have been read, flag messages for urgency or follow-up, and save draft messages on the server.
Get IMAP Mail:
Reads email from the specified email providers.
Example: Gmail, Yahoo, Rediff, So on.
Properties
Login
1. Email: The mail ID, which needs to be accessed to read emails. The user can also use the variable.
2. Password: Password of the corresponding mail, which needs to be read. The user can also use the variable.
Connection
1. Host: The IMAP host IP of the mail provider.
2. Port: The IMAP port number of the mail provider.
Options
1. Un Read: Use to Read Only Unread messages from Inbox.
Select Mail
1. Today: Reads only today’s (System Date) emails from the corresponding account.
2. Yesterday: Reads only yesterday’s emails.
3. Start of Week: Reads emails from the start day of the week.
4. Specific Date: Reads emails from a specific date.
5. Select Variable: Stores emails, which are read from the corresponding Gmail account.
Note
Here list type variable is used to store emails.
To access the subject of the mail, use variableName[index].Subject.
To access the body of the mail, use variableName[index].Body.
To access the From address of the mail, use variableName[index].From.
To access the received date and time of the mail, use variableName[index].Received.
POP3
POP3 (Post Office Protocol 3) is the most recent version of a standard protocol for receiving e-mail. POP3 is a client/server protocol in which e-mail is received and held for the user by the Internet server. Periodically, the user (or user’s client e-mail receiver) checks the mail-box on the server and downloads any mail, probably using POP3.
Get POP3 mail:
Read emails from the specified email provider account.
Example: Gmail, Yahoo, Rediff, So on.
Properties Login
1. Email: The mail ID required to access to read emails.
2. Password: Password of the corresponding mail account, which needs to be read. The user can also use a variable here.
Connection
1. Host: The POP3 host IP of the email provider.
2. Port: The POP3 port number of the email provider.
Select Mail
1. Top: Filter articular number of emails, which are present on the top.
2. Select Variable: Store emails, which are read from the corresponding email account.
Note:
Here list type variable is used to store emails.
To access the subject of the mail, use variableName[index].Subject.
To access the body of the mail, variableName[index].Body,
To access the from the address of the mail, variableName[index].From,
To access the received date and time of the mail, variableName[index].Received.
SMTP
Send SMTP Mail:
SMTP stands for simple mail transfer protocol.
Properties Login
1. Email: The mail ID required to send mails.
2. Password: Password of the corresponding mail account,
Connection
1. Host: The SMTP host IP of the email provider.
2. Port: The SMTP port number of the email provider.
Options
1. Host: The receiver’s mail id.
2. Port: Mail id if any.
3. BCC: Mail id if need to add any.
4. Subject: The subject of the mail to be sent.
5. Body: The body of the mail to be sent.
6. Attachments: Path of the attachment that is to be sent in the mail.
Note
You can send variables instead of direct text into To, Cc, Bcc, subject, body, and Attachments.
Save Attachments
Saves attachments in the local path, which are downloaded from the corresponding mail account.
Properties
Outlook: Select to download the attachments from the Outlook account.
IMAP/POP3: Select to download the attachments from other email providers.
File Path: The corresponding folder path to save the attachment.
Mail object: It is a Variable, which is used to get an attachment from an email.
Note: If there is no attachment in an email, it will ignore automatically.
Database Actions
To automate the process of database actions related to My SQL, PostgreSQL, Oracle, and MS SQL.
Properties
Select Database Type: Select either MySQL or PostgreSQL or Oracle or MS SQL based on the database type the user needs to work with.
Note When inserting a single quote data into Database, Replace the single quote ' with double quotes " ’.
Connection
The Connection action is used to connect to MySQL or PostgreSQL.
Properties
Please Select Database Type: Select either MySQL or PostgreSQL
Host: Pass the host IP address.
User Name: Pass the database name
Password: Pass the password details.
Port: Pass the port number.
Database Name: Pass the database name.
Note: In the connection action the property value of all fields should be passed directly and not using any variables.
Execute Query
The Execute Query action is used to execute the queries used in the databases.
Properties
Execute Query: Enter the Query to be executed in the Text area.
With columns checkbox is selected, it also retrieves the column names else only table data is retrieved.
Select variable: Select the data table type variable to store the data.
Enterprise Manager Console
Register with E-Manager Console
1. To get access to the e-manager console, goto https://emanager.Techforce.ai/try/signup?subscriptionId=0 enter your business email id and click on the SIGN-UP button.
Figure: Details
2. Upon successful registration, you will be redirected to the page which prompts for mail verification.
3. Go to your registered email and click on the verification link to complete the email verification process.
Figure: Verification Process
4. Once the verification process is done, you will be redirected to the page where you need to create a password to log in.
Figure: Password Process
5. Once you're done with the password process, you will be redirected to the login page.

Figure: Login Page
6.Once you are successfully logged in with your credentials, you will be redirected to the dashboard page.
Login
1. To Login into e-manager console
Figure: Login
2. Enter the credentials and click on the login button. You can see Dashboard, Action flows, E-Worker Machines, Queues, Schedules, and Secret Vault on the left menu.
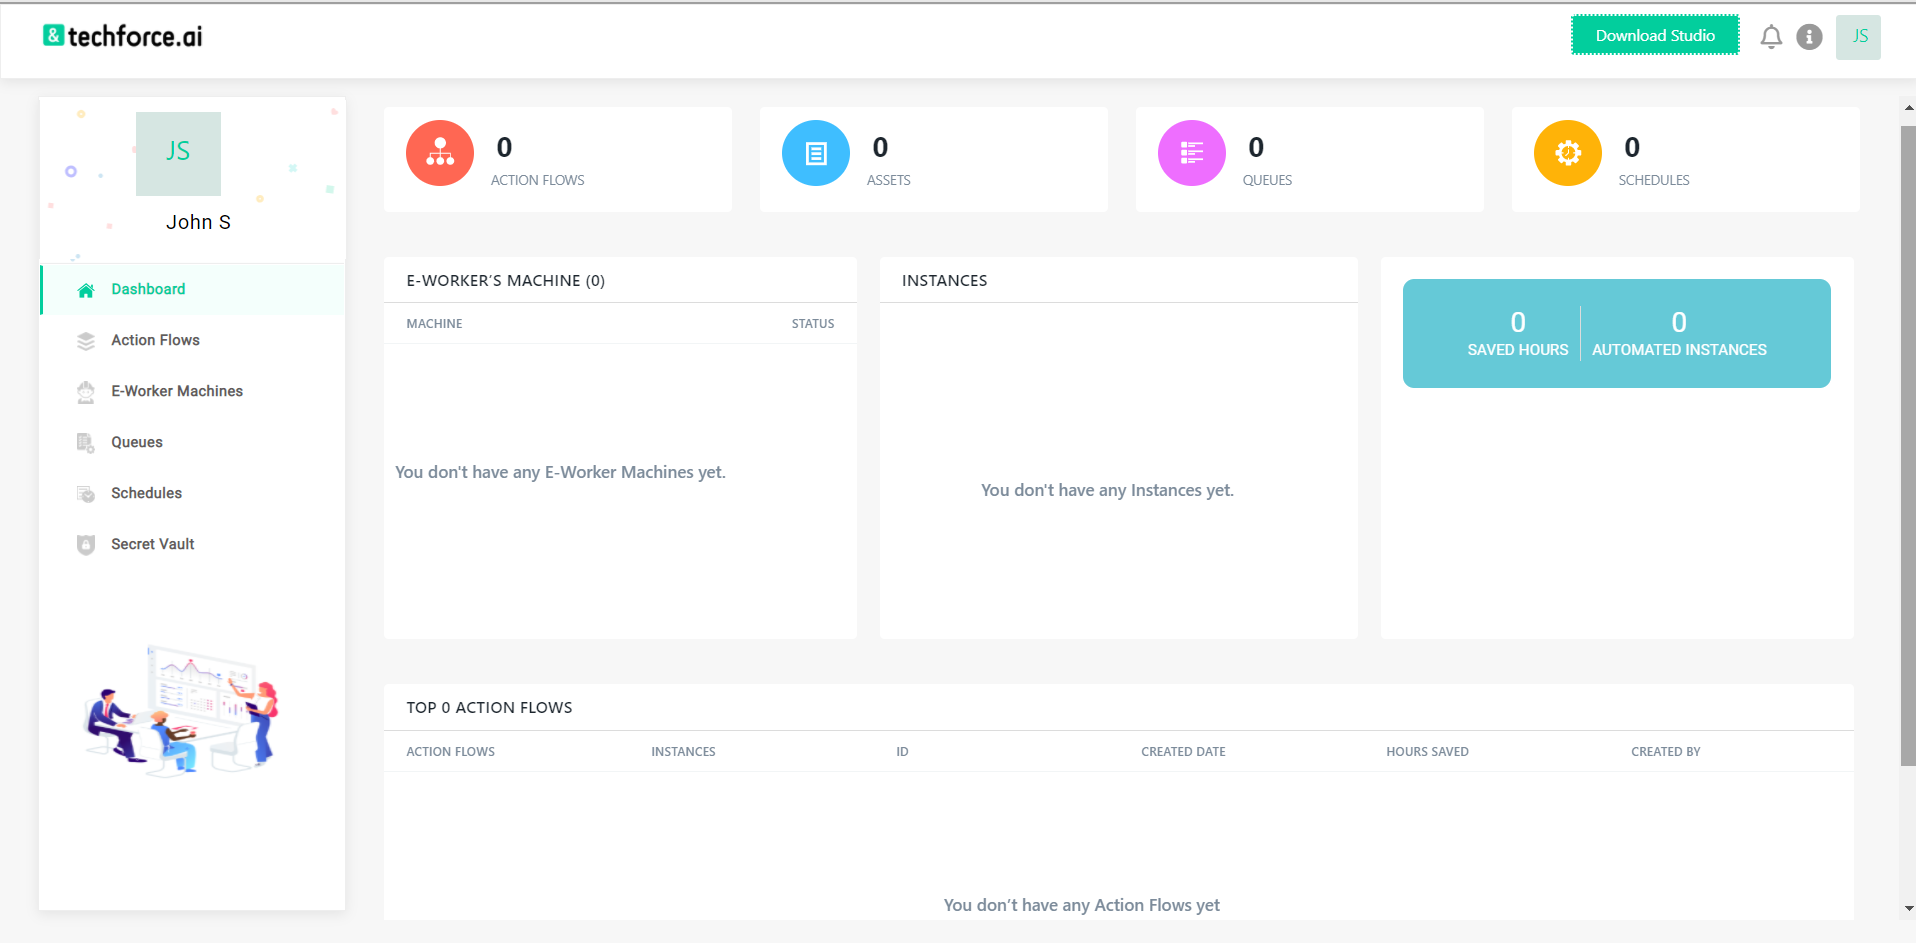
Figure: Dashboard Tab
3. The Dashboard shows the complete information of your e-manager console account.
4. The action flows tab shows the list of action flows published to the e-manager console.
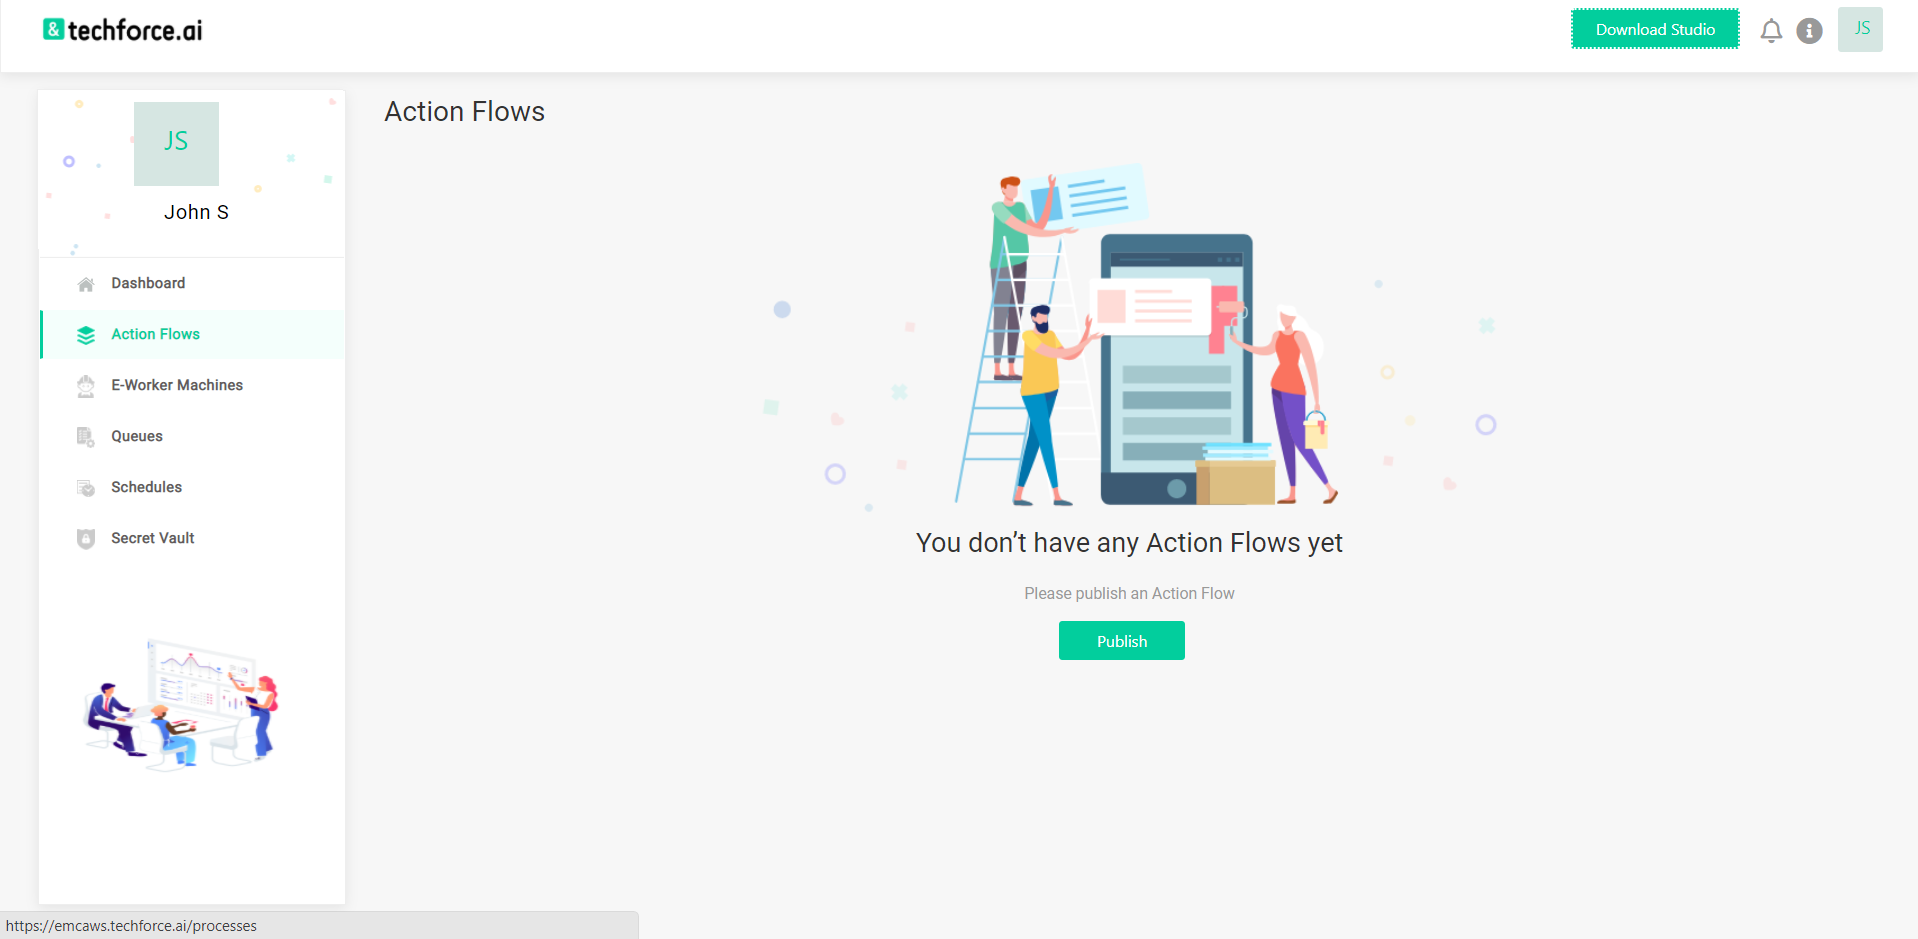
Figure: Action Flow Tab
5. The E-Worker Machine tab lists the machines registered with the e-manager console. It contains the required runtime to execute the action flows that are published to the e-manager console.

Figure: E-Worker Machines Tab
6. The Queues tab shows the current and pending tasks waiting for the execution in the e-worker machines.
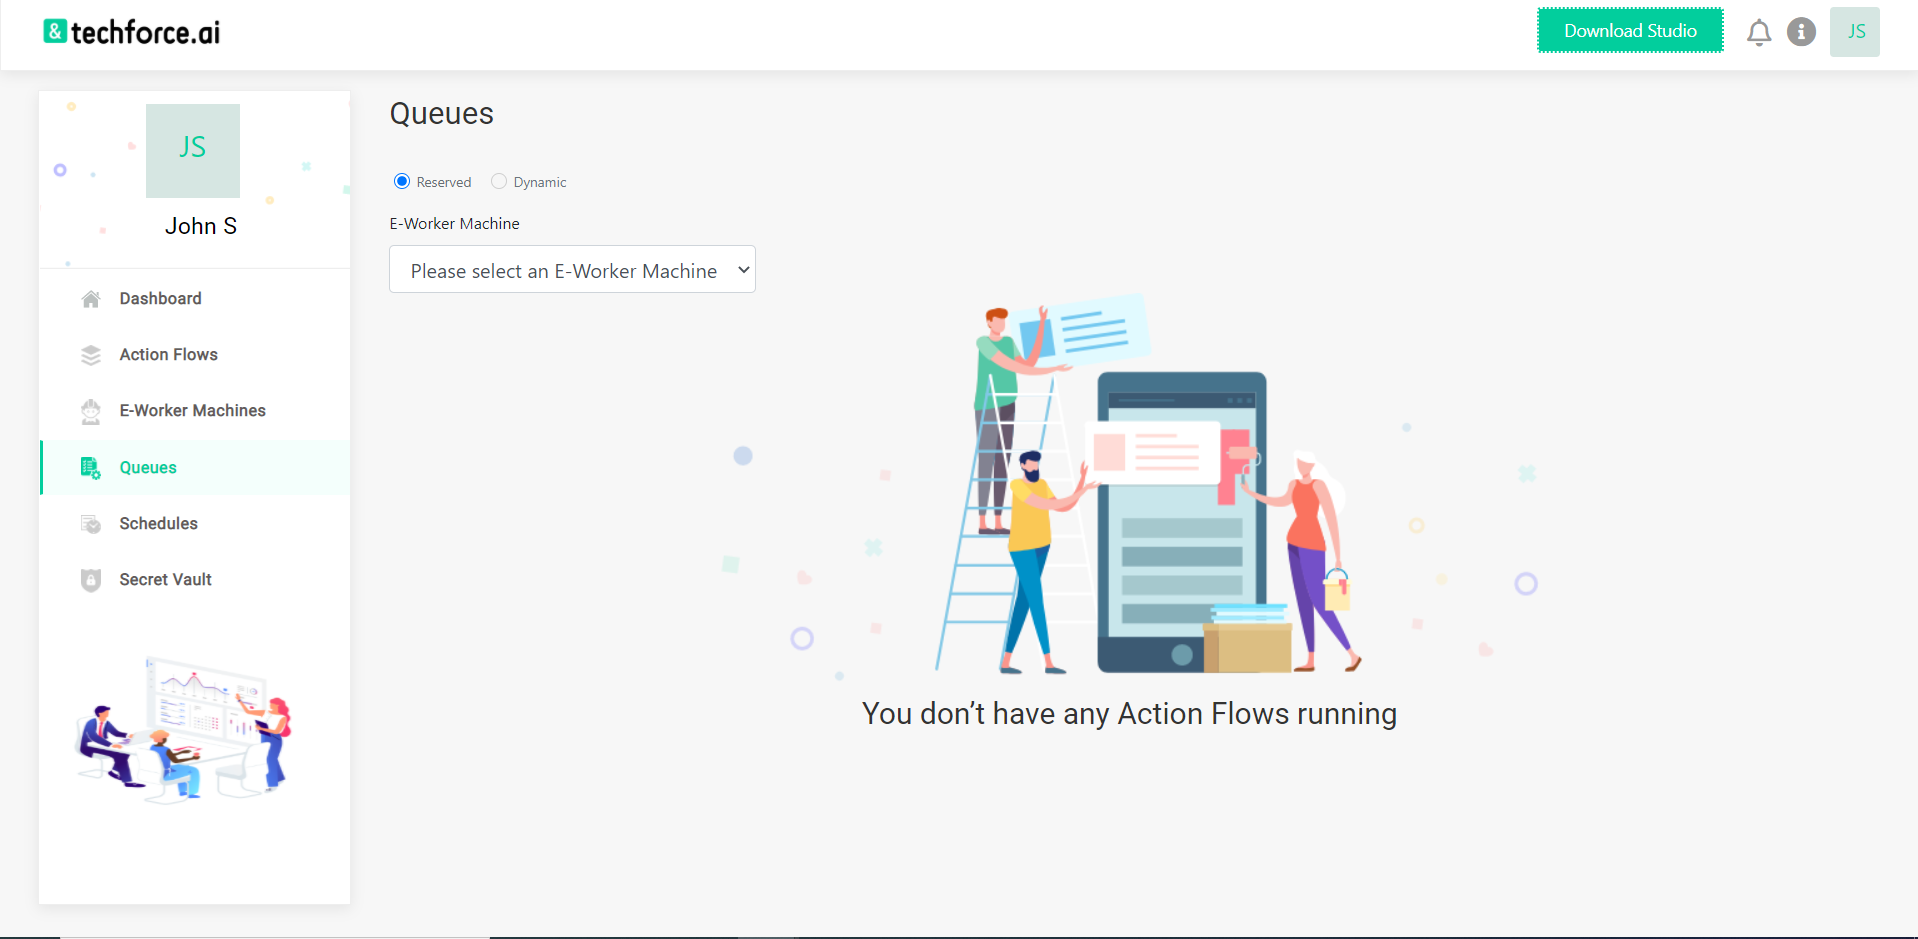
Figure: Queues
7. The functionality of the Schedules tab is to schedule/execute action flows repetitively on predefined intervals, like Minutes, Hourly, Daily, Weekly, Monthly or Advanced,

Figure: Schedules
8. Secret Vault is used to store sensitive information such as credentials, tokens, keys, etc. It supports different types of assets like Text, Boolean, Integer, and Credentials.

Figure: Secret Vault
Dashboard
1. 1. The dashboard provides the complete information of the e-manager console account on a single page.
Figure: Dashboard Tab
2. Count of published action flows, count of added assets, count of flows waiting in the queues for execution, count of scheduled flows.

Figure: Dashbord Details
3. E-Worker Machine’s name and its runtime status.
4. Details of instances like total count of executed tasks and individual count of the completed tasks, stopped tasks, and faulted tasks.
5. Count of the hours saved and count of the automated instances.
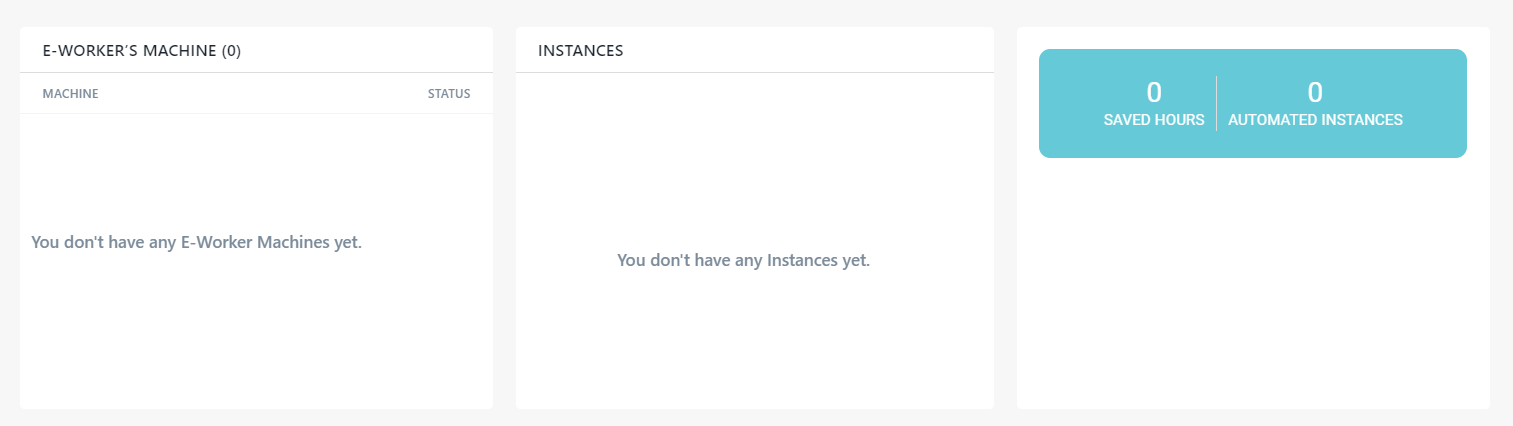
Figure: Dashbord Details
6. Details of the top 5 action flows like name of the flow, instances count of each flow, bot ID of each flow, information like date and time of the flow published at, hours saved by automating each flow, and email ID of the flow published account.

Figure: Dashbord Details
Process Management
Adding the Action Flows.
1. Log in to the e-manager console account to view the Action Flows screen. Click on the UPLOAD button at the top right corner and upload the Zip file of the RPA script onto the Action Flows. After uploading, execute the flow.
Figure: Action Flows Screen
2. Once the RPA flow is published in the e-manager console, you can see the complete details of the RPA flow like versions, Instances, flow ID, and date of creation.
3. Versions: It shows the information on the number of times the flow is published. Click on the versions to see the version number, created on, and published by information. There is a rollback option to execute the previous version and a download option to download the RPA flow.
4. Instances: It gives the information on the number of times the flow is executed. Click on the instances to see the version number of the executed RPA flow, executed e-worker machine, execution options, flow execution time, execution status, execution start time and end time, and execution logs.
5. Bot Id: Every published bot has a unique ID and is displayed in the bot ID.
6. Created Date: Provides the RPA flow’s recently published date.
Executing Action Flows
7. On the Action Flows page, upload the RPA flow and click on the PLAY button to execute the flow. After clicking on the play button, the following image will appear.
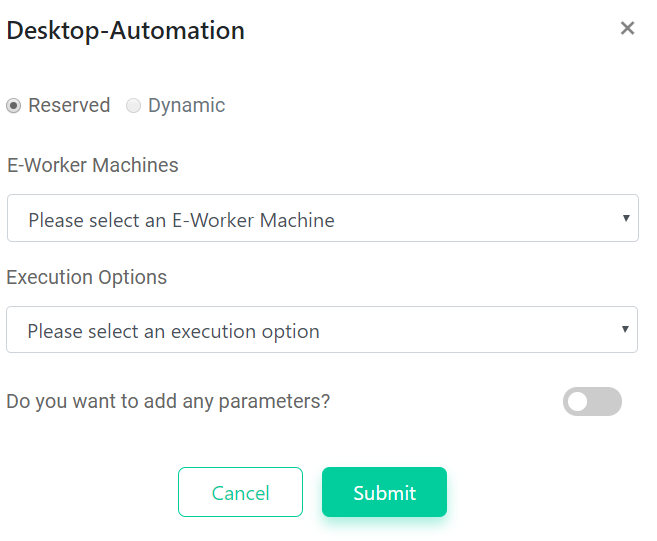
Figure: Action Flow Execution
8. Select the Execution Target Type (like Reserved). If the RESERVED option is selected as the execution type, then specify the e-worker machine.
9. Select the e-worker machine from the available list of added machines to execute the action flow.
10. Select the mode of execution as Chrome, Mozilla Firefox, Microsoft Edge, or Headless in the execution type list and click on the submit button.
Worker Management
Worker Management:
1. The main functionality of an E-Worker Machine is to execute the flows that are uploaded on the Action Flows page. So, after adding the e-worker machine, while executing the flows, select the e-worker machine that was created.
Figure: E-Worker Machine Screen
2. After creating an e-worker machine, the details of the e-worker machine, like worker ID, name, host, worker status, and so on can be seen.

3. Worker ID: : Every created worker will be assigned with a unique ID called Worker ID and it can be seen below the ID on the e-worker machine screen.
4. Name: The name of the registered e-worker machine can be seen below the name on the screen.
5. Host: The IP address of the e-worker machine.
6. E-Worker Type: Type of the e-worker machine.
7. Created: The date and time when the E-Worker machine was created.
8. Created By: Email ID of the created account.
9. Worker State: Status of the e-worker machine, like Stopped or --.
10. Runtime: Status of the machine, like Up, Idle, or Down.
11. Click on the three dots and view options like Stop, Start, Delete, and Settings.
12. Settings: Provides an option to enable or disable email alerts on the status of the worker machine. Also allows adding multiple email IDs to get the status alerts.
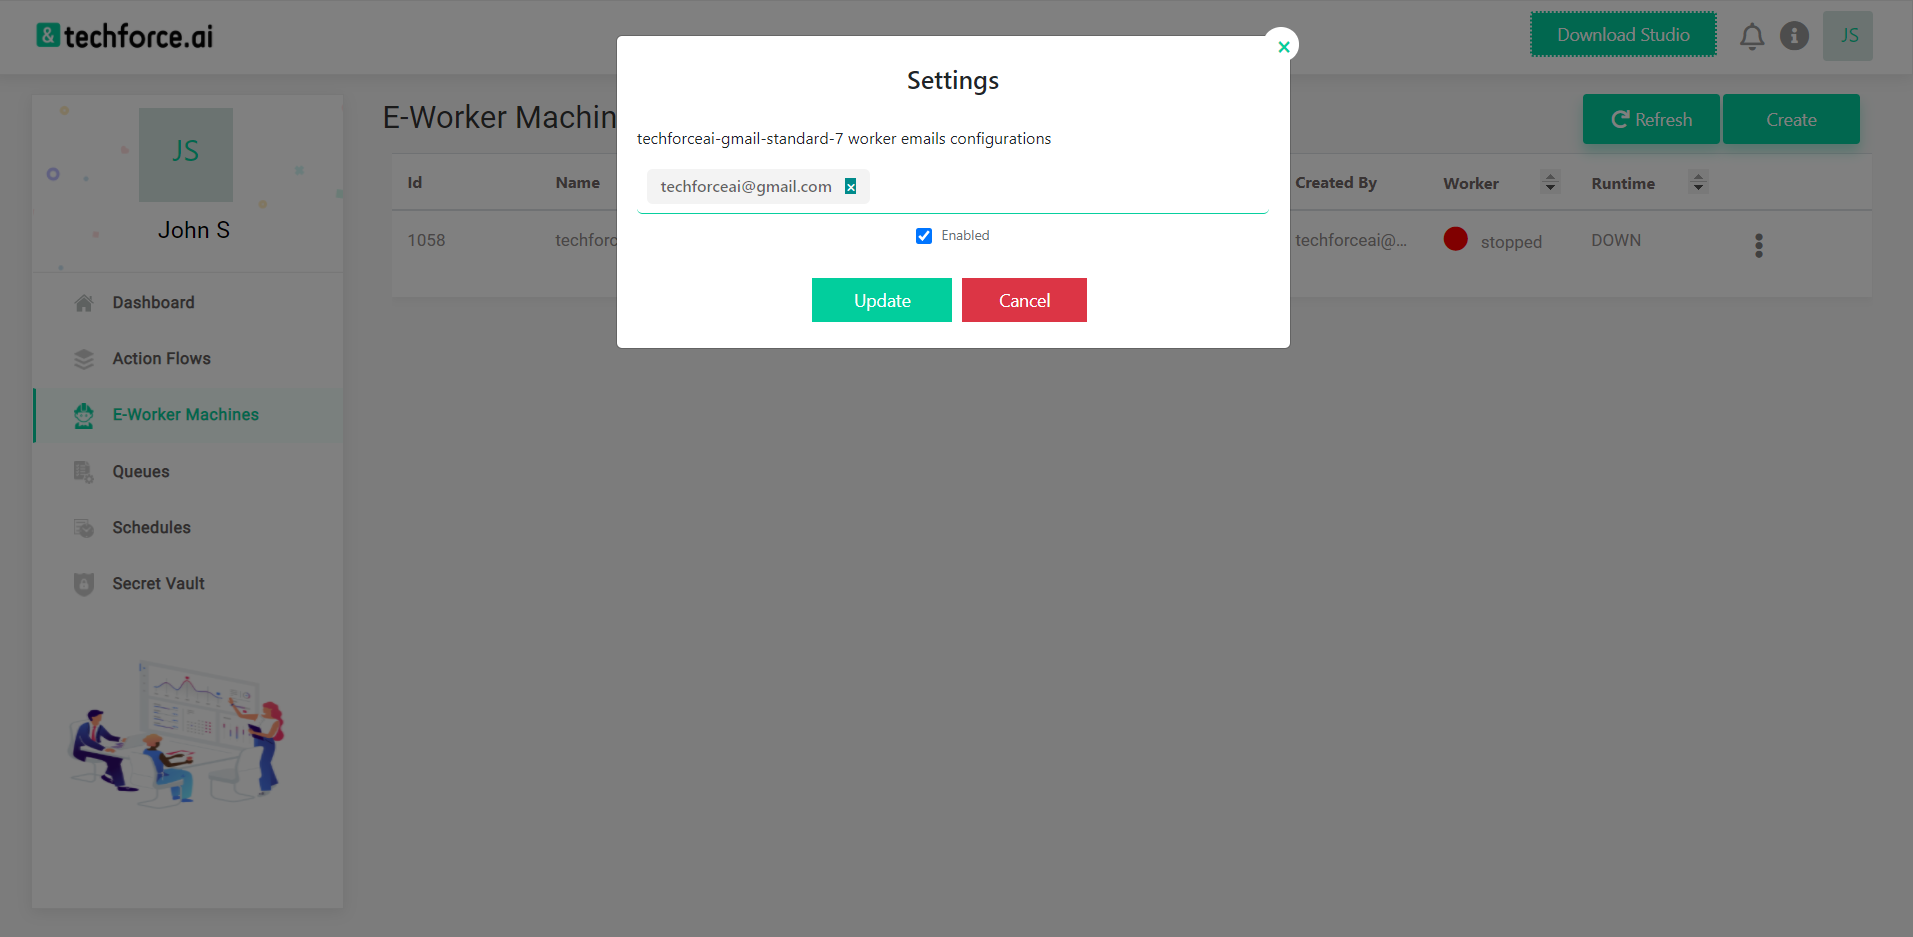
Figure: E-Worker Machine Details
E-Worker Machine Categories:
1. The worker category is the type of e-worker machine that is going to be registered. Currently, only the “Reserved” type can be created.
Reserved:
1. If an E-Worker Machine is created as “Reserved” then the flows can be executed only on that machine.
Creating an E-Worker Machine:
1. This is the E-Worker Machine screen before the action flows execution environment is created.
Figure: E-Worker Machine Screen
2. To create an e-worker machine, open the Techforce.ai studio, which will create an icon in the task tray. Open the task tray, and right-click on the studio icon. Click on settings and register. The following screen displays.
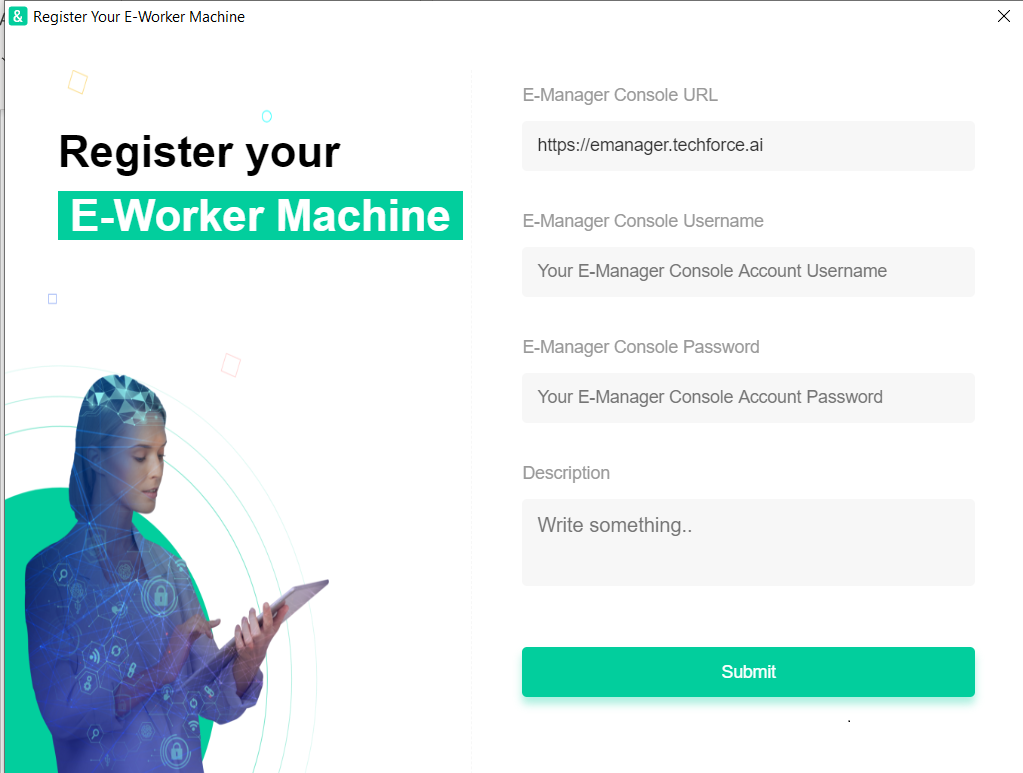
Figure: Register Your E-Worker Machine
3. Enter the details and click on SUBMIT. A message confirming successful submission will appear. This creates an e-worker machine. After creating the e-worker machine, the details of the e-worker machine, like name, host, and so on can be seen.
4. The following image shows the screen of the e-worker created. The details of the created e-worker machine can also be seen.
Figure: E-Worker Machine Details
Delete E-Worker Machine
1. To delete an e-worker machine created, click on the three dots available in the details of the machine. From the list of options, click on the delete option.
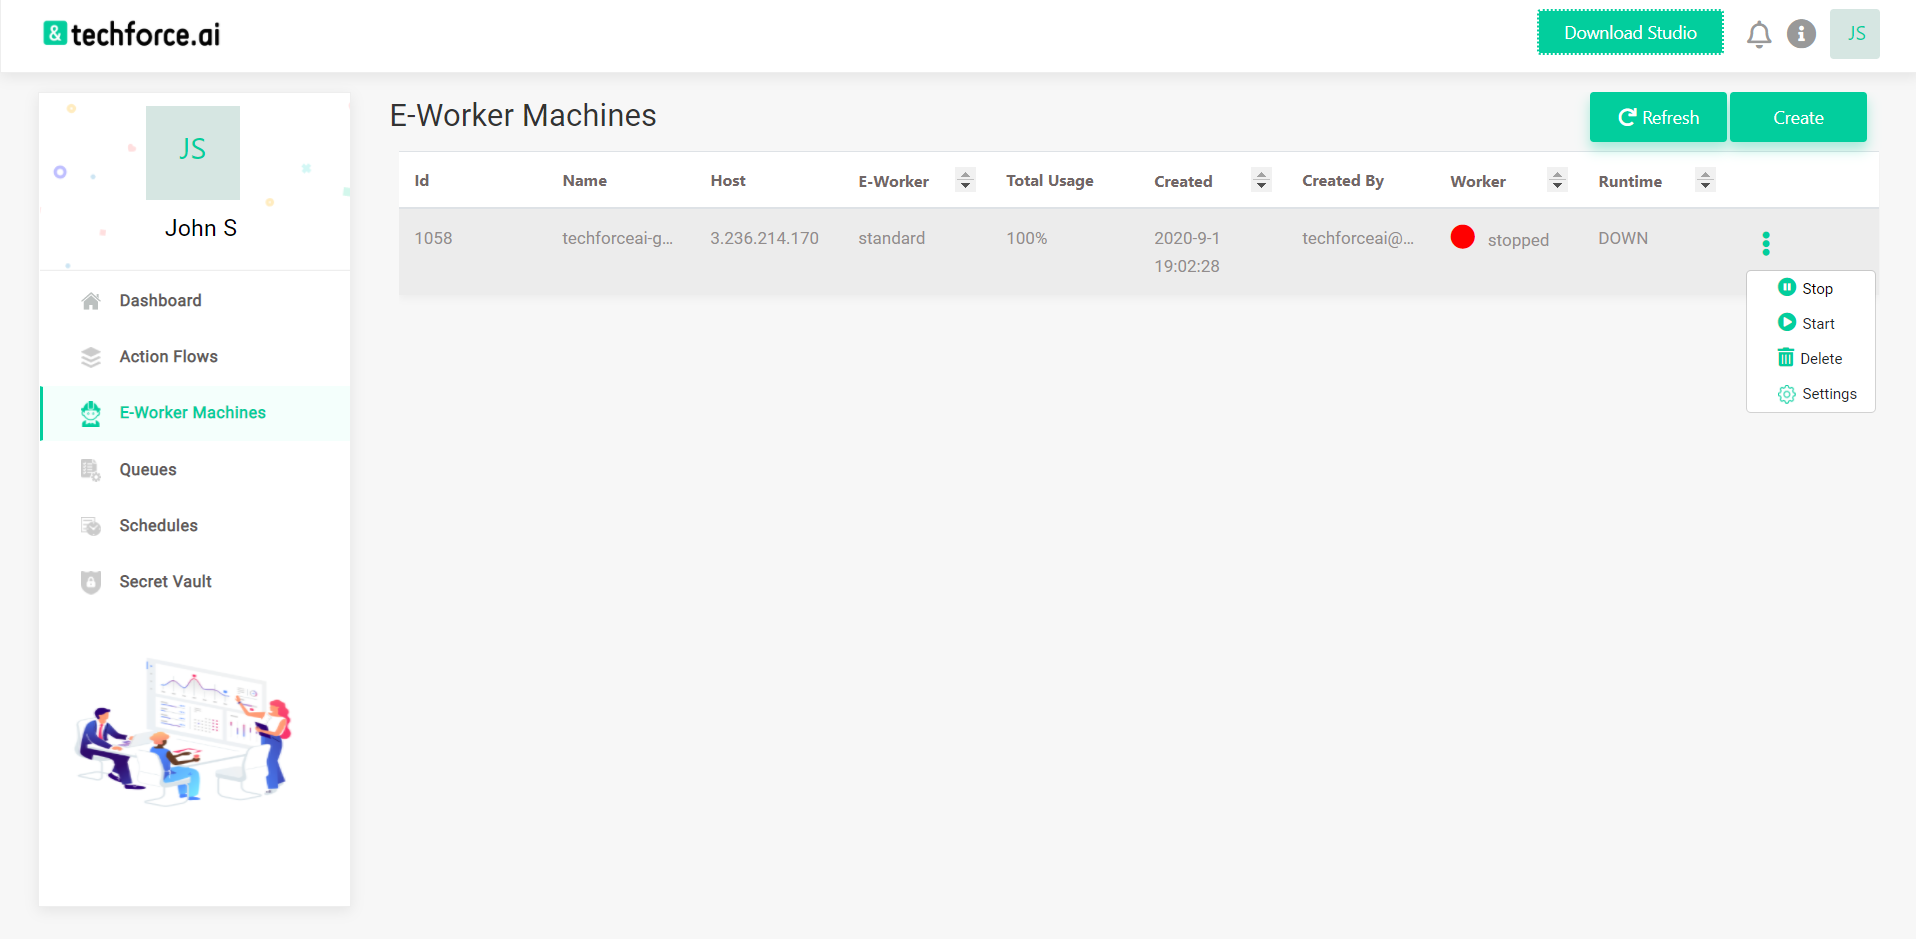
Figure: Delete Registered E-Worker Machine Screen
2. On the next screen, click on YES to confirm the deletion of the registered e-worker machine.
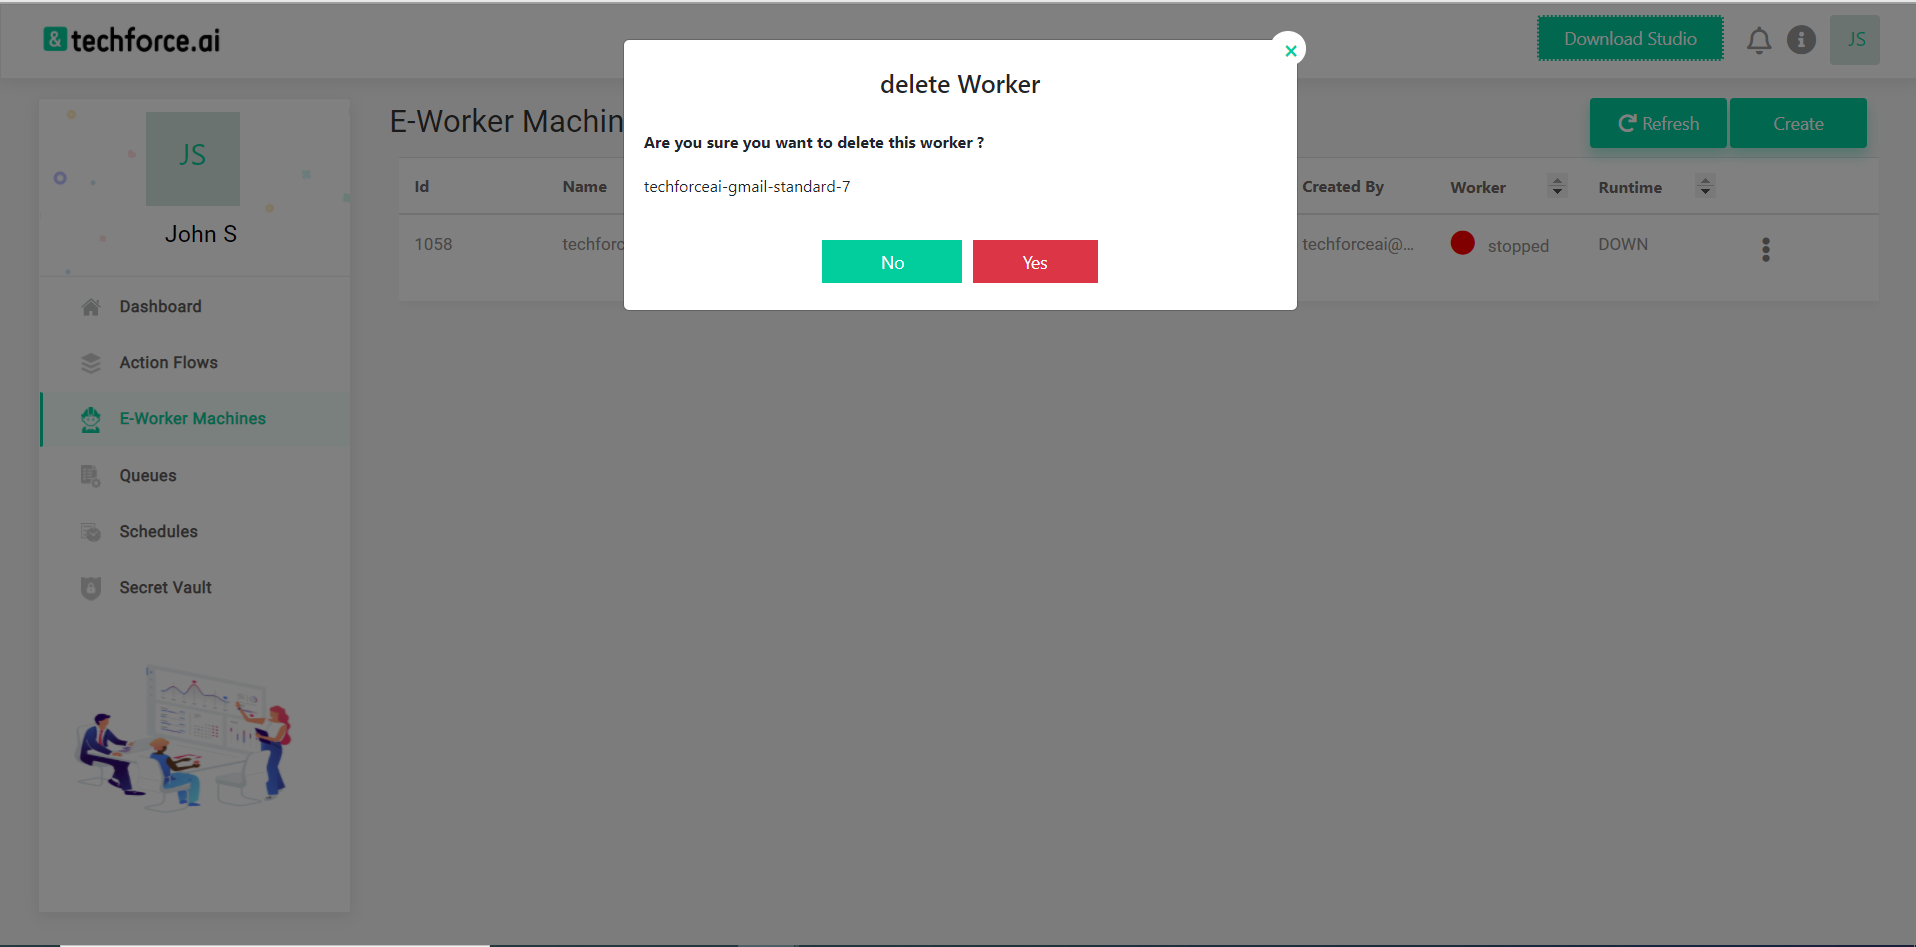
Figure: Registered E-Worker Machine Deletion Confirmation Screen
Queues
The status of currently executing e-worker machines and scheduled flows can be seen from the Queues screen.
Figure: Queues Screen
Select the e-worker machine to check the action flows to be executed in the selected environment.
After selecting the e-worker machine, you can see the action flows to be executed.
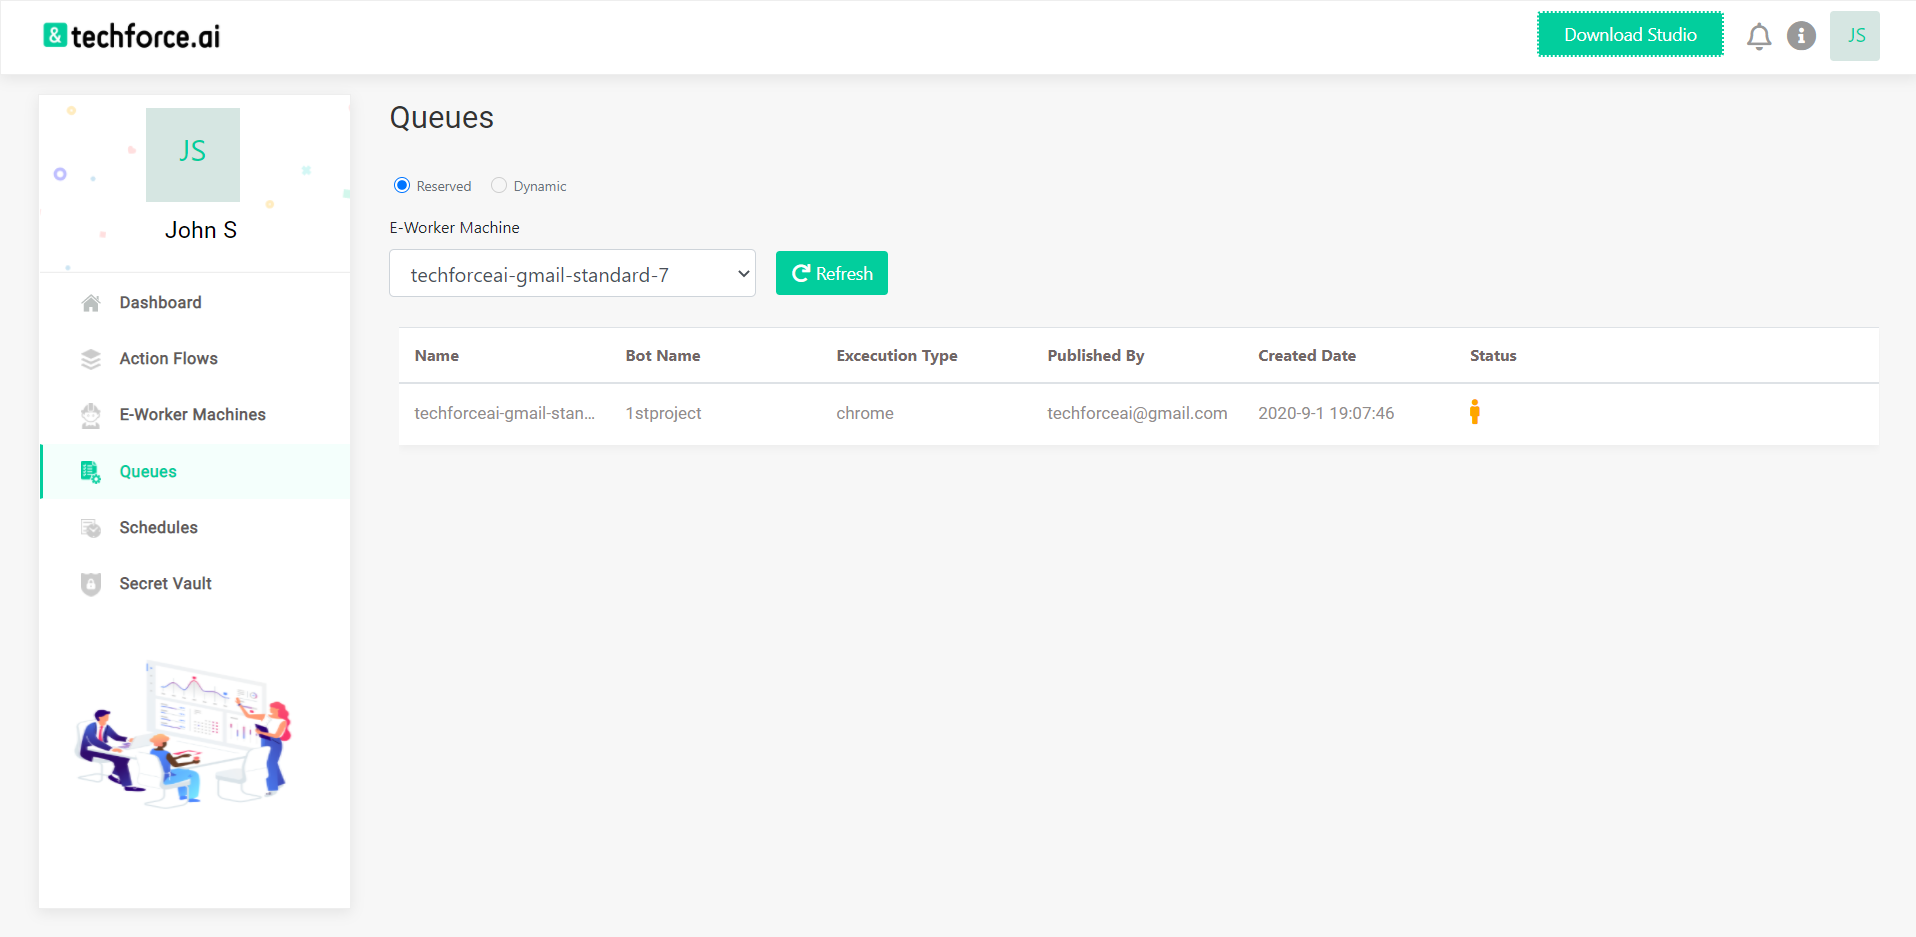
Figure: Action Flows Status
Secret Vault
The main functionality of the Secret Vault is to create the values that are not to be shared or shown to others.
Figure: Secret Vault Screen
A secret vault can be created with different types like Integer, Boolean, Text, and Credentials. To create a secret vault, click on the CREATE button.
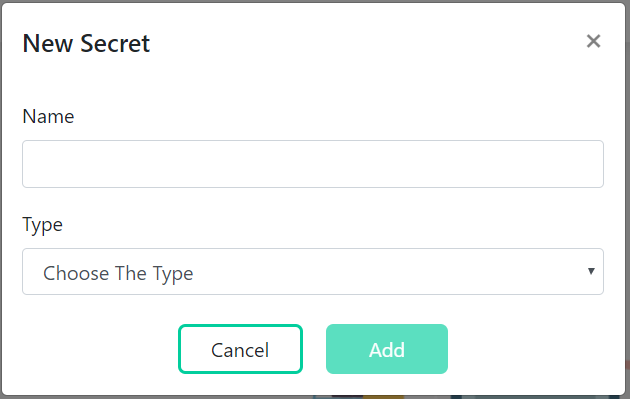
Figure: Add New Secret
Text:
To create a new text secret, click on the CREATE button, and give a name to the secret. Select the type as “Text”, and in the value field, pass the text value. Then the value will be passed as text to the RPA flow.
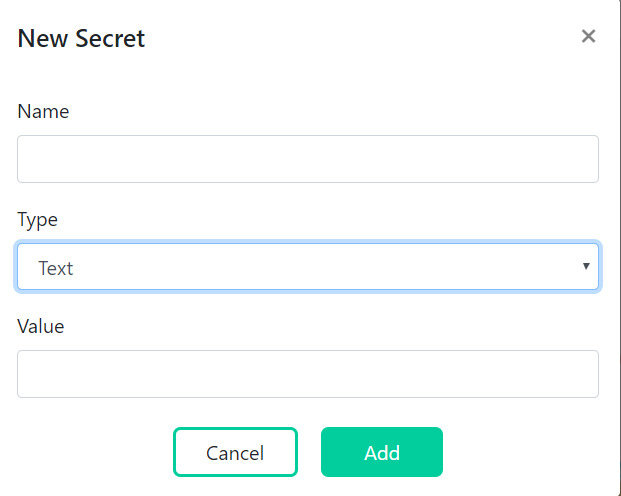
Figure: Add a Secret-Text Type
Boolean:
To create a new Boolean secret, after clicking on the CREATE button, give a name to the secret. If the selected type is Boolean, in the Value field, select the value as either true or false from the available buttons. The value will be passed as Boolean to the RPA flow.
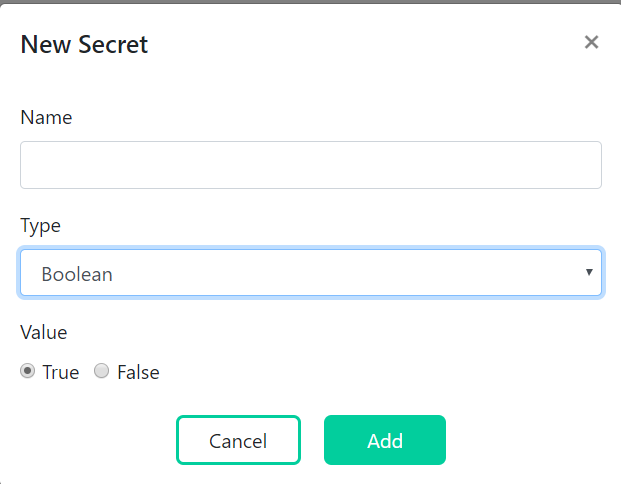
Figure: Add Secret Boolean Type
Integer:
To create a new integer secret, after clicking on the CREATE button, give a name to the secret. If the selected type is INTEGER, in the value field, pass the integer value. Then the value will be passed as an integer to the RPA flow.
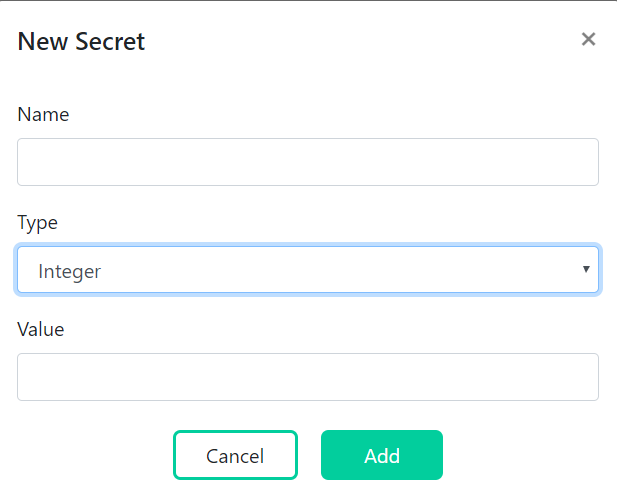
Figure: Add Secret-Integer Type
Credentials:
To create a new credential secret, after clicking on the CREATE button, give a name to the secret. If the selected type is Credentials, in the Username field pass the username value, and in the password field, pass the password of the username, which will be entered in a secure format and will never be shown to any other user. These saved credentials can be passed into the RPA action flows.
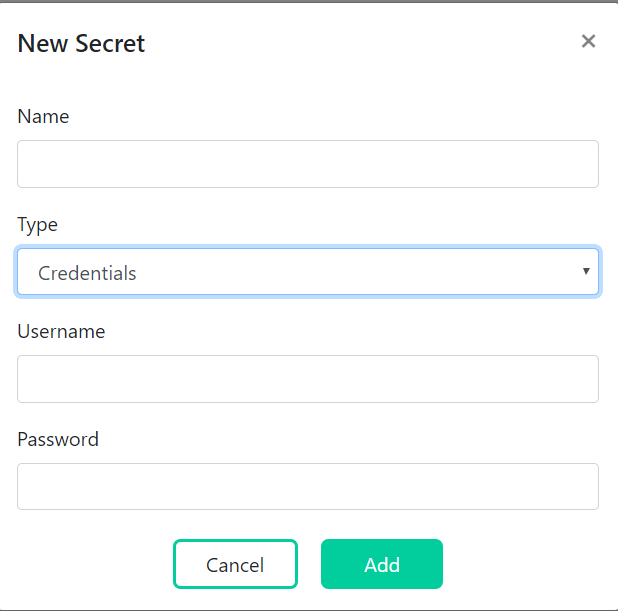
Figure: Add Secret Credentials
Schedules
The main functionality of scheduling is, to schedule/execute action flows whenever required. After uploading the action flow, you have to schedule those flows. To schedule a flow, first create a “Schedule”.
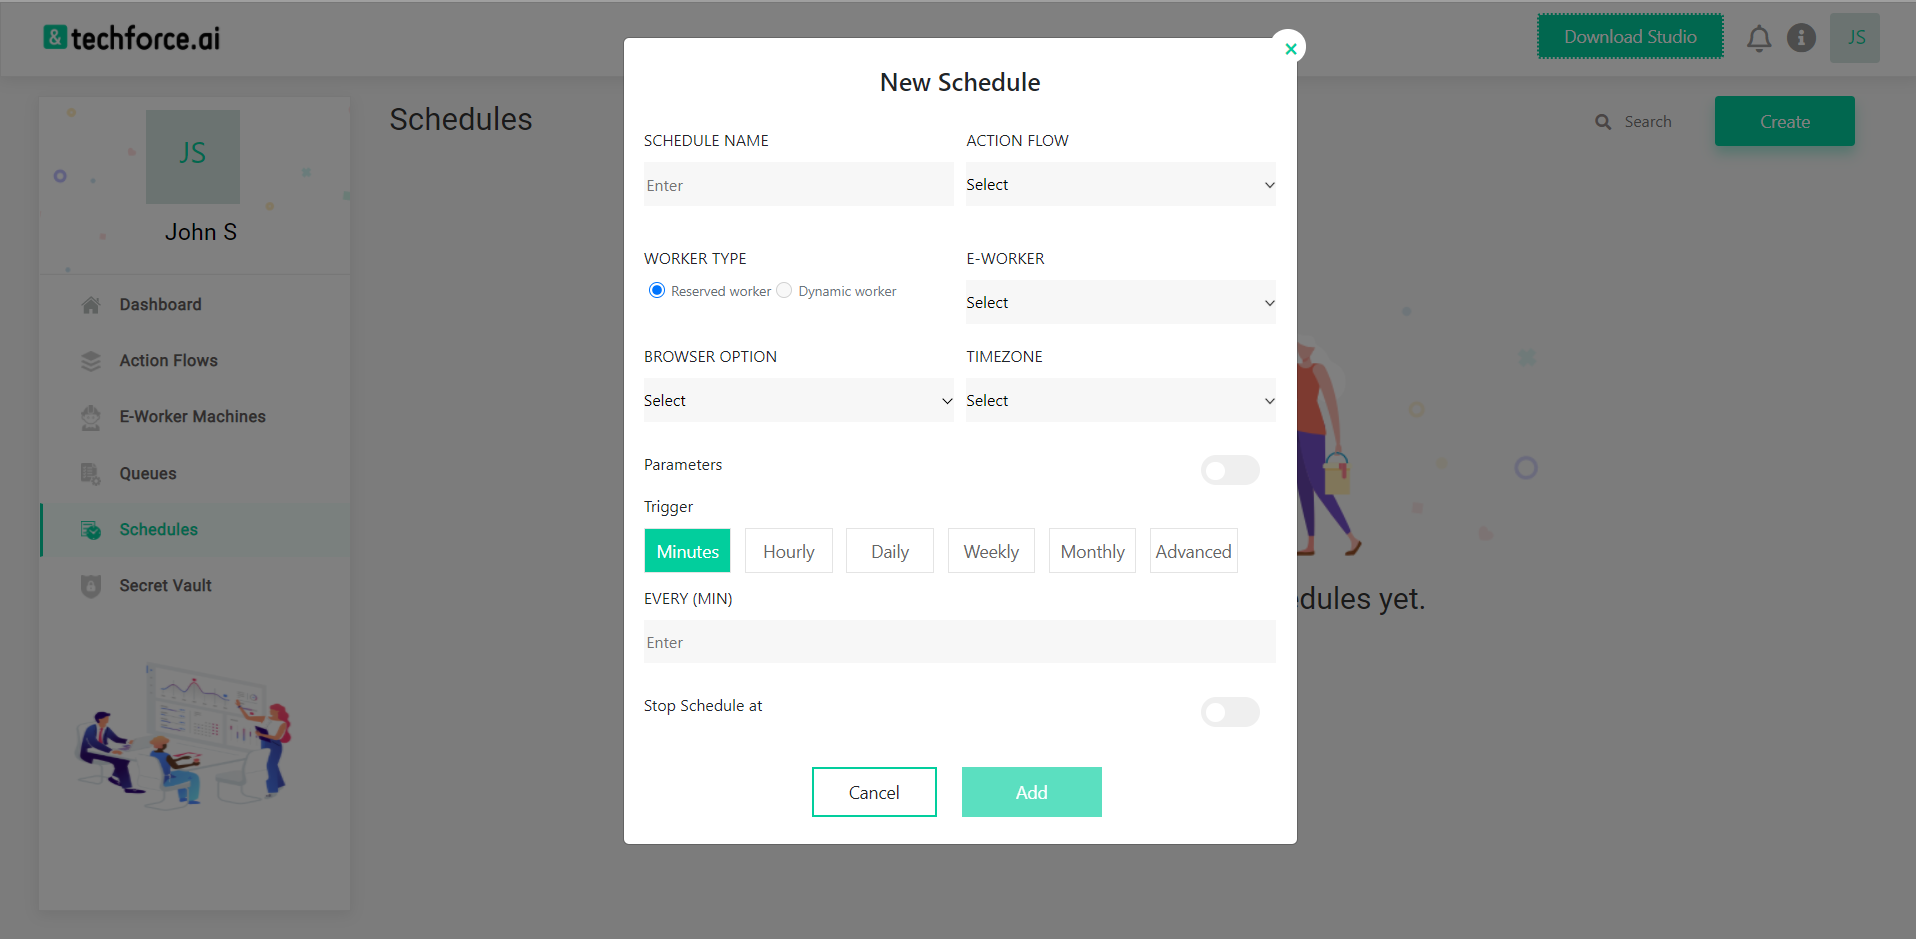
Figure: Create Schedule
To create a “Schedule”, navigate to the “Schedules” page, and click on the “Create” button to start adding a new schedule.
1. Name
Give a name to the schedule.
2. Action Flow
Choose the “Action Flow" that you want to Schedule.
3. Reserved
Select the e-worker machine in which the execution should be done.
4. E-Worker Machine
Select the e-worker machine in which the execution should be done.
5. Browser option
Select the Browser option to execute in Chrome, Mozilla Firefox, Microsoft Edge, or headless mode.
6. Timezone
Select the time zone in which it should run.
7. Trigger
Here specify the time interval to execute the flows.
8. Minutes
If the trigger type is selected as minutes, then the Action flow will execute at specified intervals measured in minutes. For example, if an Action flow is scheduled to execute every 15 minutes, then the flow will continuously execute after every 15 minutes until that scheduled flow is stopped/destroyed.
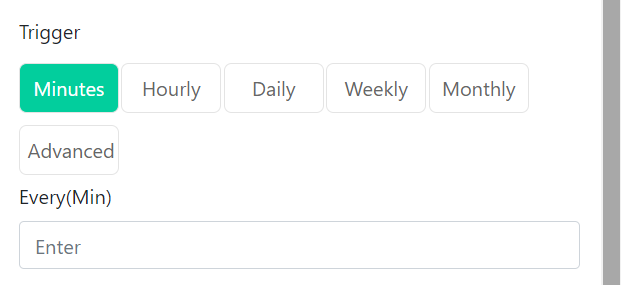
Figure: Trigger Type-Minutes
9. Hourly
If the trigger type is selected as Hours, then the Action flow will run at specified intervals measured in hours., For example, if an Action flow is scheduled to execute every 3 hours and 30 minutes, then the flow will continuously execute after every 3 hours and 30 minutes until that scheduled flow is stopped/destroyed.
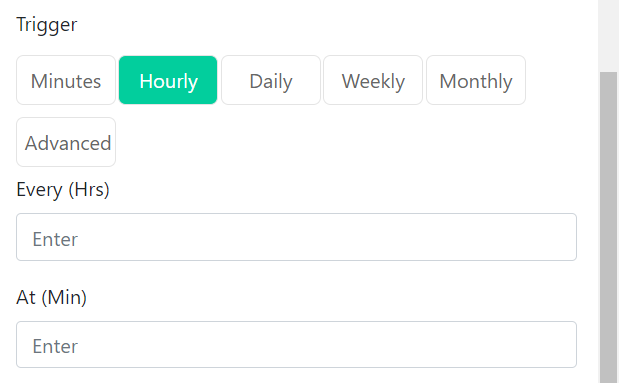
Figure: Trigger Type-Hourly
10. Daily
If the trigger type is selected as Daily, then the Action flow will execute every day at the specified time. For example, if an Action flow is scheduled to execute every day at 05:30 a.m. then the flow will continuously execute every day at 05:30 a.m. until that scheduled flow is stopped/destroyed.
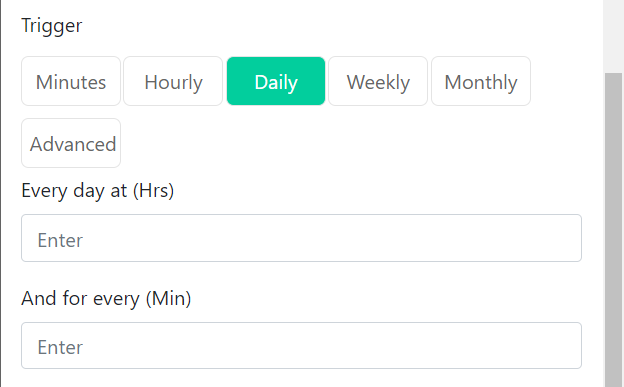
Figure: Trigger Type-Daily
11. Weekly
If the trigger type is selected as Weekly, then select the weekday i.e. Mon, Tue, and so on. Then the Action flow will execute every week at the time specified. For example, if an Action Flow is scheduled to execute every Monday at 05:30 a.m. then the flow will continuously execute every Monday at 05:30 a.m. until the scheduled flow is stopped/destroyed.
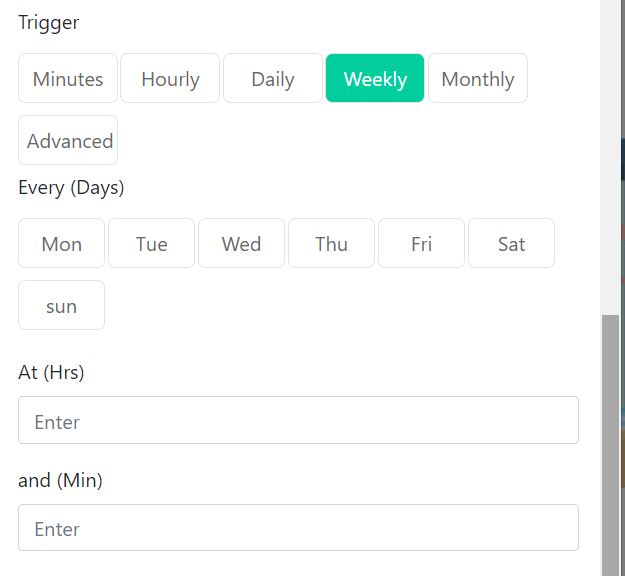
Figure: Trigger Type-Weekly
12. Monthly
If the trigger type is selected as monthly, then select the month i.e. Jan, Feb, and so on. Then the Action flow will execute every Month at the time specified. For example, if the Action flow is scheduled to execute every month on a specific day/date at 05:30 a.m., then the flow will continuously execute every month at 05:30 a.m. until the scheduled flow is stopped/destroyed.

Figure: Trigger Type-Monthly
13. Advanced:
In the Advanced option, one can write a Cron expression.
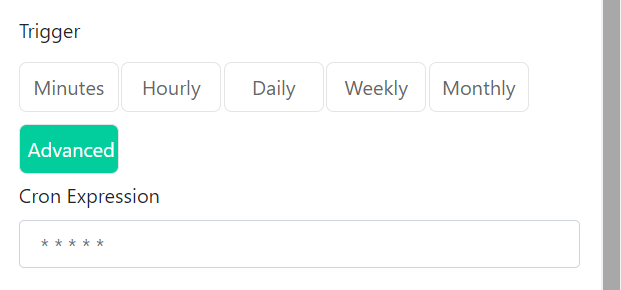
Figure: Trigger Type-Advanced
14. Stop Schedule
To stop the schedule at a particular time, enable the button and enter the time, when to stop the schedule.
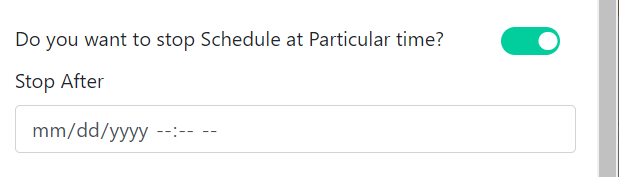
Figure: Stop Schedule
Organization
Only the admin will have access to create an organization. To create an organization, navigate to Account Management, and from the Account Management drop-down, select the ORGANIZATION tab. On the Organization screen, click on the “ADD” button to create a new organization.
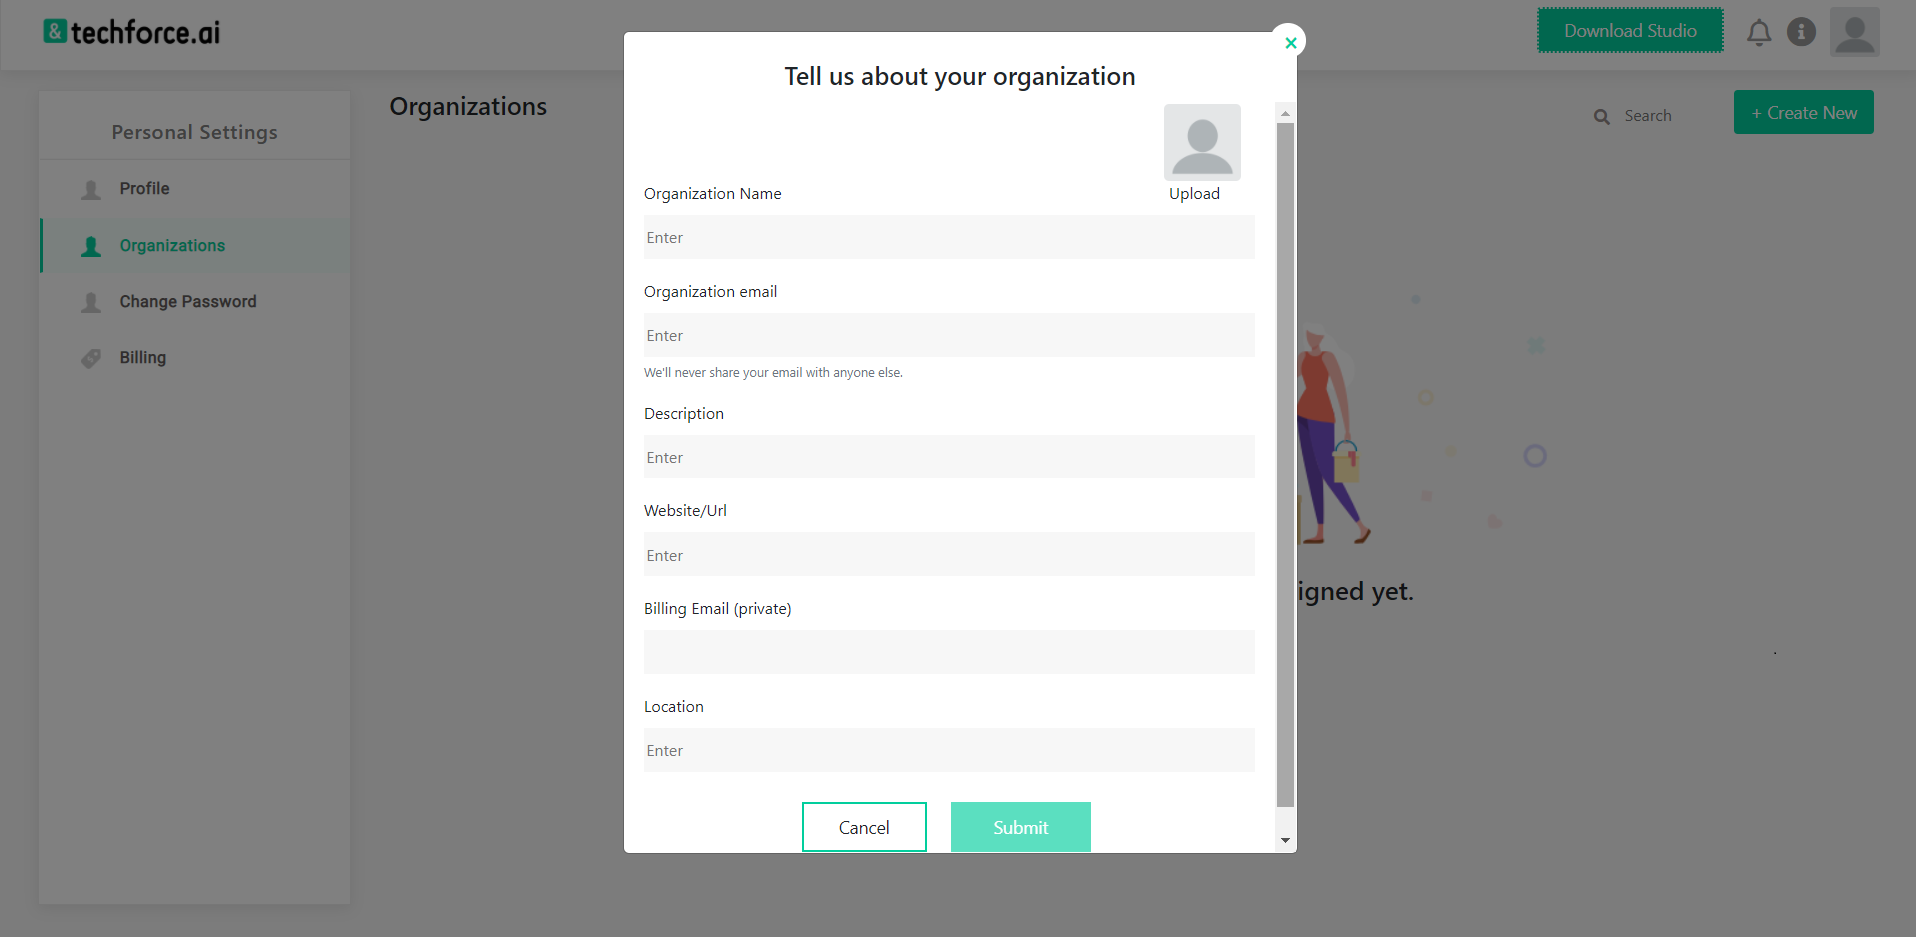
Figure: Organization Details
Profile Settings
Profile
Profile details are created when a user logs in for the first time. Those details can be updated in Account Management.
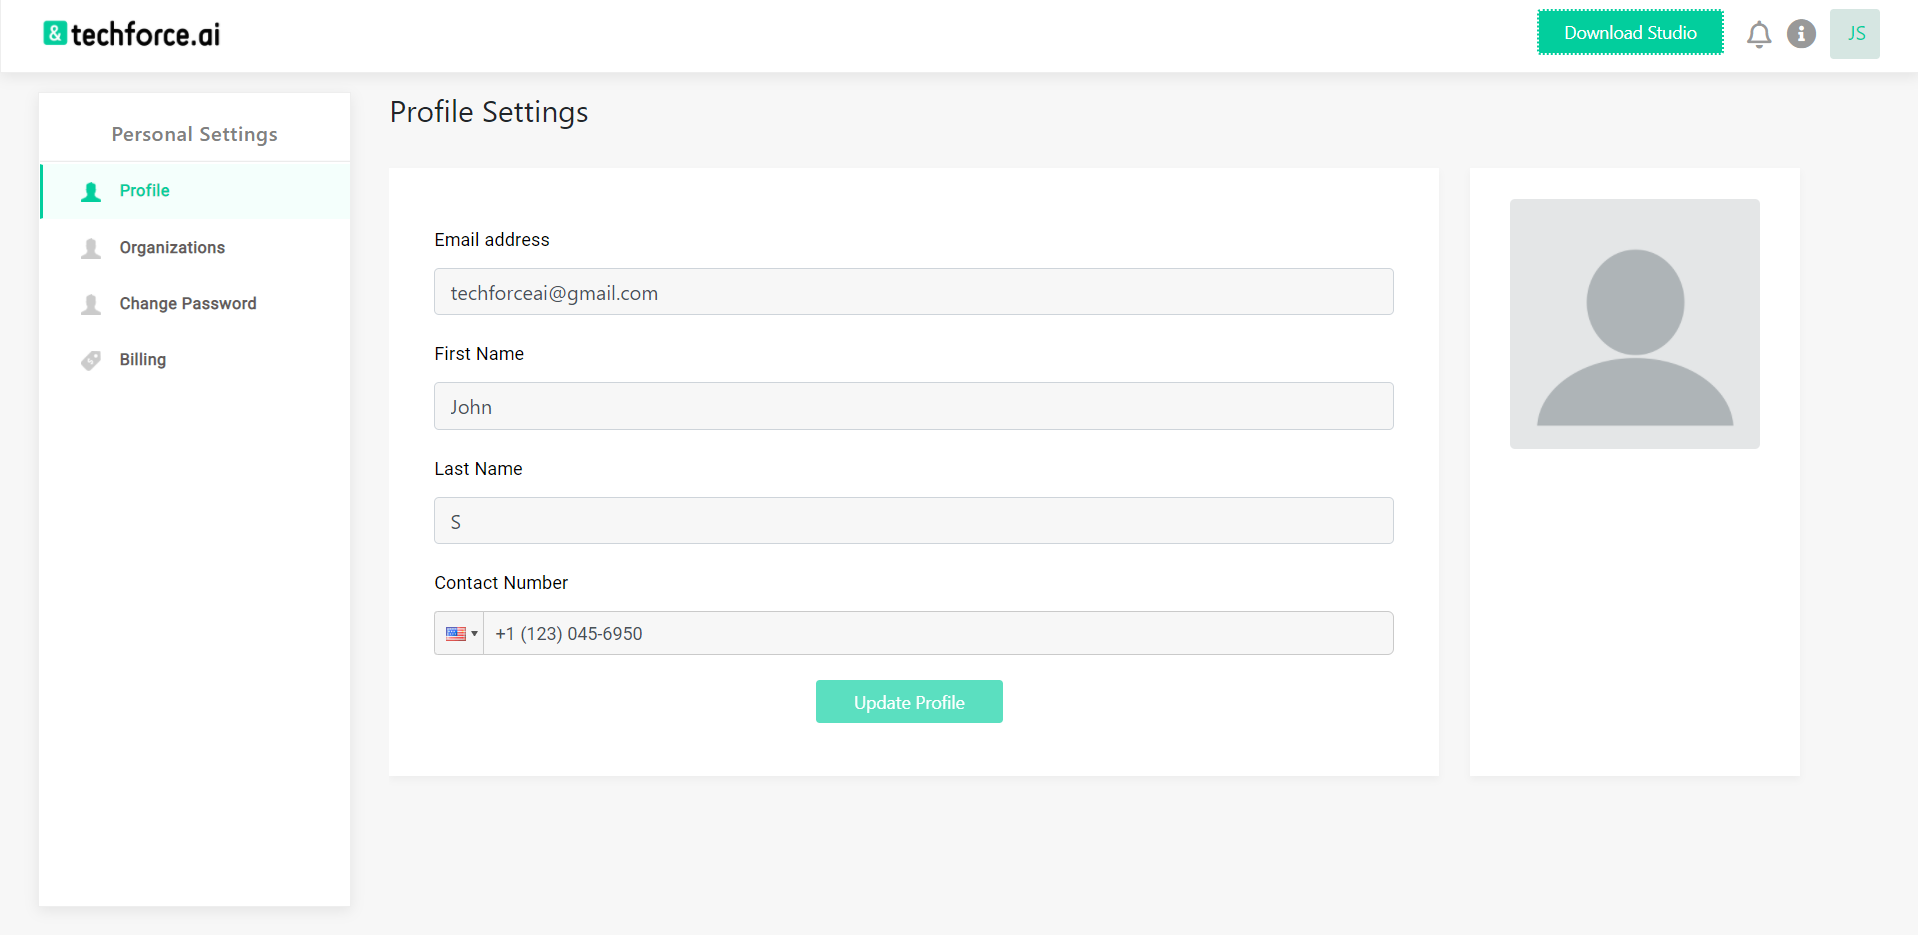
Figure: Profile Details
Billing
1. The billing section shows your current plan and options available for upgrading.
Figure: Billing Details
Update Password:
1. To update the login password click on the Update password button and an email will be sent to the registered email id.

Figure: Update Password
Notifications
Notifications feature displays all the notifications related to the account.

Figure: Notifications
E-Worker Machine
Runtime Installation Steps
Software Requirements
E-Worker Machine
OS Compatibility:
- 1. On Premise: Windows 10 / Windows Server 2016.
- 2. GCP: Windows Server 2016 Data Center / Windows Server 2016 Datacenter Core.
- 3. MS Azure: Windows 10 Pro version 1809, 1803 / Windows Server 2016 Data Center.
- 4. AWS: Microsoft Windows Server 2016 Base.
| On-Premise | GCP | MS Azure | AWS |
|---|---|---|---|
| Windows 10 / Windows Server 2016 | Windows Server 2016 Data Center / Windows Server 2016 Data Center Core | Windows 10 Pro Ver 1809, 1803 / Windows Server 2016 Data Center. | Microsoft Windows Server 2016 Base |
Hardware Requirements
- 1. Processor: Intel Core i5 2.6GHz
- 2. RAM: 8GB
- 3. Storage: 10GB
- 4. Others: Microsoft .Net Framework 4.6(Windows 8.1 and Windows Server 2012 R2: 4.6.1).
Installation Instructions
Refer Installation Instructions from Studio GuideInstalling Techforce.ai OCR
Refer Installing Techforce.ai OCR from Studio GuideUn-install Instructions
Refer Un-install Instructions from Studio GuideRegistering E-Worker Machine with E-Manager Console
Refer e-worker machine creation from Worker ManagementTriggering Action Flows
1. To trigger an action flow, log in to Techforce.ai e-manager console and go to the Action Flows screen.
2. The Action Flows page lists the action flows that are published to the e-manager console.
3. To publish an action flow to the e-manager console, first zip the action flow folder. Click on the UPLOAD button on the top right corner of the page, browse the zip file, and click the UPLOAD button. The action flow will be uploaded.
4. After uploading, execute the flow by clicking on the PLAY button.
5. Select the Execution target type as Reserved, select the e-worker machine in which the flow should get executed, select the execution type, and click on the submit button.
6. E-Manager Console automatically maintains versioning for the published action flows. Click on the number below versions to see the default version of the action flow. The default version of a published action flow is 1.0. If you publish the action flow again with some changes, the latest one is marked as the default one. You can switch back the older version of action flow at any point in time by simply selecting the required version.
7. You can see the logs of an executed action flow under the instances of the Action Flows. You can also see the live logs of an instance while the execution is in progress.
8. Schedules functionality is, to schedule/execute action flows repetitively on a timely basis.
9. To create a Schedule, navigate to the SCHEDULES page, and click on the CREATE button.
10. Provide a name to the schedule. Choose the “Action Flow” that needs to be scheduled. Choose the Browser Option, e-worker machine, and Time Zone. Then specify the time intervals to execute the action flow like Minutes, Hourly, Daily, Weekly, Monthly, or Advanced. Also, specify when to stop the Schedule.
11. If selected Minutes, then the Action Flow executes at specified intervals in minutes.
12. If the Hourly option is selected, then the flow executes at specified intervals of hours and minutes.
13. If the Daily option is selected, then the flow executes every day at the specified time considering hours and minutes.
14. In the case of the weekly option, the flow executes on the selected weekdays at specified hours and minutes.
15. If the monthly option is selected, then the flow executes based on the selected month, selected weekdays, specified hours, and minutes.
16. If the Advanced option is selected, you can write your custom schedule.
17. Specify the stop time to stop the schedule after a certain amount of time. Just enable the stop schedule button and enter the date and time to stop the schedule.
Best Practices & Guidelines
Workflow Design
1. Techforce.ai by default offers a diagram for integrating activities into a working structure when developing a workflow file:
Stage
1. Stages have a simple linear representation that flows from top to bottom, when activities follow each other. For example, they are useful in UI automation, when navigation and typing happens one click/keystroke at a time.
Choices
1. Decisions need to be implemented in an Action Flow to enable the flow to react differently in various conditions in data processing and application interaction. Picking the most appropriate representation of a condition and its subsequent branches has a big impact on the visual structure and readability of an Action Flow.
If Activity
1. The IF activity splits a stage vertically and is perfect for short balanced linear branches. Challenges come when more conditions need to be chained in an IF… ELSE IF manner, especially when branches exceed available screen size in either width or height.
Data
1. Data comes in a single flavor when it comes to visibility and life cycle: variables. While in Techforce.ai the purpose of variables is not bound to a single workflow file it can also be passed from one workflow to another.
Naming Conventions
1. Meaningful names should be assigned to workflow files and variables to accurately describe their usage throughout the project. e.g. PROCESSNAME_FLOW, PROCESSNAME_SUB_FLOW, PROCESSNAME_SUB_FLOW2.
2. Variables should align with the naming convention.
3. Variables should be upper Camel Case, e.g. FirstName, LastName
User Interface Automation
1. Sometimes the usual manual routine is not the optimal way for automation. Carefully explore the application’s behavior before committing to a certain approach.
2. UI automation goes at its best when Robots and applications run on the same machine because Techforce.ai can interact directly with the technology behind the application to get data behind the scenes.
Input Methods
1. There are two methods Techforce.ai uses for triggering a Click or Enter Keystrokesstrong in an application. These are displayed as properties that deal with UI automation.
2. If HTML Selector is selected, Studio hooks into the web application and triggers the event handler of an indicated UI element using its Xpath. (button, edit box). This method is preferred for web-based UI Automation.
3. If the Location Selector is selected, Studio searches for the specified offset location to perform Click or Keyboard actions. This is the preferred selector if the UI of the screen is static.
Image Automation
1. Image recognition is the last approach to automating applications if nothing else works to identify XPath on the screen (like DOM or keyboard shortcuts). Because image matching requires all the elements to be fully visible on the screen and that all visible details are the same at runtime as well as during development. When resorting to image automation, extra care should be taken to ensure the reliability of the process. Selecting more/less of an image than needed might lead to an image not found or a false positive match.
Resolution Considerations
1. Image matching is sensitive to environment variations like the desktop theme or screen resolution. When the application runs in VM, the resolution should be kept greater or equal than when recording the workflows. Otherwise, small image distortions can be compensated by slightly lowering the captured image accuracy factor. Check ho4w the application layout adjusts itself to different resolutions to ensure visual elements proximity.
OCR Engine
1. If OCR returns good results for the application, text automation is a good alternative to minimize environmental influence. Google Tesseract engine works better for smaller areas.
Headless Automation
1. If automation is intended to share the desktop with a human user, all UI interaction must be implemented in the background thus allowing the application window to be hidden or minimized during the process.
2. Use the Click, Keyboard Shortcuts, and Enter Keystrokes activities for navigation and data entry.
3. Use the DOM and Select activities for background data entry.
4. Use IF Present to verify the application state.
Best Practices Of RPA(Basic)
1. Selecting a project to implement RPA
Select a process that is less error-prone and rule-based. Automating a process that is changing every day is a waste of time because developers will spend a lot of time on maintenance. Stable processes are good candidates for automation.
2. Break up a Workflow
Break the workflow into parts. This will allow us to implement and test the various parts separately and reuse them. Call various workflows into one flow using the Add External Flow action in the studio.
3. Readability of the script
Ignoring the readability of the RPA script is a common mistake made by many new RPA developers. Readability, in this case, means how easy is it for someone else (other than the developer) to take the script and understand what the software robot is being programmed to do.
4. Naming Convention
When creating very large automation, there is a high probability to forget what every variable does. Hence, it is important to have a good naming system in place.
To avoid that,Techforce.ai recommends writing Variables in camelCase,i.e., firstName, lastName to maintain the standard of the script.
All your workflow names should contain the verb describing what the workflow does, e.g. GetTransactionData, LoginToSAP.
5. Avoid Hardcoding
It is always the best practice to use variables instead of hard coding values. Hard coding should be avoided, because these settings are prone to changes over time. For example, the file location where you download the daily report might change due to business requirements.
The idea is to minimize unnecessary changes to the script, especially if it has already been deployed to production, to avoid introducing additional bugs or errors. Also, if these settings are used multiple times within the script, if you hard code, you need to know exactly where the changes are required (chances are that you do not).
6. How the script should be?
Keep the script simple and efficient. As far as possible, try to reduce or eliminate unnecessary complexities in your script. This will help reduce the number of bugs or programming errors, so that you need to spend less time trying to debug or resolve them.
7. Using Exception handling
Put problematic workflows in try/catch blocks. Implementing flows within the Try / Catch blocks will allow you to restore the workflow.
8. Error logging
The truth, unfortunately, is that the robots, no matter how carefully designed and developed, is unlikely to work all the time. Hence, in RPA, robots need to be able to handle errors and exceptions. Logging should be done so that further investigation if warranted, can be carried out.
9. Implement a clean process
It is the best practice to implement a clean process. i.e., try to soft close the applications you opened while running the script.
For example, If the script has an action to open the SAP application and do manipulations, add an action to close the SAP application after the completion of those manipulations.
10. Understand the Limitations
No matter which RPA platforms you use, there is no one perfect tool. There are always limitations to what all this commercially available RPA software can do, despite what your vendor may tell you.
Some of these include:
Image recognition should be used only as a last resort when all else fails. This is because image matching only works when the image is fully visible on the screen, i.e. it cannot be in the background. Also, image recognition is sensitive to screen resolution, which can be sometimes tricky to handle.
Most RPA tools allow you to extract text from desktop or web applications, either natively or using an OCR engine. If you are using the latter, do be mindful that OCR is not a hundred percent accurate. In cases where accuracy is important, you might not want to rely solely on OCR.
11. Problems are common
You are not alone facing the problems/issues. Developers are likely to encounter some seemingly “insurmountable” problems during the development stage. It is highly likely that someone else has encountered the same problem and found a solution for it.
Check out for the solution in the Techforce.ai forum using the following URL:
forum.techforce.aiCouldn't find the solution yet?
Don't worry. The expert team of Techforce.ai will guide you on how to solve the problem. Post your question in Forum.
12. Dos & Dont’s
Avoid moving the mouse and also unnecessary keystrokes.
Make sure to add enough wait time between the keyboard shortcuts and keystroke actions.
Always use a maximized window for better portability.
Tips and Tricks of using Techforce.ai Studio
1. Variables:
In Techforce.ai RPA all variables are global variables. It means any variable can be used anywhere in the script.
The variables declared in main action flow can be used in sub action flow, but vice-versa is not possible.
Use a forward slash (/) instead of a backward slash (\) while giving the path in the variables.
For example, the usual notation in the windows system is C:\Users\Documents\xyz.xlsx
Use C:/Users/Documents/xyz.xlsx or C:\Users\Documents\xyz.extensions while giving the path in the variable.
2. Loops and Conditions
Use IF ELSE actions to implement business logic and Loops to iterate. Use Jump Statements and infinite loops if necessary.
3. Frame:
While capturing the XPath of any element, make sure to check whether they are within the Iframes or PopUp.
4. Excel actions:
Use only .xlsx files for Excel automation.
Make sure the Excel workbook is closed before executing the script.
If the given sheet name is not available in the excel workbook, a new sheet with the given name will be created while using the write actions.
5. Capturing an image or location of the element:
While capturing the image/location of the element, ensure that the middle point of the selector should be on the element where e-worker needs to click.
The screen scaling should be 100%.
The location coordinates will work only in the same resolution and scaling while executing in any environment.
For example, observe the below image.
6. Exception Handling:
Avoid using multiple stages for global level exception handling.
7. Files & Folders:
While using the write file action, if the given file is not available, a new file with the given name will be created automatically in the specified path.
8. Outlook:
While using the Outlook action make sure that the Outlook Application is closed. Using Close App action before using the outlook actions in the flow is recommended.
Make sure the attached file used in Send mail action is available in the mentioned path/location.
9. Get Credentials/ Get Secret:
Make sure that you store your sensitive data in the secret vault and access the data using these actions.
Benefits of Techforce.ai Studio Upgraded version
1. Maintaining the logs of Action Flows.
2. Scheduling the flows.
3. E-Worker Machines to select the run environment to execute the flows.
4. Queues
5. Secret Vault
6. Restricted user hierarchy
7. Action Flows can be executed either in Attended or Unattended mode on the selected e-worker machine environment.
Architecture & Deployment Models
SaaS Model
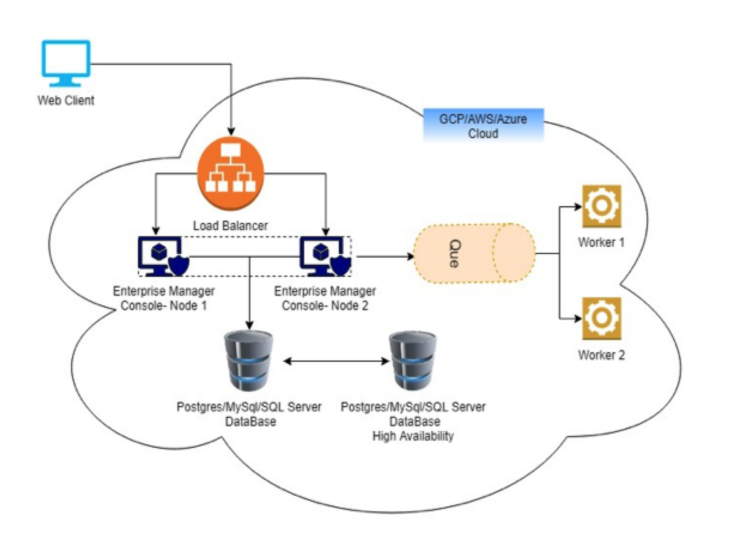
Hybrid Model
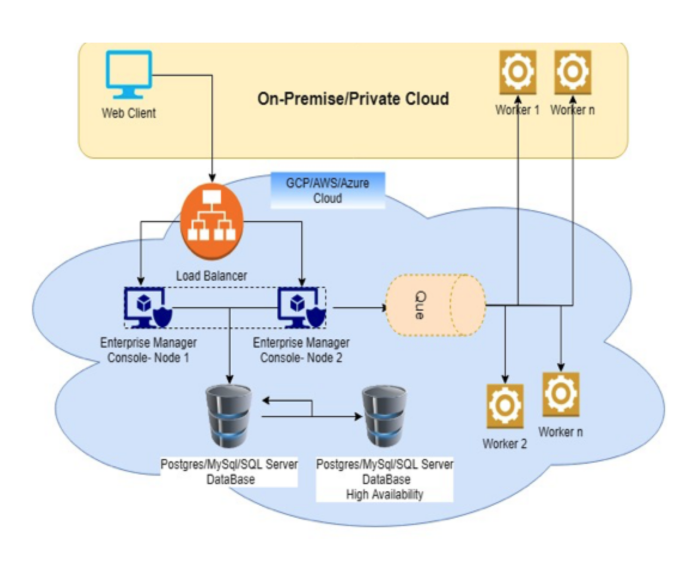
On-Premise Model
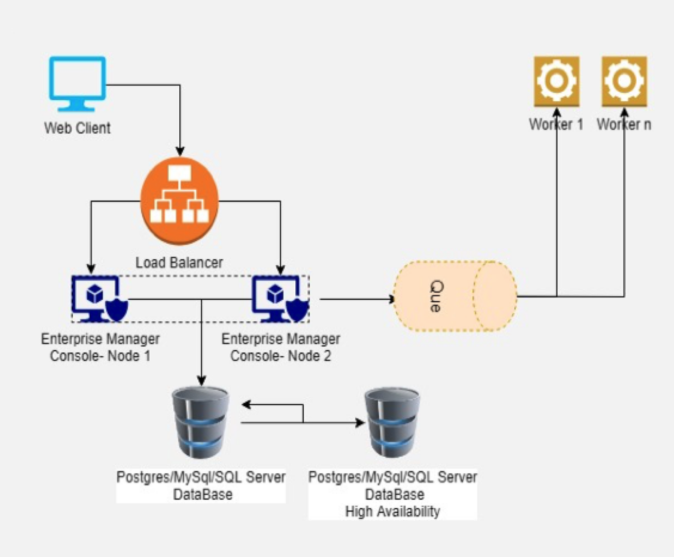
Security Architecture
Techforce.ai Platform Enterprise Security Framework
1. Techforce.ai platform follows industry best practices in security and continuously works towards achieving higher standards. Techforce.ai follows NIST guidelines and builds its platform security around SANS Top 20 Controls for Internet Security. Techforce.ai also retains a security firm to identify application security issues of our platform regularly.
2. The Techforce.ai platform is created as an independently scalable microservices framework. The Platform can be easily deployed in all supported Kubernetes platforms including AWS EKS, Azure AKS, GCP Kubernetes, and OpenShift.
Identity and Access Management:
1. Techforce.ai platform supports various federated Single Sign-On methods like OAuth, OpenID Connect, and SAML. At the same time, it allows you to authenticate against enterprise directory services like LDAP and AD.
2. Techforce.ai platform has a built-in Role-Based Access Control (RBAC) to ensure authorization at a granular level. Owing to BPM backed framework various authorization workflows with human approval steps can be seamlessly included as part of the automation process